Everyone who owns an old house needs to know how to restore old windows. There are lots of them and they usually need a lot of work, but with the tutorials, tools, and supplies on this page, you can learn how to restore old windows like a pro, from a pro.
Your home’s old wood windows are some of the most valuable, yet misunderstood elements of a historic house. Most people find them painted shut with sash cords cut, and with missing bits and pieces of hardware. That’s the time they usually opt to start over with replacement windows.
But replacing historic windows is a big mistake and I don’t want you fall into it!
Reasons people choose to replace old windows:
- Inoperable windows
- Leaky and energy-inefficient windows
- Lead paint concerns
- Aggressive marketing from window companies
All these problems can be easily solved and you can make your historic windows just as efficient as a new window, but much longer lasting!
The Facts About Historic Windows
1. Repairable – Historic wood windows are designed to be easy to repair. Unlike replacement windows where the whole window unit must often be replaced or factory repaired if an issue arises, historic windows can be repaired piecemeal. Each individual piece can be repaired, restored, or replaced quite simply by the homeowner or local tradesman.
2. Upgradable – Your old windows may be drafty but they can very easily be weatherstripped and have storm windows (interior or exterior) added to dramatically increase their efficiency beyond even what new replacement windows can offer.
3. Simple to Maintain – Keep your old windows painted. That’s it! With some paint every decade or so, you can keep them protected and safe for decades longer than a replacement window will last.
4. Resilient – Being made from old-growth lumber, these windows (when properly maintained) can last for several centuries unlike replacement windows today which are obsolete within just a few years.
Now that you know the facts, you’ll want to know the how and what of repairing these old windows. So below I have included links to posts that detail exactly how to restore and care for these windows. I’ve also included links to where you can find the proper tools and products to use in the restoration process.
 Old Windows Made Easy

First things first: if you want a comprehensive guide for the restoration of your wood windows you need to get a copy of my book Old Windows Made Easy. This book is the absolute simplest way to restore your wood windows. In this guide, I walk you through the entire restoration process step-by-step so as to leave no stone unturned.
This book will save you hours and hours of working time and thousands of dollars in restoration costs. You can learn more about the book here or order your copy now!
Not ready for the book? Then check out the information below for free and you’ll learn how to restore old windows at the pace you want.
The Techniques
- How To: Reglaze Old Windows
- Which Glazing Putty is Right For You?
- How to: Glaze Wood Windows
- How To: Open Stuck Windows in 4 Easy Steps
- How To: Remove Window Sash
- How To: Restring Old Windows
- How To: Remove Paint From Old Hardware
- How To: Replace Broken Window Glass
- How To: Weatherstrip Wood Windows
- A Window Glazing Tip & Trick
- How To: Work With Spiral Balances
Old Window Tools & Supplies
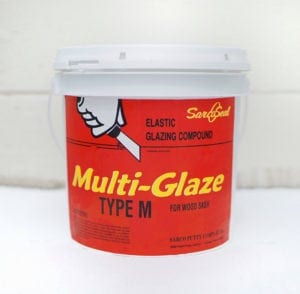
My favorite putty for wood sash. Fast skinning and ready for paint within 1 week. This linseed oil based glazing putty is for in shop glazing only.
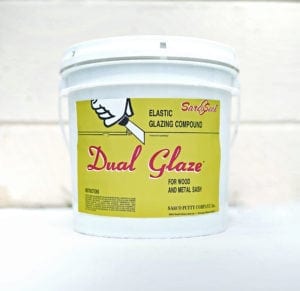
A slow curing (2-3 weeks) glazing putty ideal for on-site repairs and steel or wood sash. Immense flexibility and long life is the name of the game for this linseed oil-based glazing putty.
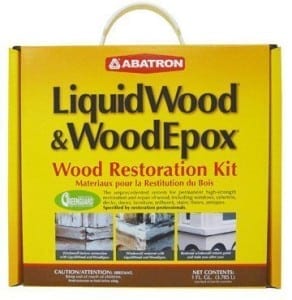
My favorite and still undefeated champion of epoxies in my honest opinion. This easy to use wood epoxy is great for making almost any kind of repair to wood windows. From minor filling of rot, to complete reconstruction of profiles, this combination of epoxy filler and consolidant does it all with style.
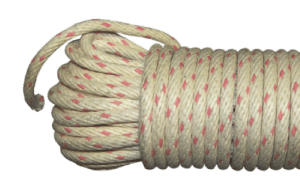
Sampson #8 Spot Cord is the ideal sash rope for wood windows. Able to support up to 150 lbs it will support any size window, and that’s why it has been the industry standard for over 100 years.
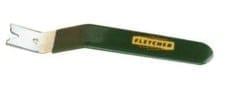
An easy to use tool great for cutting sashes free from years of built up paint and caulk to get them working again. Its serrated edges provide a great cutting edge that helps keep other surfaces free of damage.

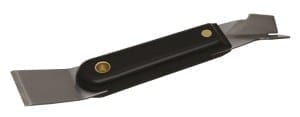
With 2 sides this glazier’s tool can be useful for those learning to glaze. I use only the beveled edge after years, which I find has the perfect bevel for glazing my windows.
For paint stripping infrared heat is a great way to get the paint off without damaging the surface beneath. Lose decades of old paint easily in minutes with this tool and keep yourself safe from lead paint by eliminating dust.

Faster and smaller than the Original Speedheater, this new addition to the line up is great for the small parts on windows like muntins. Softens paint in only 2-3 seconds and overall makes your life easier.

Simple to use and provides great hold for glass in wood sash. This style works great with the Fletcher glazing point setting tool below. For simple hand setting of points, this is the best choice.
Point driving guns can be expensive, but with this easy hand tool, you can set multiple styles of glazing points with one affordable tool. Sure, it might take a little longer than a gun, but it gets the job done all the same.
Need more help? Don’t be shy, become a Patreon! Being a Patreon is about how I can give you better access to me, so we can work together on your personal home projects. Whether you just want to chip in a couple bucks to support my website or you want some one-on-one coaching Patron is the place for you.
Click the link and join the Craftsman Patreon family!


Founder & Editor-in-Chief
I love old houses, working with my hands, and teaching others the excitment of doing it yourself! Everything is teachable if you only give it the chance.
Great post, thanks for sharing..
Do you have a source for treated lumber suitable for making replacement sash?
Check out Accoya. My favorite! Not sure who the dealer is in your area.
I live in a house that was built in the mid 20’s.I recently got one of the windows replaced by northtech(http://northtechwindows.ca/) with a vinyl window and now the window is leaking.I checked the window and its mullion was open.What do I do to fix this problem?
Hard to tell, but it doesn’t surprise me that a vinyl window is leaking. Check with the installer and have them come back out to fix the problem. If they are a reputable company they should stand by their product.
Does anyone have any tips on repairing/restoring 1930s era Casement Window SCREENS ?
What kind of problems are you having with the screens Paul?
One more thing: For the inside… I didn’t wait as long for them to dry, I didn’t have drapes etc to worry about.
Hi Paul,
I stripped all the old finish & paint, then sanded, tack cloth-blue shop towels with turpentine (Be careful to air out and not create a fire hazard! I was dedicated not using anything that would build up where wood touches wood ensuring easy sliding windows. I also like to use natures own products! On the inside surface: yes it was bare wood. I played with 1. applying stain first and the wood preservative. 2. (WP) 1st stain next, what I settled on was #3. wild mix of the two multiple applications. There is SO MUCH turpentine that there is very little residue on the surface. I admit… this was an experiment with a learning curve. I would suggest you search out a local old time woodworker…. or experiment for yourself before you use it on the final product (I didn’t because I just like natural wood and anything would have been better than all those layers of paint) Please track down BIRC – biointregal resource center for their WP recipe. If you can’t find it I will track it down. If I remember correctly I melted 1 oz paraffin (found it at Michaels craft supply), and whipped it into about 3 cups of turpentine with a paint stir attachment on my drill, then mixed in 1 cup of linseed oil. It helped using it when the ambient temperature was between 80 & 90… or I found I needed to reheat the old mix. (they recommend a double boiler – I did it outside in the dirt & did have a little flame once! Never leave it on the stove!!!) Really, talk to the experts first. I really loved doing it. OH! In the BIRC liturature they say dry 36 hours (I think) For the exterior of the windows that I was going to paint, I used the WP, let it dry a LONG time – week or so, then primed & painted. (I think oil based primer…. but again refer to BIRC.) ps: no affiliation! Best tip, allow for time and learning curve… and if you aren’t using any stain it makes it really stress free. IF you do end up with a residue of linseed oil on the surface wipe it off with cloth & turpentine before it dries. AND this isn’t the cheapest way to go… Just seems authentic and real to me, except I used an electric hot plate vs a wood fire! OH wear gloves! I found the heavy mil harbor freight box of 100 very useful! It penetrates and leaves a matte finish. Have fun. Glad you like the idea.
I picked up your book “Old Windows Made Easy” at one of the local “Sash Revival 2016” events and was hoping to use the information to restore the windows in our c.1890 house myself. Your book covers painting the sash, but what do we do if we want to keep the interior of the sash a natural wood instead of painted? Could you explain what all we need to do the the interior part of the sash in that case? We don’t just leave it bare sanded wood do we?
Glad you got a sash revival this year, Paul! There are a lot of finish options for the interior, you can stain and apply a spar urethane or go with a more traditional wax, boiled linseed oil, or shellac finish. Just depends what you are comfortable with applying as all are appropriate.
Hi Paul C
I just redid windows & wanted unpainted as well! I used an old woodworkers formula of turpentine with melted paraffin mixed in and then linseed oil whipped in. The recipe calls for lots of turpentine to act as a carrier. I did the runners (?) where the windows touch and the edges & inside face of the sashes. I added a touch of stain to match existing frame. LOVE how they turned out. Reference: Bio integral Research Least toxic pest management– I used the recipe in their booklet on termites & wood destroying organisms. PS good luck finding turpentine! AND, all our previous painters thought painting was a good idea !!! What a mess and frustrating to use. NOW it is like a luxurious vacation to open the windows!
Nancy, thanks for sharing your experience. The turpentine-paraffin-linseed might be an option for me based on your reported success. Does it get applied to the bare wood only, or any other prep necessary? Is it easy to work with? Does it dry and leave a nice lasting finish by itself and is the drying time reasonable? Any other tricks or tips that you would recommend?
Hi Scott, we live in Portland OR and I’d like to try to restore functionality to some of our original windows. It’s not a very lux house originally and the windows all appear to be single hung wit the slanted block of wood affixed under the upper pane. Is there a way to make single hung windows double hung? The weather is getting hotter and hotter here so I’d love to use the passive ventilation.
Elaine, often they can be modified to be double hung with some work by a pro. It just depends a lot on how they constructed and installed originally.
I have about 8 medium sized double hungs to repair and restore. One has a rotted side jamb in the middle — the end adjoining the sill appears to be sound wood. I haven’t identified the source yet (termites? Failed flashing?) but also am not sure how to tackle this repair. Will the entire window unit (jambs and sash) need to be removed or can it be repaired in place? Will a new piece need to be spliced in or would epoxy be adequate? In case it matters, this unit has an acme twin style balance system installed on the same side as the rot and it is in a bathroom (though not in tub area). Thanks for your great site!
My home was built in 1900 and the huge windows will not open. They have the counter weights cut, caulk in the track and multi layers of paint inside and out. I do not want replacement windows, just to get a couple of them open. Any suggestions?
Sharon check out the post listed on this page https://thecraftsmanblog.com/4-steps-to-open-stuck-windows/ it will help you get them open again. Getting them to stay open without ropes will need a little more help though. All the posts you need are on this resource page.
Very nice.
We have been offered windows from a home built in 1870. We want to repurpose them as artwork. If they test positive for lead paint, can we simply paint over the paint already on the windows? Is there any risk to exposure after repainting the windows?
Thank you..VC
VC, as artwork the Windows have very little risk of any lead issues. Remove any loose chipping or peeing paint and then repainting will seal the lead paint in place underneath a safe coat of paint. You can also use polyurethane if you want to show the old patina instead of covering it with fresh paint.
Thanks ever so much for your concise, and quick response. It is very much appreciated.
I have a 1925 Craftsman bungalow in Northern California and it has at least 2 window frames on the shady side of the house that are starting to rot. I’d love to think I could do the repairs myself, but I don’t have much faith in my handy skills. 🙂 I also live in a historic district, so rhey need to be made according to period and match the others on my house.
Since I am going to be looking at hiring someone, I was wondering if there is anything in particular that I should ask or look for in a contractor. I want to make sure the new frames are made to match the style of the house and will also last the next 100 years.
Thanks!
Hi Scott,
I live in a home built in 1929 with an addition that is 20 years old. The original windows are by far much nicer than the 20 year old windows. But most of old windows do not open. I do not have any maintenance history on them and am just assuming that most of them are just painted shut. There are 31 old windows and to take on the task of repairing that many windows fills daunting. I would love to keep the original windows and not replace them with new. Any advise? Kathy
Kathy, restoring your original is always the best way to go in my mind. Some people have the time and desire to do it themselves and if you’re one of those people then my book Old Windows Made Easy is the perfect thing to help you do it! If you want to hire someone to restore your windows that’s he easy way to go about it though it will cost more. You can find a restorer at http://www.windowpreservationalliance.org/directory
That’s interesting that historic windows are designed to be repairable. I thought that they might be more difficult to repair because of their age. However, I’m sure that you would want to hire an experienced company to perform the repairs. That way you can keep the charm of your home’s look for years to come. Thanks for the post.
I know you’re a pro too Alex but that’s the great thing about historic Windows. Most repairs are simple enough homeowners can handle them and we can help them for the complicated stuff.
I was wondering if anyone has or had thoughts on how I could/should make my top sash stationary. I have 10 windows that all need to be redone. They all are double hung and 68″ tall windows. We never open the top sash and seems like a lot of work to rehang 10 additional sashes. 10 windows is going to be a lot of work already. Also seems like they would be much more air tight with the top sash sealed shut.
Has anyone “locked” their top sash in place? What is the best way to do this?
Thanks,
Marcus
Marcus, it’s often as easy as caulking the top sash in place and you’re done. If it is moving or has a tendency to slip downward then you can cut a piece of blocking (you can make it decorative or simple) to fit in the jamb below the top sash to hold it in place. This was often the design for single hung windows.
Thank you!
Personally, I’d never make a double hung window a single hung. The beauty of double hung windows is heat escapes through the top sash and cool air enters through the bottom sash.
A debt of gratitude is in order for sharing Catherine! I’ve officially hot my duplicate and it is a fabulous asset.
Annabel,
Are you thanking me of Eco-Strip for talking about our Speedheater Infrared Paint Remover?
Repairing an old window can be easy in some situations, but not all the time. Beware of the glass and if you do want to fix it yourself you should make the environment as safe as possible. It is highly recommended that you call professional help and leave it to the expert to fix your windows when it comes to replacing the whole window or if it is a broken glass situation.
If you want to repair and change, your old windows. SRS Hardware is one of best place for wooden window weights. Here you will find the best products at best price.
Looks like you found an unfilled market niche. Get to work!