
 While most of the windows on historic buildings built before WWII used the simple and effective rope and pulley counterweight system, there are some that utilize different balances systems. A popular option were spiral balances, sometimes called a tube balance, and that’s what we’ll talk about today.
These balances are not terribly complicated, but they can be troublesome to work with if you’re not familiar with them. I’ll be speaking specifically about one of the more common types I’ve come across, but there are dozens of variations made by several manufacturers.
The advantages of these balances is that they are a relatively simple design and can be tensioned to meet the weight of the sash in question. There are different size balances to meet the needs of differing height sashes.
They also eliminate the need for weight pockets and can be installed in smaller rough openings and allow for larger window sizes.
The problem with them is that just like any delicate mechanical item, they can rust, dent, bend or otherwise break, rendering them unworkable, and in a lot of cases, they are not repairable unless you can salvage missing/broken parts from a similar balance.
How To Remove Spiral Balances
This style balance is held in place with a single screw at the top corner of the jamb and one or 2 screws on the bottom of the sash. Each sash requires 2 balances (one on each side) to support it properly.
Before removing the balance, you have to know that it is under tension and when the screws are removed, the balance will spin dramatically to remove the tension. Depending on the weight of the sash, this tension may be significant, so do be careful when removing them.
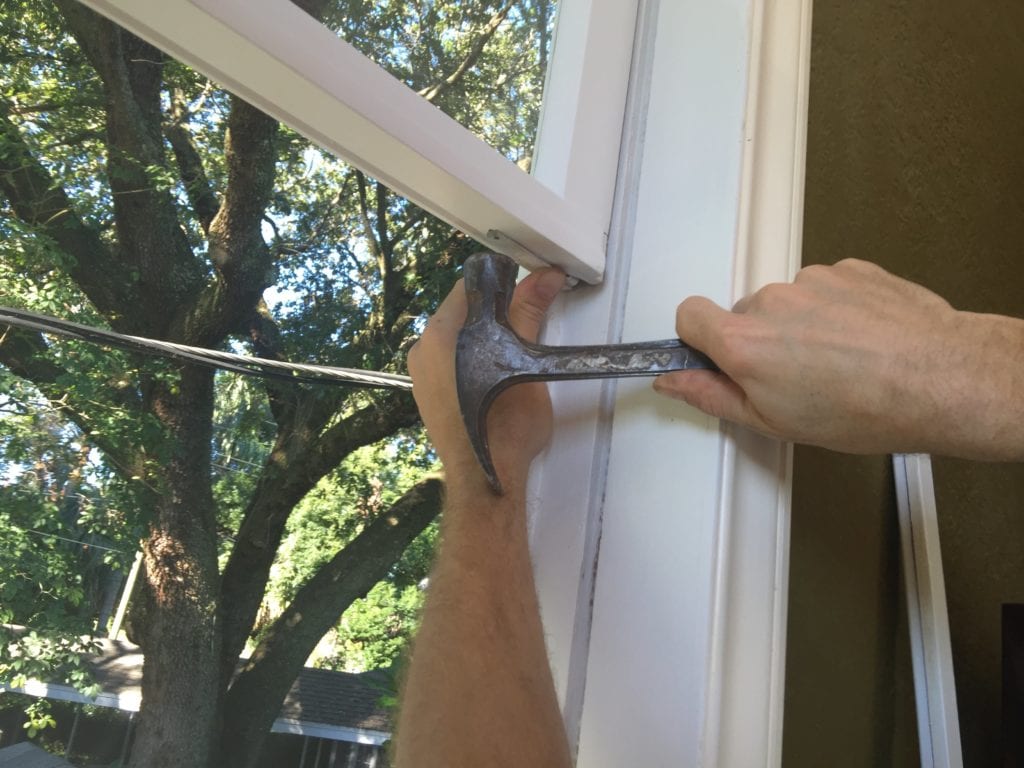
Step 1 Remove Top Screw
On the bottom sash, remove the screw in the top corner of the jamb, holding the tube in place. These screws are notoriously difficult to remove since they have been in place for decades with tons of caked on paint or corrosion. Follow the tips on my post 4 Guaranteed Tricks to Remove Stubborn Screws if you get stuck.
If the screws are so stubborn that they simply won’t move (which is often the case), I usually end up wedging a pry-bar behind the tube and giving them a few swift pops to pry the screw out. These screws are more like a spiral shank nail than anything, so they come out easier than a typical screw would when pried out.
Step 2 Remove the Support Bracket
After the retaining screw at the top is removed, there is only one other place that needs to be removed to get the balance off, and that is the screws in the bracket underneath the sash.
For a top sash, this is underneath the meeting rail on either side of the sash. For a bottom sash, it is on the bottom rail that rests on the sill when closed.
There will be one or two screws holding the bracket in place, depending on the style of balance. You don’t need to remove the bottom bracket in order to remove the sash from the jamb, but to do any work on the sash or balance, you will have to remove it so it’s best done now.
Remember, these balances are under tension and will spin like the dickens when the first screw is removed, so be careful. Now, let’s look at repair and reinstallation.
How To Repair Spiral Balances
I keep a stock of these in my shop because you never know when you’re going to need spare parts and the parts are not simple to find always. A salvage yard is a good place to find replacements if you need them or you can try manufacturers like Caldwell who still make versions of this balance.
Fixing Bent Balances
Most of the repairs I do with spiral balances are to straighten out bent balances. This is technically easy, but can be painstaking work to get right. Spiral balances will not work properly with kinks or bends in the tube or the spiral, so straightening them out is essential to good operation.
You can use any number of tools to work out the kinks, but my favorite are a small hammer and some pliers. Bottom line: do whatever it takes to get a straight balance again.
Replacing Brackets
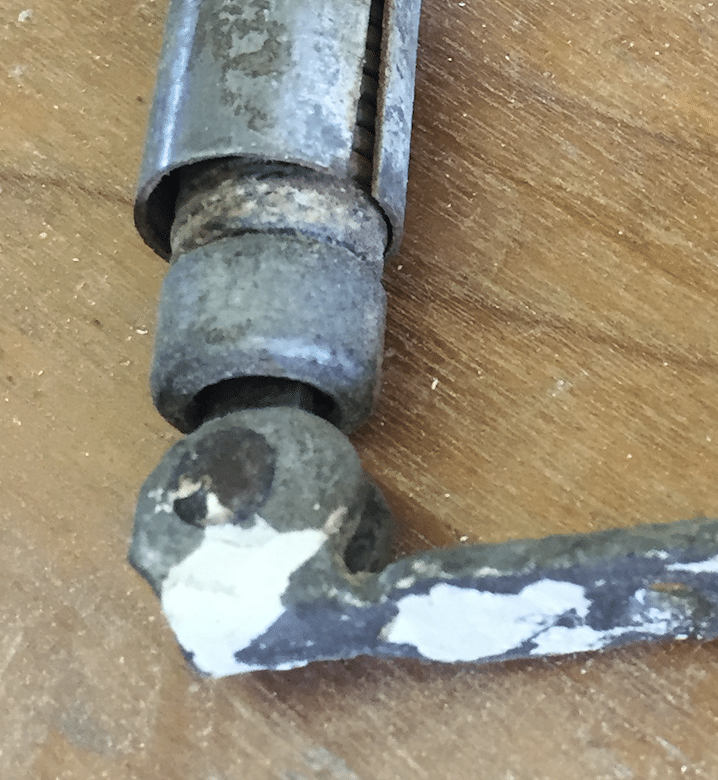
The brackets at the bottom often rust away or break from abuse. They can be replaced if you can find some extra junker balances to scrounge parts from.
There is a single rivet holding the bracket on in most cases that should be punched out with an awl and then you can attach a replacement bracket or have a machine shop make one for you if you can’t find one to match.
Tune Up & Cleaning
The standard treatment I give all the balances we get in the shop is to strip all the paint off of them with a wire wheel or steel wool and then wipe the dirty old grease from the spirals with WD40 until everything is clean and working smoothly.
How To Install Spiral Balances
This is the part that can give some folks trouble. This is the smoothest way I have found to reinstall these. I’m not proclaiming that this is the best way or the industry standard (there isn’t one), but this is how I like to do it.
To start with, this whole thing can be done with just one person, but it helps a TON to have a helper to hold the sash in place while you work. If you don’t have a helper, then you’ll need to cut a block of wood to prop under the sash while you work to hold it in place.
Also, the steps are the same for the top sash and bottom sash, so I’ll just walk through them once and you can handle it from there.
Step 1 Set the Sash in Place

When your sash is ready to go back in and the jamb has the parting beads removed, set the top sash in its track and let it rest on the sill. Test it to make sure it slides smoothly in the jamb all the way to the top and bottom with no trouble before doing anything else.
Before setting the bottom sash, make sure the top sash is in place, working smoothly and the parting beads are all installed.
Step 2 Drop in the Balance
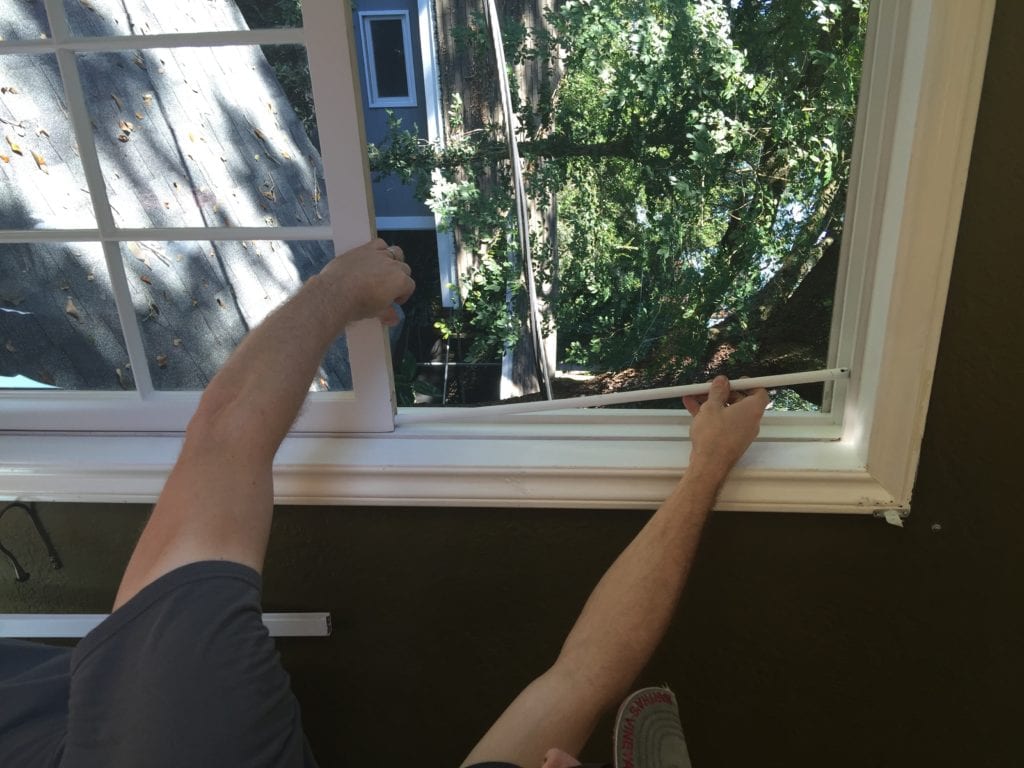
The next steps will all be repeated on both sides of the sash since there are two balances per sash. With the sash in place, drop the balance, bracket end first down into the mortise on the side of the sash. It should slide all the way down to rest on the sill while you hold the top of the tube above the sash.
Step 3 Attach the Tube
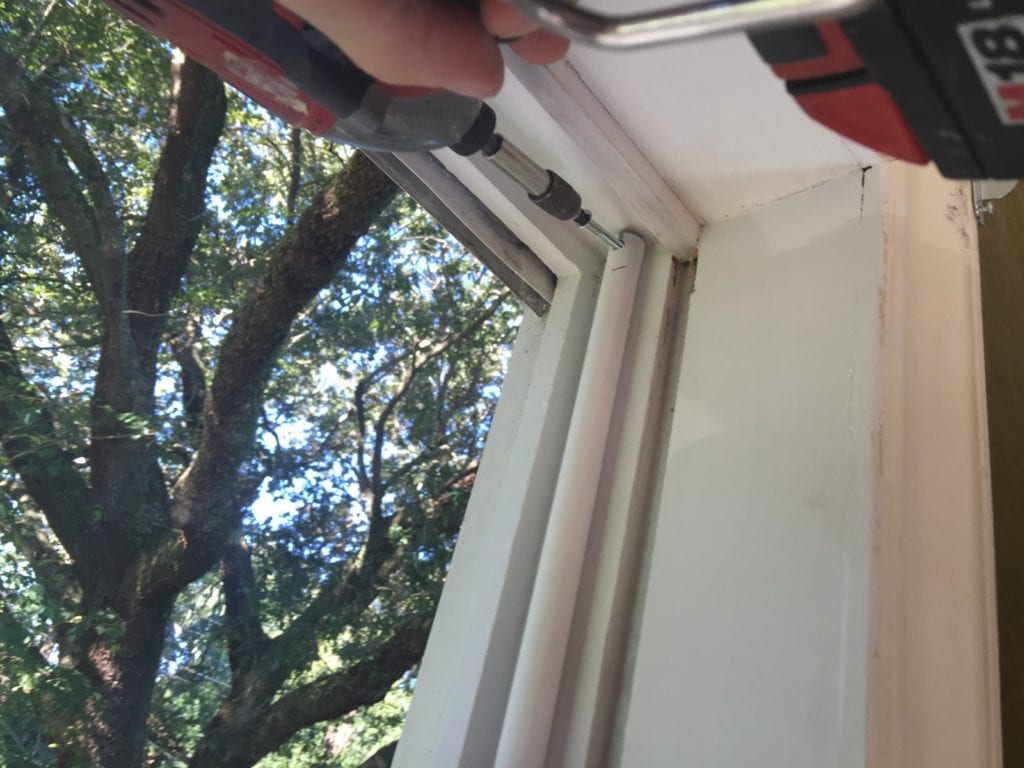
Pull the tube all the way up to the top of the jamb letting the spiral fall down into the sash mortise. Keep the seam on the tube toward the jamb so it doesn’t show. Attach the tube with one 1 1/2″ wood screw. A pan head screw works best, but really any attractive screw will work since it will be visible.
There are two things you need to focus on here:
- Don’t tighten the screw too much that you dent or flatten the tube.
- It’s imperative that you keep the tube centered in the track so that the sash can move fully up and down without binding.
Step 4 Tension the Balance

With the tube securely attached at the top, slide the sash up to the upper most position and hold it there while you tension.
Grasp the bracket, as it should have fallen through the bottom of the mortise, on the side of the sash and begin to spin it clockwise.
It will get shorter as you make the revolutions. Continue turning until the bracket is almost at the bottom of the tube and then pull it down about 6-8 inches and continue turning (adding tension) until it makes its way back to the tube again.
At this point, you should have enough tension to support a standard sash. Without letting go of the bracket, move on to the next step to attach it.
Step 5 Set Bracket & Attach
Some brackets have a little nub on the end that allows it to be lightly hammered into a small mortise on the bottom of the sash. This allows the bracket to stay in place while you get a 1″ wood screw to securely attach the bracket onto the bottom of the sash.
Some brackets may accept two screws and I prefer these, so if there is any way to add a second screw, do it. The extra insurance is well worth it!
Once both balances are attached, test the sash, moving it all the way up and down in the jamb. Stop at various points and make sure that the tension is adequate to support the sash wherever it may need to rest along its track.
You can always remove the bracket and adjust the tension (add a little, remove a little) as needed. Once you figure out the tension needed for the first window, the rest will be very similar if they’re the same size.
Once both sashes are in, put the stops back on, and you’re ready for action. If you have questions about some of the other elements of removing a sash that I just touched on briefly )like removing stops and parting bead, dealing with lead paint, etc.) feel free to check out my resource page How To: Repair Old Wood Windows for a variety of posts on the different elements of a wood window and how to work with them.
There you have it! If you have any comments on your experiences with spiral or tube balances or have some suggestions on how it can be done smoother or tips for working with some of the many models of spiral balances, please feel free to share those in the comments below as well.


Founder & Editor-in-Chief
I love old houses, working with my hands, and teaching others the excitment of doing it yourself! Everything is teachable if you only give it the chance.
Scott, do you happen to have a video of you doing this? Or know of one. I think I understand just about everything but I have some little extra pieces that I *think* are the sash stops but am unclear how/where to install them. Also….not sure exactly what tensioning the balances looks like. TIA.
Do you know where I can find a slim spiral balance spring? The standard D6 15mm springs are too tight to fit in my aluminium frame making the sash too stiff to operate
What lubricant/grease do you use on the spirals after you have cleaned off the old stuff?
I AM RESTORING 1954 double hung, non-tilt windows with spring balances. My question is: There were aluminum jamb liners that got beat up removing the windows. Is there an alternative for these?
Hi,
We are searching how to make some of our old 1938 wood sash windows functional again. We live in Montreal, Quebec. The information you post on your blog is very interesting but I have questions. I found out that one of the windows could not be kept opened without putting a support and I finally noticed that the tube on the side had disappeared. Actually, there was no more screw. Following your indications we tried removing the screw at the bottom of the front sash but it doesn’t work. Is it possible to fix this by simply putting back the screw to hold the tube in place while rolling the spiral? Thank you fo any advice!
Hi
I just had the spring balances replaced by a professional sash repair but today I opened the top window and it did not hold, slamming to the bottom window. I recently had them decorated and sprinkled balances replaced Easter this year.
Okay so how do you put the spiral metal rod back into the tube if it has been removed??
I tried inserting it back into the top, but the bottom spring and plastic piece keep me from getting it all the way through.
I tried inserting from the bottom, but it won’t fit through the plastic piece .
Can I remove the plastic insert at the bottom to insert the rod?
If so how??
I have the same problem! Did you ever get an answer? My top sash fell down and the spiraled metal rod separated from the aluminum tube. How the heck do you get it back in???!!!
Hi,
I’m installing spiral hung sash window and would like to know what the “gap” in mm needs is best between the upright style and the frame i.e. 1mm, 2mm ….. in order to have a jam free open and close motion
Help! No clips, but a spiral balance that is broken and the window will not open. I can not remove the sash because the window will not open no matter what.
Thank you in advance.
Hi from Sydney, Australia.
My broken spiral sash is in an aluminium window frame. I have received my replacement and upon installation it keeps dropping out of the foot when I close the window. Its got a cross tab and when tensioned I fit it into a foot that is screwed into the bottom of the window that opens and closes.
Can someone help me? Why is it falling out of the spiral foot after being tensioned and placed into the foot. It happens again and again. I tension it, place it in the foot, then close the window and as soon as I have closed the window I here it drop out from the foot.
Turn it clockwise to tensjon. If you dont their is no tension holding cross bar in plave in footer. Also pinch the adjustable footer a bit more to close as they are a bit spread.
I have many windows in my 1938 house that have spiral balances. The springs are in good condition but the tube covers were apparently discarded by a previous owner. Can you suggest where i can find these tube covers?
Thank you. You have a good blog.
– Harris Honickman
Blaine Window has replacement parts https://blainewindow.com
Just a quick thank-you. Your efforts to explain how to maintain these balances is very much appreciated.
Ok Scott. I avoided being impaled by the flying spiral screw and the bottom brackets are loosed. The window is a bit too long to slide the tube containing the spiral completely out of the window space. I removed the trim on both sides of the window, but now I find that there is metal weather stripping holding the window in. Not sure how to deal with that to slide the entire window out of the frame. Wanted to take both upper and lower out so I can completely strip the wood and remove and re glaze the glass sections. Is there a way I can send you a photo of what I am dealing with?
Email pics to scott @ thecraftsmanblog.com
Did you have an answer to this one? I’m dealing with the same thing.
I’m having the same issue
I have a home that was constructed in 1947. I believe is still has the original windows. They are single hung wooden windows with spiral balances. I opened one of the old windows today and I’m not able to close it. It appeared that the spiral balance on the right side was stuck, and would not allow the window to be lowered. I was able to close the window most of the way by placing the blade of a screw driver in a notch on the bottom end of the balance, then turning it will allow the window to lower a bit. But it still won’t close completely. Can you recommend a course of action? I would appreciate your advice, thanks!
Hi there,
The spirals of my 2 swisco spiral balances were pulled out of their tubes during an installation. I think the spiral wasn’t tensioned enough and the window fell open far enough to yank the spirals out. Tiny cross pins at the top of the balance are still there, but bent. Can these spirals be fixed or do I need new ones? The item itself doesn’t look too complicated, but I don’t know what’s inside them. I can’t figure out how to reinsert the spirals. If they can be fixed, that’d be great. Better than waiting another week for replacements to come in the mail.
I haven’t worked with Swisco enough repairing them so I’m not sure if it can be repaired. Worth a shot while the others are in the mail.
Hi
This just happened to me. Did you find out a way to fix the broken ones?
Thanks
Gemma
What grease do you suggest be applied after you clean the spiral with WD40? I’ve heard blue grease (graphite) is good but I’m not sure what to use.
SWISCO who still makes these types of balance recommends white lithium grease or Three-In-One oil to keep them functioning smoothly.
Thanks. I have double hung wooden Windows and I’ve successfully cleaned and re lubricated the bottom window. It’s working beautifully. The springs for both the top and bottom windows are mounted at the top edges of the window. When resetting the spirals for the bottom window I opened the window as you suggested (ie moving them to the opposite end of their “home” position). Im not sure how to set the spirals for the top window. Is it ok to lift it to the top of the window pane (in “home” position) to set them?
I appreciate your advice, thank you.
Thanks Scott! I ran into these spiral balances on my porch Windows. I figured out how to remove and clean, but didn’t know how much to tension them. Had trouble finding help on the web until I found your site. Thanks again!
Happy to help Steve!
Thanks! I need this to do a complete repair and reglazing of my kitchen window. It works OK, but the finish is shot and it is leaky.
BTW, do you have any advice on the best natural wood finish for old wood windows. I’m a bit hesitant to put polyacrylic on them. I have only one original 1920s window with original trim and hardware in the house, and the finish has turned to powder.
The traditional finish on the interior was usually shellac, though another good option today would be spar urethane.