

No matter the season or region attic insulation is a major part of any house. And when retrofitting an old or existing house you need to be very purposeful when it comes to how, where , and with what you insulate. Installing insulation willy-nilly can create serious moisture problems leading to a bunch of problems like mold, rot, or other issues that can seriously compromise your health or the health of your house. You should definitely be insulating your house and the attic is the first and most important area to hit, but it must be done strategically.
In this post, I’ll help you understand the materials, methods, and potential pitfalls very comprehensively so you can come back and reference this page in the future. There is a lot of information here so use the subheadings below to zero in on the important pieces for what you need now and come back for the rest if and when it applies. If you want to know anything about attic insulation this is the post for you.
Picking the Right Materials
There are numerous forms of insulation and even more brands on the market today. Below is a run down of just a few of the most popular. Remember the higher the R-value the greater the insulation provided. But keep in mind that R-value is about as exact of a science as gas mileage on a car. Proper installation can make a big difference here!
Cellulose
(R-value ~3.8 per in.) $
Cellulose is the oldest building insulation. Many types of cellulosic materials have been used, including newspaper, cardboard, cotton, straw, sawdust, hemp and corncob. Modern cellulose insulation, made with recycled newspaper using grinding and dust removing machines and adding a fire retardant, began in the 1950s and came into general use in the US during the 1970s.
Cellulose is usually blown in as loose fill in attic floors and can be blown in wet on wall cavities or in dense pack installations which are best done by a pro. Many people will add it to wall cavities on an existing old house and we’ll talk later about why that can be a very dangerous proposition. An example of this today is a product called Green Fiber which is available at your local big box store.
Fiberglass
(R-value ~2.7 per in.) $
In 1938, the first fiberglass insulation was produced. It was invented by the Owens Corning Company, which is the world’s number one producer of fiberglass to this day. Fiberglass insulation is made from tightly-woven glass fibers. It’s usually sold in large rolls known as blankets or batts, thought it is also available as loose fill, and is the most widely used type of insulation in the U.S.
One negative is the itchy feeling from working with the stuff and the need to wear a dust mask and cover your skin, but there are versions that are itch free today. It performs well and is inexpensive, but it has trouble when it gets wet so installation should be carefully planned to avoid any areas where moisture may be a problem. To learn more visit Owens Corning. Fiberglass insulation is also available at your local big box store.
Recycled Denim
(R-value ~3 per in.) $$
Whoever thought of using old, ground up blue jeans as insulation was a pretty clever person because today it’s a small, but growing, segment of the insulation market. Denim insulation works just like fiberglass and is sold in the same forms.
The benefit? It’s ALL recycled and good for the environment. Plus, no itching later on! It boasts a slightly higher R-value than fiberglass as well. Visit Bonded Logic, the #1 producer of the stuff, for more information. The downside is that this is available only through distributors and is a little harder to find, plus a bit more expensive than cellulose and fiberglass.
Mineral Wool
(R-value ~3.3 per in.) $$
Mineral wool is a stone-based mineral fiber insulation comprised of Basalt rock and recycled steel slag. It costs about about 25% to 45% more than fiberglass, but I feel its benefits more than justify the additional costs. Below are some of its benefits and characteristics.
1. Fire Resistant
Unlike fiberglass which melts around 1,200°F, mineral wool has an extremely high melting point and can withstand fires up to 2,000°F making it one of the safest forms of insulation when it comes to house fires. It will not melt or off-gases any dangerous fumes in case of fire and functions as a fireblock, which delays the spread of the fire buying you valuable time to escape.
2. Water/Mold Repellent
Mineral wool is manufactured with a small amount of oil in the mix which helps give it a hydrophobic property. This characteristic keeps mineral wool performing effectively and does not lower it’s R-value when exposed to water.
Any water that does end up on mineral wool rides down the surface rather than absorbing into the body of the insulation. This awesome feature and the fact that it is comprised of rock makes it virtually impossible for mold to grow on or in mineral wool. Compare that to fiberglass, which readily absorbs and holds water which greatly decreases it’s effectiveness and lowers its R-value when wet.
3. Higher R-value
R-value is a big deal in insulation, so lets see how they stack up. Fiberglass has an R-value of between 2.2 to 2.7 compared to mineral wool weighing in at 3.0 to 3.3. So that means, for standard 2×4 wall mineral wool comes in R-15 batts, while fiberglass comes in R-11 or R-13. For 2×6 walls, mineral wool comes in R-23. Fiberglass? R-19 with special order of up to R-21
Another bonus is that mineral wool is available in batts that fit 2×8 framed walls at R-30. Fiberglass? Not available in that size.
The biggest advantage is the consistent R-value of mineral wool as opposed to fiberglass that comes with poor installation. Fiberglass is easy to accidentally compress which greatly diminishes its R-value. With mineral wool that isn’t an issue since it is already compressed.
4. Easier to Install
Installation of mineral wool is different from fiberglass entirely in that it comes in thick batts almost like a huge loaf of bread that must be cut by what unsurprisingly looks like a bread knife. Unlike fiberglass, you don’t have to compress it and then cut it with a razor knife before stapling a kraft paper face onto the stud.
There is no paper facing because mineral wool does not come with a vapor barrier- you have to install your own vapor barrier if it is necessary in your situation. In my opinion, this usually results in a better installation because the vapor barrier is one solid piece, rather than a bunch of joints that have a greater likelihood of not being properly sealed.
For mineral wool, you cut the piece to size but leave it a little tight so that it compression fits into place in the stud bay. You can install straps for installation on a ceiling to make sure it stays in place. A tight installation is best and I find that this is easier for most of us to accomplish than trying to ascertain if a piece of fiberglass is too fluffy or too compressed to perform properly.
5. More Versatile
Mineral wool is not just for inside the house either. There are versions that can be installed on the exterior of a building in place of rigid foam. Installation on the exterior is an excellent use of mineral wool because of its hydrophobic properties.
Combine that with its versatility of coming in configurations for 2×4, 2×6, and 2×8 walls, and you have an easy option for builders and remodelers to turn to. Especially for those of us in old homes where stud size is not always a standard dimension.
With its dense composition, mineral wool is also easier to ensure proper installation around cutouts like electrical boxes and plumbing lines. I find that fiberglass is usually just compressed in these sections, whereas mineral cannot be compressed to fit around them. It forces the installer to do it correctly or not at all.
Spray Foam Insulation
(R-value ~3.5-6.5 per in.) $$$
In the last 20 years, spray foam insulation’s popularity has grown immensely and for good reason. It has a very high R-value per inch when compared to other insulations like fiberglass, mineral wool, and blown-in insulations. This high R-value, coupled with an ability to provide excellent air sealing helps a lot of contractors who specialize in new construction meets the more stringent air sealing requirements of the building codes today.
Open-Cell Spray Foam
- R-Value: 3.5 per inch
- Cost $1 to $1.25 per SF
The most affordable of the spray foam options, open-cell spray foam, is used in many applications like roof, walls, and ceilings. Open-cell foam insulation expands greatly upon installation and is fairly soft to the touch, unlike closed-cell foam. Open-cell foam is also vapor permeable which means it does not count as a vapor barrier and needs to have one applied over it. The vapor permeability of open-cell spray foam means that it can take in water and hold it, which can be a real danger. In the case of leaks, open-cell foam will absorb water and hold it against the framing and sheathing elements facilitating mold and rot.
Bottom Line: It’s a great and affordable insulation option when there is no chance of water intrusion, but you’re rolling the dice if you think it might get wet.
Closed-Cell Spray Foam
- R-value: 6.5 per inch
- Cost $2 to $3 per SF
Closed-cell spray foam is the king of the insulations when it comes to both R-value per inch and cost. Nothing else comes close, really. Unlike its open-cell cousin, closed-cell spray foam is not vapor permeable and will not hold water. This makes it an excellent option in case of water intrusion. It also includes binders and glues in many applications that help it to literally glue a structure together. Its strength can help prevent uplift when applied on roof decks and provide shear strength to structures. One downside is that often the blowing agents for closed-cell foam are hydrofluorocarbons, which are not so good for mother nature.
Bottom Line: It’s expensive, but wow, will this get you a structurally sound and well insulated building.
My personal preference on spray-foam insulations is that for new construction, they are an excellent option (if applied correctly, since user error during installation can cause catastrophic results. Learn more here). On historic buildings and remodels, I’m not a fan because the design of older homes especially historic in nature was never meant for this type of insulation and can cause performance problems.
Spray foam is NOT reversible, which is a major problem in historic buildings, which may cause irrevocable damage to historic fabric.
Rigid Foam Insulation
(R-value ~3.8-6.8 per in.) $$
Not all foam insulation is spray foam. Rigid foam insulation is another option for insulation that should be considered, especially since unlike spray foam, it is easily reversible, a major plus for historic structures. Rigid foam insulation come in several varieties and of course, there are different makers of each type.
All of these rigid foam insulation options are usually sold in 4×8 sheets of varying thickness from 1/2″ to 2″ so you can pick and choose the best option for your house.
Expanded Polystyrene (EPS)
- R-value: 3.8 per inch
- Cost: $.26 to $.32 per SF
Expanded polystyrene (EPS), often known as Styrofoam, has been popular for years. It does just as well at insulating coffee cups as it does old houses. While it may have the lowest R-value of the rigid foam options, it does also follow with the lowest cost of any we’ve mentioned so far. There have been newer High-Density EPS products that have managed to bump up the R-value and excel in exterior applications.
Extruded Polystyrene (XPS)
- R-value: 5 per inch
- Cost: $.38 to $.45 per SF
Extruded polystyrene (XPS) rigid foam is usually blue or pink in color and is not quite as rigid as the other foam insulations, which gives it a little more versatility, in my opinion. XPS has no problems with absorbing water, unlike polyiso, which is another mark on the plus column for XPS. It typically does not come faced with foil like the other two types of rigid foam mentioned here.
Polyisocyanurate
- R-value: 6.8 per inch
- Cost: $.65 to $.75 per SF
Polyisocyanurate (polyiso for short) has the highest R-value and (no surprise) correspondingly the highest cost for any rigid insulation. Its R-value does have a tendency to degrade over time with exposure. Typically sold with a radiant barrier of foil on both sides, you also get the benefit of stopping radiant heat with this foam. Read about radiant heat transfer here! Polyiso is essentially the board form of the closed-cell spray we talked about in the first section.
Rigid foam insulation is not something you cut and stuff into the stud bays like fiberglass or mineral wool. Rigid foam insulation is best installed on the exterior of the framing and then the siding is installed over top of it. This may be particularly difficult and expensive for retrofit installations.
Installation on roof decks as a part of a re-roof project often makes the most sense and provides the biggest payback. If you’re going to add 2″ to the height of your roof by decking with rigid foam prior to installing new shingles, you’ll need to make some modifications to the cornice and fascia, but this can be done in ways that don’t impact the overall appearance of the house too much.
Radiant Barrier
(R-value ~??) $
Though it’s not technically insulation radiant barrier is an important part of any attic insulation plan especially in hot climates. This usually comes in rolls of aluminum foil looking materials, sometimes plain and sometimes with bubbles like packing materials. Radiant barrier doesn’t technically have an R-value because unlike insulation its prime job is to reflect radiant heat back out the outside.
It’s an inexpensive addition if you live in a hot climate because regular insulation does little to nothing to stop radiant heat.
The Wrong Way to Insulate
Old home insulation is a controversial topic among old house owners and restorers. Used to be I was someone who promoted the retrofitting of just about any old house with new insulation, but looking back, that was naive of me. There are certain times (and places) where adding insulation will be immensely valuable and other times when it can prove catastrophic. So, you certainly need to know what you are doing before you take on the task of insulating an old house.
I’m not really talking about the problems with existing old home insulation, but rather the topic of how and where should you add insulation to an old home. Homes built before the mid-20th century were not built with the same techniques that we use today.
These older homes were largely built without insulation and just open cavities in the walls where the house could breathe. Builders knew that water was the #1 enemy of any house and the way they built may have allowed water to get into the walls in minute amounts, but due to the extraordinary looseness in the building envelope, the house could always dry out safely and quickly.
Then a few decades later, we come by and stuff those cavities full of fiberglass which acts like a sponge and we wonder why our old house is having so many problems. Adding insulation where it was never designed to go (mainly the walls of an old house) causes a host of problems all due to the moisture issues it creates. Here are just a few of the highlights.
- Wood Rot – Wood can get wet without issue, but keep it wet and then the problems arise. Anywhere that water gets trapped causes wood moisture levels to rise and once they get above 20% to 30% those are ideal conditions for wood rot. Installing any kind of insulation in an area that gets wet with any regularity will almost inevitably lead to wood rot even if you follow my tips to prevent it. You have to remove the continuous source of the water.
- Peeling Paint – When paint is peeling down to bare wood, you may think it was a shoddy paint job, but the cause is usually moisture related. Once again, the moisture gets into the wall assembly and gets absorbed by the insulation where it sits like a dirty sponge soaking into the wood. When excess moisture builds up in the wood, it will try to escape through the wood surface and push the paint right off. Wondering where you have moisture issues? Look for the peeling paint and you’ll be in the right spot.
- Mold – Black, green, brown, it really doesn’t matter what color it is, nobody wants it in their house for the health hazards it poses. What does mold need to thrive? Warmth, oxygen, wood, and (you guessed it!) moisture. Ever hear about the mold outbreaks in the desert? I didn’t think so. Dry houses are happy houses. Wet houses…not so happy. Want help getting rid of mold? Check out this post.
Let’s start with the basics. I’ll show you where to insulate and where to leave it alone. I understand that you may disagree with me about the risk vs. payback when I tell you to NOT insulate an area, but trust me, I have your best interests at heart. I have seen insulation go sideways too often to not share what I have learn from my years in the industry.
Start in the Attic
The attic should always be the first place you add insulation whether you live in Florida or Fargo. It doesn’t matter the climate, just start with the safest place that provides the biggest bang for your buck and that is always the attic. I’ll say that one more time. ALWAYS the attic! I hope I wasn’t unclear.
How do you insulate the attic safely to avoid problems? Well, the attic floor is a great place to start because even if there is a roof leak there is air flow between the roof and the attic floor that allows things to dry out and avoid the problems we talked about earlier.
Stay away from the underside of the roof if you have an older roof or especially a wood shingle roof which is designed to get wet and needs to breathe to dry properly. If you have recently had your roof replaced and have adequate waterproofing, underlayment, and flashing applied, then I usually agree that insulating the underside of the roof is then an option as long as you keep a diligent eye on your roof to make sure it stays in good repair.
Leave the Walls Alone
Don’t insulate your walls. What?? But it’s cold? I know and it pains me to say this, but the number one danger area that causes problems with old house insulation is your walls. Wood siding is usually not replaced every couple decades like shingle roofs. It likely has the same 100 year old kraft paper behind it that provides virtually no water proofing support.
There are a couple creative yet expensive ways I would consider retroactively insulating the walls of an old house if you are in a far northern climate where it might make financial sense. For anyone living below the Mason Dixon line it is never worth the expense to retrofit an old house with wall insulation.
One situation where it is okay to insulate the walls is if you remove all the siding and apply a new housewrap and then go over that with a rain screen before reinstalling your old siding. This may seem like a massive undertaking and it is. Full energy retrofits like this are expensive, but it really is the only safe way.
If you end up adding insulation without doing a full retrofit then you run the risk of developing Sick Building Syndrome (SBS) which saw a major spike in the 1970s after the energy crisis motivated people to stuff their walls with insulation indiscriminately.
What About the Crawlspace?
Insulating under floors is a great way to keep warm with very little potential issues. Sure it’s dirty and difficult to do, but you wont run into issues like with the walls. My preferred material for crawlspace insulation is Mineral Wool since it’s not rodent friendly.
Installing Mineral Wool between the floor joists takes a lot of work due to all the plumbing and electrical penetrations but it is very effective. Using a material like fiberglass batts works nearly as well, but fiberglass is a favorite nesting place for critters in the winter so I prefer Mineral Wool which is far less hospitable.
How Much Insulation Do I Need?
For most climates, adding a thick layer of insulation in your attic here will give you the greatest return on your investment. How much insulation do you need? For most areas of the country, R-30 is the bare minimum, but you should definitely go higher than that, especially in colder climates. We’ll talk more about insulation for hot and cold climates in a minute.
Click on the map below to see the recommended R-values for your area.

Insulation for a Cold Climate
There are specific techniques that work best in colder climates and special considerations if you live in an area where you heat your home more than you cool it.
Hot or cold climate, air sealing is the elephant in the room that is often overlooked. Yes, air sealing is not insulation but it is, in my opinion, MUCH more important. Old houses breathe and to an extent that is a good thing, but too much of anything is no good and most old houses could very easily have their envelope tightened up without problems developing.
The Roof
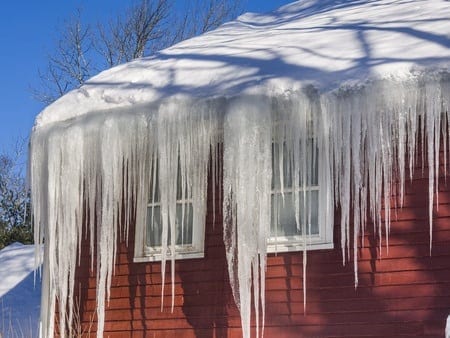
When it comes to insulation for a cold climate a cold roof is a wonderful thing. You want the underside of your roof insulated well enough that you don’t get melting snow which leads to ice dams and other not so fun problems. Heat rises and without sufficient insulation under your roof, you will be loosing all that precious (and expensive) heat out of the top of the house.
In the northern parts of the country (zones 5-8) EnergyStar recommends insulating your attic to somewhere between R49-60. That’s a ton of insulation, but you need it in these cold climates. That means 14-18 inches of insulation if you are using traditional materials like fiberglass.
In a hot climate insulating the attic floor is all that’s really necessary, but in a cold climate you want to keep that roof deck cold to avoid the ice damns so that means rigid foam on the deck, spray foam on the underside of the deck, or multiple layers of fiberglass or mineral wool batts under the deck.
Doors and Windows
These are easy solutions with the plethora of permanent and temporary weatherstripping options available. Check out these easy ways to tighten up your windows and doors and stop the cold drafts.
Chimneys
The next spot to think about when it comes to sealing drafts is your chimney. Is there a flue and does it close tightly enough to keep your warm air from flying out the roof? Make sure it’s opened for fires and closed as soon as the embers have died out. A lot of folks leave it open all night after a fire and that cold air pours right in.
Electrical and Plumbing Penetrations
Anywhere a pipe or wire goes in or out of your house and then makes another penetration through the wall that is a big place drafts come from. On the outside of the house caulk any of these penetrations. Consider adding something like these gasket covers to your outlets and light switches because they are essentially big holes cut into your walls.
Baseboards
The junction between your wall and floor is notoriously bad about creating drafts. On most old houses there have been enough coats of paint that this isn’t an issue but if you notice the joint between the baseboard and the plaster is not sealed, go ahead and caulk and paint it.
Insulation for a Hot Climate
Unlike in a cold climate the temp of the roof is not quite as important down south. Sure a cooler attic means a longer life for your poor shingles, but that can largely be handled by proper ventilation of your attic. The brutal sun in the southern states will cook your attic and turn it into an oven (literally). A good option for the south is to install radiant barrier on the underside of your roof deck to fight the intense radiant heat the southern states get that the northern states don’t.
After that it’s time to focus on the floor of the attic if it is unfinished. If you have a finished attic, then the focus should be solely on the underside of the roof like the northerners, but for those of us with open and unfinished attic spaces, every inch is fair game.
For this I recommend blown-in insulation. It is dirt cheap, easy to install and does wonders to bring down energy bills. You can load up the attic floor with as much insulation as you can fit for very little money like we discussed earlier.
There are a couple things to look out for when insulating an attic floor though:
- Knob & Tube Wiring – If you still have active knob & tube wiring, do not disturb or cover it in insulation- that’s how fires start. Call an electrician and have it removed immediately. Read about the dangers of Knob and Tube here.
- Airflow – Make sure your insulation doesn’t block any airflow, whether it’s to soffit vents, gable vents, or ridge and off-ridge vents. You attic needs to breathe to keep your house healthy.
How To Install Blown-in Insulation
Let’s start talking nuts and bolts here. You will need the following things to get the work done:
- Cellulose or Fiberglass (duh!)
- Blowing machine
- Safety glasses
- Gloves
- Respirator or dust mask
Cellulose insulation isn’t a health hazard, but installing blown-in insulation does make a dusty mess and you want to protect your eyes and avoid breathing the dust filled air as much as possible. You also don’t need to worry about wearing long sleeves since cellulose doesn’t make you itchy like fiberglass.
Setting Up the Blower
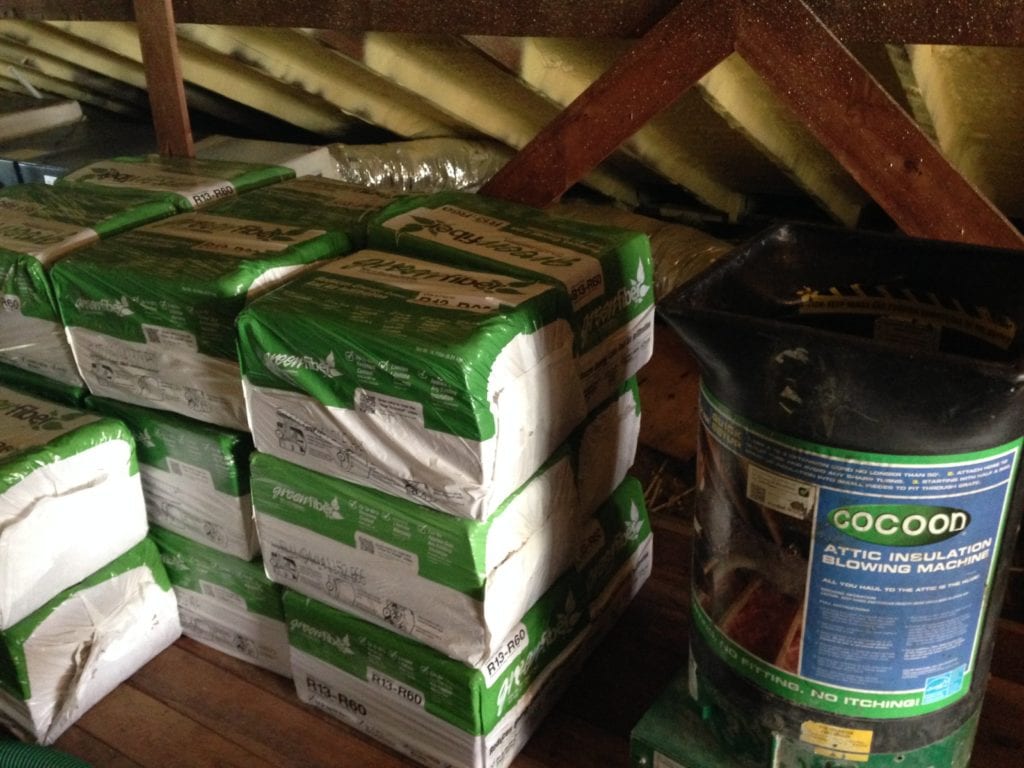
I’m sure other hardware stores have similar deals, but I have to give Home Depot credit on this one. They will give you a free rental of an insulation blower if you purchase 20 bags or more of insulation. Not bad!
The blower comes with a long hose so you don’t have to haul it up the stairs if you don’t want to (which I don’t recommend because this thing is a heavy beast).
Setting up the blower is pretty straight forward. You just attach the hose, plug it in, and load some insulation into the hopper. You will need a helper to keep loading bags into the machine while you use the hose to direct the insulation where you want it, otherwise you will be crawling back to the hopper every 5 minutes.
Let it Blow
You’ll need to install the cellulose all across the attic floor starting from the furthest sections and working your way back to the exit. Blowing in insulation in this manner will give you what’s called “loose-fill” insulation.
The power of loose-fill is in its ability to slow down air and heat transfer through the thick fluffy blanket you blow in. This is different from “dense-pack” installation methods which are a little more complicated.
That being said, your goal here is to create the fluffiest covering of cellulose you can. Don’t blow it in and try to pack it down. It will settle a bit over time so always fill more than you think you should. When I say fill more than you think go big because the settlement factor over that first 6 months to a year is big! I lost about 4 inches to settlement and wish I had installed more.
I would recommend a minimum of 10″ of loose fill for an attic floor, which should give you about an R-30 rating. But like I said earlier, if you’re gonna do it, you might as well do it right and add as much as you can.
What’s the Cost?
To give you an idea of how much insulation you’ll need, GreenFiber has a coverage chart on their website to help you do the math. I found that the chart is pretty much right on.
For my 1300 SF house, I decided to get about an R-36 rating which required about 45 bags in my case. I could have done more but we already have spray foam on the underside of the roof deck so that put me at a total of about R-43 in the attic, which is well above what is recommended for our Florida climate.
It took me one full, very dirty day to get it all done and cost me $581.33. For that price, I can make that money back in energy savings easily within the first year. After that first year, that’s money in my pocket! So, if you haven’t already done it, put some insulation on that attic floor.
How To Install Batt Insulation
Batt insulation is one of the most common forms of attic insulation on the market. It’s easy enough to install as well since it comes in standard size batts that are designed to fit into standard size stud bays. That is, if your old house has standard spacing of studs like 16 or 24″ O.C., but if you’re like most old houses this is not the case which makes things a bit harder than they could have been. meaning you’ll have to likely get the wider version and trim to fit your particular sizes.
Faced or Un-faced?
Batts come in one of two forms. Faced or un-faced. Faced batts have a kraft paper backing on one side which has little wings that can be overlapped onto the studs allowing the batt to be stapled in place very easily. Faced batts should always be installed with the paper facing the living space so keep that in mind.
Un-faced batts are just the insulation (fiberglass, denim, mineral wool, etc.) with no paper and require something else to hold them in the stud bay. The simplest way I’ve found to install them is by nailing strapping to the face of the studs every couple feet to hold the batt in place.
So, which type should you get? Faced are easier to install of course, but the facing is not there for your convenience as much as it is there to act as a vapor barrier to keep moisture in the air from getting into your insulation and causing mold and mildew. If you are adding insulation where none was then faced batts make sense, but if there are already faced batts installed, say on the floor of your attic with the facing down against the drywall as it should be, then buying the slightly cheaper un-faced batts makes more sense because you don’t need or want an additional vapor barrier.
Tips For Installing Batts Properly
Fiberglass insulation needs to remain fluffy to work best. When it is compacted it looses its effectiveness, so make sure that you aren’t cramming insulation into stud bays willy-nilly. Deal with obstacles like pipes and wires by cutting channels into the fiberglass so it surrounds the obstacle rather than getting smushed by it.
Cut around electrical boxes so there is an even surround of fiberglass rather than installing with no changes and letting it cause gaps around the box.
Cutting batts to length or width is pretty easy with one quick trick. Lay a piece of plywood over top of the batt to compress it on the floor and then using your razor knife trim the batt as you need. Trying to cut uncompressed batts is frustrating and ineffective so this little trick will help avoid the frustration and the plywood also provides a nice straight edge to use as a guide.
Conclusions
Attic insulation is by far the most important piece of your insulation plan whether you live in a hot climate or a cold climate. You can make the greatest difference in your energy use here for the least money and with the least potential issues.
You know the materials now and the prices. You know where to insulate and where to not insulate. You’ve calculated the savings and you’ve got a plan. Some of it may be a DIY project and some of it may be something you hire a pro for but now you’ve got a plan. You do have a plan, right?
Trust me the sooner you start your attic insulation plan the sooner you will reap the savings so while the best time to insulate your attic was 10 years ago, the second best time is today!


Founder & Editor-in-Chief
I love old houses, working with my hands, and teaching others the excitment of doing it yourself! Everything is teachable if you only give it the chance.
It’s important to be aware that poor installation can result in future moisture issues with the insulation. My husband and I were just chatting last night about replacing our home’s roof and attic insulation in the next several weeks. Thank you for making it clear to me why it would be worthwhile to pay for professional insulation installation!
Wow, I never knew that attic insulation was drastically different for places with cold climates. This is probably why my roof hasn’t faired well against the dropping temperatures lately, as I don’t recall ever hearing about how the attic and upper areas of my house were insulated when I bought it from my friend who sold it to me. Once I find an insulation contractor in the area, I’ll make sure to have them pay extra attention to the attic area and do what is necessary to prevent ice dams and freeze-ups.
It’s good to know that improper installation can lead to moisture problems with the insulation in the future. Last night my husband and I were talking about installing new roof and attic insulation for our home within the next month or so. Thanks for helping me see why hiring an insulation professional for the job would be worth the cost!
You might want to add a section on air barriers- I know it is required by code during major remodels (if they require a permit) in some locations and some code enforcement officers / permit inspectors like to see a thick Polyethylene Sheet in place. But this can exasperate moisture issues- unless you install a vapor permeable air barrier. I’ve also seen people who use drywall as the air barrier (but this requires extra prep work- sealing the gaps, etc.). This is the route we ended up using for the renovation of our 1890s Victorian- the 3rd floor didn’t have plaster walls, it used homosote and wallpaper as a wall board- and was in bad shape. So we took that out, replace the blown in insulation (that had quite a few rodent carcasses interspersed) with rock wool and installed drywall. What are your thoughts on air barriers for older home renovations?
Hi Scott,
We have a circa 1926 wood frame – brick face single stall garage with a 4-hip roof that has never been finished. It’s an open frame and located in St Petersburg, Fl. We want to insulate this space and use It as a home gym. The roof was recently replaced with a full adhesive barrier beneath 50-year shingles. The roof frame is full dimensional 2×6 24” oc. I’m hoping to leave the ceiling vaulted.
Initially I was considering closed cell foam however, after giving consideration to the fact that termites could be trapped in there with no way to inspect, and other reasons you cite, I’ve pretty much ruled that out.
Based on what you’ve written here and other sources, I’m inclined to go with the mineral wool batts or denim batts.
My question is the need or not to use proper vents between the rafters and add soffit vents too. Also, does the mineral wool need to be covered or can it be left exposed in this situation?
Thanks,
Bill
Hi, Scott It’s a very informative post. Yes, attic insulation is a very important part of any house. There are several types of attic insulation to choose from. The primary purpose of attic insulation is to prevent heat transfer. Inspecting the attic before buying a home is important. For any type of query related to home inspection services, you can contact 0420 846 356 or visit the Prompt Building Inspections website.
Thanks
My attic is floored. What insulation should I use and how do I install it without tearing up the floor?
I have an old home from 1876 in the Galveston historic district. My issue is with the first floor temperatures during the winter. It’s a pier and beam house with a crawl space. In winter the floor can get very cold. I’d like to insulate under the flooring but am concerned about what could happen if we eventually get another big hurricane that causes flood water to get into the first floor. This has happened about once every 100 years or so. Recommendations please!
Hey Tim! I’m also buying a historic pier & beam home in Texas and I came across an excellent post about this very issue by @buildingsciencefightclub on Instagram recently, in response to our recent deep freeze event. Christine, the architect, owns a historic pier & beam home in Dallas and shares her personal retrofit.
Why didn’t you mention Sheep’s wool? It has awesome properties, such as being safe, easy to handle, and deals really well with moisture. It’s not hard to get either.
I was surprised that you didn’t mention wool insulation. I mean real wool from sheep. I believe there is a dealer in Colorado. Would you care to address this?