
 If you own an old house, you have paint problems…somewhere. It may be from a poor paint job at some point or a paint job that is just too old.
Keeping your house painted properly, especially the exterior, is imperative to the long term care of your house. Exterior elements deteriorate quickly without a protective layer of quality paint.
Here are the four most common paint problems that you may find around an old house and how to fix them.
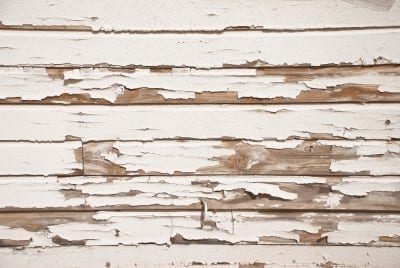
1. Alligatoring Paint
This occurs when oil-based paints have gone beyond their usable lives. As oil-based paints age, they become harder and more brittle.
This makes for a great hard finish on trim, windows and doors, but eventually they become too brittle to keep up with the constant expansion and contraction of wood. Soon, the paint starts cracking in a way that looks like a subway map of Manhattan.
To fix this issue, you have a couple of options.
- Scrape, sand, use chemical strippers or heat to completely remove the old paint. (Caution: When removing old paint from before 1978 you may be exposed to lead dust. Always follow the EPA’s guidelines for safely working with lead paint.) Apply a good primer that is designed for the material you are planning to paint (wood, masonry, etc.), then apply two top coats of quality 100% acrylic paint. (This option will give you a longer lasting paint job than the option below)
- Remove any loose paint and apply a filling primer that will smooth out the surface and fill most of the cracks. Then, finish with two top coats of quality 100% acrylic paint.
2. Peeling Paint
Peeling paint is the bane of old house owners. It can happen without warning sometimes and without specific reasoning. There is one sure fire way to avoid peeling paint (most of the time!), and that is to strip everything down to bare wood and prime before painting.
The two major causes of peeling paint:
- Moisture issues in the substrate
- Too many layers of old paint built up
If you have peeling paint all the way down the bare wood, you have big problems and more often than not it is due to one of these two issues. The only way to fix peeling paint is to deal with the source of the problem.
If it is a moisture issue, find the source of the leak or moisture build up. This doesn’t have to be bulk water, it can be something as simple as too high humidity inside the house or as complex as vapor drive through the walls.
If your house simply has too many coats of paint built up, you may have had a catastrophic paint failure with huge sheets of paint peeling off. This is a unique issue that no one can really predict, but when it happens to you we all feel your pain. The only solution is to remove all the old layers of paint down to bare wood and start over again.
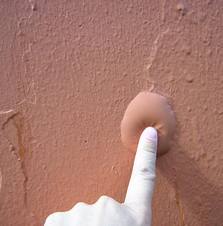
3. Blistering Paint
Blistering paint can be a real pain here in the hot and humid south. There are a few causes of blistering that can be easily avoided if you just prep properly. You must also know when to paint and, more importantly when not to paint. Here are some common causes:
- Painting a damp, dirty, or hot surface
- Applying oil-based over latex paint
- Improper surface preparation
- A moisture source from the other side of the wall
- Exposing latex paint to rain too soon after paint has dried
The solutions are pretty self explanatory. Avoid painting under any of these conditions, and you’ll be sure to avoid blistering paint. For example, try to avoid painting in direct sunlight, especially in hot summer months, and avoid painting when it looks like it will rain.
If you have blistering paint, I’m afraid you’ll have to remove everything down to the layer that is blistering and start over.

4. Chalking Paint
Chalking paint is the one paint problem that isn’t due to something you did wrong. Chalking paint is old paint that has been exposed to sunlight for a long time and it is completely natural. All paint is made up of several elements. Two of the most important are the binder, or resin, and the pigment.
As paint ages, the binder slowly breaks down and the pigment starts to wash away. The paint looses most of its sheen and if you run your hand across it, you’ll get a powdery residue. The chalking paint on your hand is the old pigment coming off since the binder isn’t there to hold it all together anymore.
Chalking paint is part of the natural lifespan of modern paint systems. If your house’s paint is chalking, that means it’s about time for a new paint job. Here’s how to deal with chalking paint on your old house:
- Gently pressure wash the exterior with a eco-friendly cleaner. You need more than just hosing the house down, but you don’t need to be super aggressive with the washing (read about the dangers of pressure washing an old house here!)
- Let the house dry for at least 24 hrs
- Though not absolutely necessary, you can use a quality primer if the chalking is severe even after the cleaning
- Finish with a coat (or two) of top quality 100% acrylic paint
Paint problems usually arise from taking shortcuts or missing issues that need to resolved prior to painting. Good prep is the answer to most of these issues and good prep takes time and effort. Don’t shortcut it. In painting more than anything else, you get what you pay for.
The most expensive paint job is almost always cheaper in the long run.


Founder & Editor-in-Chief
I love old houses, working with my hands, and teaching others the excitment of doing it yourself! Everything is teachable if you only give it the chance.
Help! I just repainted my exterior door with high gloss oil based paint and its mess, some parts of the paint dried with serious drip spots, and in other areas the paint didn’t adhere at all. The original door was mat, and I painted over it with high gloss oil based and it turned out beautiful. What happened this time! How can I fix this, I am willing to sacrifice the the high gloss, for an easy quick fix. The door looks terrible!
I have paint rolling off my walls! This job has been hell! We thought the drywall guy’s sanded properly but when we put the primer on we could see the lines from where it wasn’t sanded. We then had to skim the walls and primer it again, then primed it one more time. Did this cause the failure? If not what and how can I fix this. I was going to sand it down with a Palm sander and strip it and start again. Please let me know your idea.
I live on a tropical island and fortunately, we haven’t encountered any hurricanes(we call them typhoons)in over 10 yrs now. I use a semigloss paint for the exterior of my concrete home and after every hurricane, we get blisters on walls that were blasted for hours by the winds and rain. In my case with frequent hurricanes, will proper preparation prevent blisters?
The blusters may be from wind driven rain getting into inevitable small cracks or pin holes in the paint surface that develop over time or from moisture getting trapped in the wall and trying to escape. Either way it’s tough to know without some testing in your situation. Hurricanes and Typhoons are tough customers!
Just purchased our first older home! Unfortunately, there are a lot of blisters on 2 sides of the house. According to the realtor, house was only repainted 2 years ago. The inspector that looked at the paint said to pop pin holes into the paint to get the moisture out. Have you ever heard of doing something like this? Is my only option to remove all of the blisters and repaint the house? Thank you!
Blisters are often from improper prep before painting. Popping the blisters won’t help as much as removing the blister back to the point of paint that is still adhered well and then priming and painting the patches. Sanding the edges also helps prevent more peeling. If the blisters are excessive it may be worth stripping and repainting the sides of the house that have the worst trouble.
Replace oil paint with acrylic paint? About to remove paint from my siding, repair clapboard and repaint. Trying to decide what paint product/type to use…
Katie, if you’re removing the paint down to bare wood I would recommend priming with an oil-based primer and then painting with two coats of exterior acrylic paint. Use the best paint your budget will allow for exterior. You truly get what you pay for when it comes to paint.
Thanks! This is helpful! I am planning to remove the mostly failing paint layers down to wood using the ultra-violot light paint remover tools. Are you familiar with the AllBeck Lindseed oil paint products? They are expensive but I was considering working on one side of the house each year. Would be much easier for me to find exterior acrylic and oil based primers at Sherwin Williams or Benjamin Moore.
I haven’t used Allback’s linseed oil paints but I am familiar with them. I believe you have to go all the way to bare wood to apply them properly. If you do use them email and let me know your experience. I’d love to have some info about how the perform in the real world!
I have never even heard or seen the last two problems! So far, the outside of our house looks okay, but I’ll definitely refer to this post if anything arises in the future! 🙂
Toni