There is no doubt that metal weatherstripping is one of the best choices for air-sealing wood windows and doors, but which one should you choose? I’ve been restoring wood windows and doors since 2010 and have tried all types of metal weatherstrip and I want to share my years of experience on the topic so you can make a better decision
Compared to other types of weatherstripping like felt, vinyl, or rubber, metal weatherstripping is an extremely durable option that rarely if ever needs replacing. That makes metal weatherstripping the best option for an extremely long-lasting installation (we’re talking 100+ years for any of this stuff!) that you can set and forget on both windows and doors.
Some metal weatherstripping is incredibly DIY-friendly to install and others are a pain the sash. But all of them are by far the most effective weatherstripping on the market despite the higher costs than the throw away materials most people use.
In the sections below I’ll describe the each type of metal in-depth and share some tips and tricks for when to use them no how to install and work with them. Let’s dive in!
What is Spring Bronze?
Spring bronze is one of the oldest forms of weatherstripping and most DIY-friendly. It is sold in rolls of 100 feet typically and can be used to weatherstrip wood doors, double-hung windows, single-hung windows, casement windows, and a slew of other types of wood windows. The installation process is fairly straight forward but can be tedious because it involves installing dozens of nails to hold the bronze in place.
It can be purchased in different widths ranging from 3/4” to 1 3/4” wide, but I have found that in most cases 1 1/4” is a fairly universal size that can be used in almost all applications. Installing spring bronze involves cutting around hinges, latches, pulleys and any other obstruction in the jamb of the window or door which takes some precision and time.
Spring bronze can be used to resolve gaps as small as 1/16” to about 1/4” successfully Though it can be “sprung” at times to resolve larger gaps it does not perform as well in gaps larger than 1/4”.
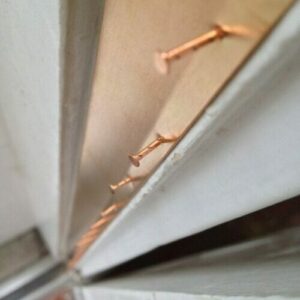
The most time consuming aspect of spring bronze is that it must be nailed approximately every 1 1/2” to 2” along its entire length using either copper-dipped steel nails or solid bronze nails (solid bronze nails are required in coastal regions). That’s a lot of nailing and it can be frustrating if you’re not good with a hammer as you can easily end up with bent nails and dinged bronze in that hard old-growth wood. You can purchase spring bronze in varying lengths in our store here.
The Most Efficient Way to Use Spring Bronze
Over the 15 years I’ve been restoring windows the cost of bronze has gone up ridiculously (as have many metals). Spring bronze is typically sold in rolls of 100 feet which, for some folks, can be a lot more than you need. You’re stuck paying for a bunch of bronze you don’t need.
To combat that we started selling spring bronze cut to size for our customers. Now you can get that sweet spot 1 1/4” spring bronze and only pay for what you need in increments of 10 feet. My hope is that it will save a lot of people money on their weatherstripping and encourage folks to seal up those old windows with a lower cost barrier to entry.
Pros
- Easy to store and transport compact 100’ rolls
- Excellent for sealing 1/16” to 1/4” gaps
- Very attractive
- Can be easily adjusted to fit gap size
Cons
- Requires lots of precise nailing
- Easily kinked if not installed straight
- Poor air-sealing of gaps larger than 1/4”
How To: Install Spring Bronze
Of all the types of metal weatherstripping mentioned in this post I will tell you that from my experience Spring Bronze is by far the easiest for a DIYer to install. It requires no specialized tools like some of the other types of metal. It’s not a cake walk and requires precision, but is far more forgiving than some of these other options.
Below you’ll see the steps with pictures to install spring bronze on a door and then a video of the spring bronze installation on a wood window.
Tools Needed:
Step #1 Cut to Size

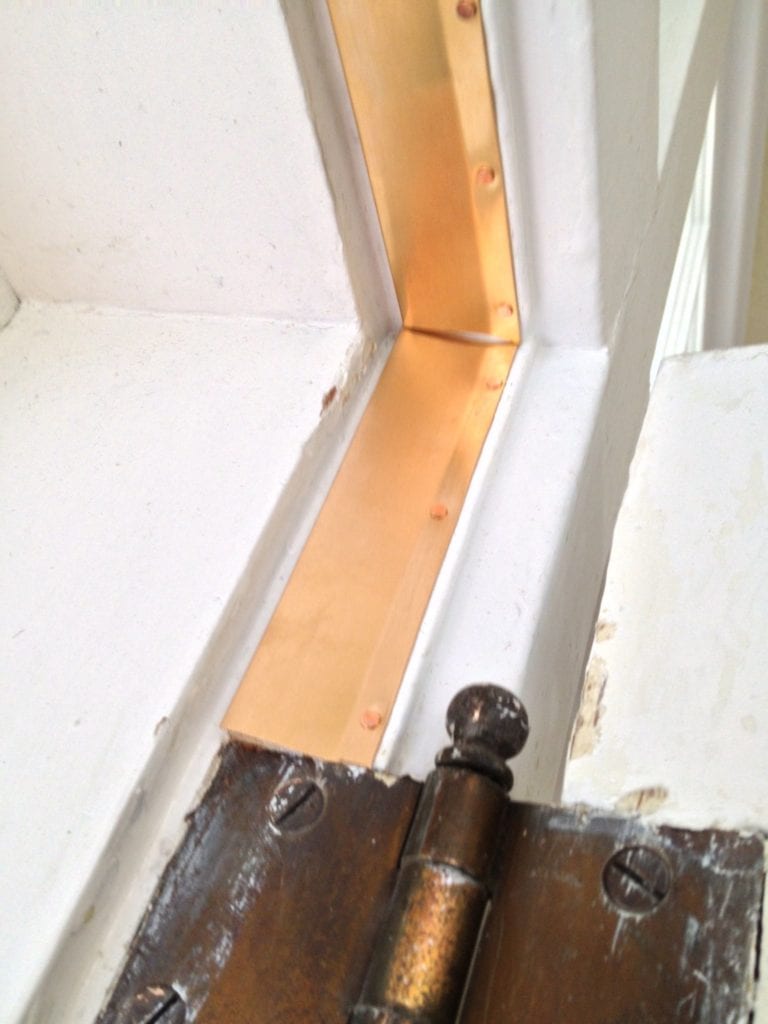
Measure the door openings and using tin snips cut the weatherstripping to length. The weatherstrip needs to go in the rabbet that the door fits into when closed. There is a flat side and sprung side to spring bronze. The flat side goes on the interior and the sprung side faces the exterior so that the door compacts it as it closes.
You’ll need to cut the bronze so that it doesn’t cover and interfere with the hinges or latches.
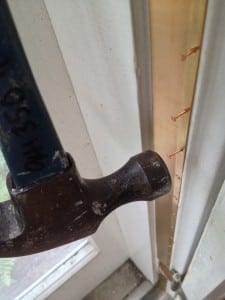 Step #2 Nail in Place

Line up your spring bronze and nail it in from the top down. Make sure you start from one end and keep the bronze straight the whole length so it does not bubble or bind in places. Also, be careful not to nail the bronze too close the the door jamb (see spacing in photo) or it may not be able to lay down completely when compressed.
Your nails should be no more than 2” apart. I prefer 1 1/2” between nails to make sure the installation is lasting. Some people prefer to pre-drill the bronze, but I find that unnecessary if you’re good with a hammer.
Corners require the weatherstripping to meet at simple butt joints.
The nails should be flush with the surface. Run your fingers across them and if you feel any that are standing a bit proud, set them a bit more with a nail set.
 Step #3 Adjust the Fit
Depending on how tight the existing door is in the frame, you may need to increase the spring angle on the weatherstripping or “spring” the bronze to fill the gap.
Use a wide 4” putty knife or 5-in-1 tool to gently bend the bronze to increase the tightness of the fit. Close the door and check for any gaps where you can see sunlight. If you do, open the door and keep going until all light is blocked.
Alternative Installation
Sometimes I have come across windows where the jambs are just too loose and beat up to nail anything even with pre-drilling. In these cases, I have resorted to a battery narrow crown stapler to install the bronze. I’m not going to lie, it goes MUCH faster! But there are a few things to be careful of if you decide to go this route.
- Use only 3/4″ stainless steel staples – Anything longer than that can get in the way of the moving weights behind the jamb. These nails will be exposed to the weather so if they aren’t stainless, they will rust and loosen their hold in a short time. Also, anytime you put two different types of metal together, you run the risk of galvanic corrosion which causes the metals to rust and corrode prematurely.
- Test the depth on your nailer – It is very easy to blow right through the thin bronze with a battery or pneumatic stapler. Test a few strips to find the right air pressure and depth.
- Still put a nail at the top and bottom of the bronze. The coppered nails hold better than pneumatic staples will. The two spots that are most likely to pull away are the end of the bronze so put a nail in those spots to make sure it doesn’t pull away in the future.
There is also a strip of bronze that can be installed at the meeting rails between the two sashes, but I rarely use it since I have found that by simply adjusting the sash lock, I can achieve a good enough seal to avoid this added expense.
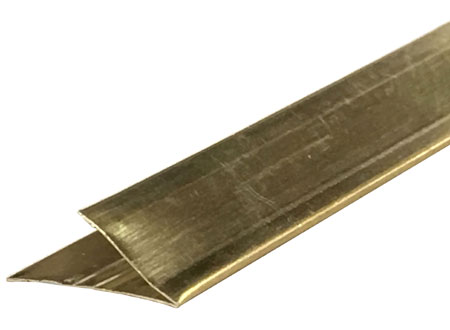
What is V-Bronze?
V-bronze, sometimes called “cushion bronze” is extremely similar to spring bronze except that its form is essentially an extra wide spring bronze that is doubled over on itself. This type of weatherstripping is extremely effective at resolving larger gaps from 1/8” upwards to 1/2”.
It is sold in specific straight lengths, the most common of which are 3, 4, 7, or 8 foot lengths. Unlike the roll of 100’ like spring bronze you have to specify a length of v-bronze when you order and you may end up with more waste because of that.
Like spring bronze it is also available in a variety of widths ranging from 1/2” to 1 1/8” of which I find 3/4” to be the most useful and a happy compromise since it can fit in most applications and avoids overlapping of elements within the jamb like the larger widths do.
Due to its design, v-bronze requires fewer nails than spring bronze which is a welcome relief to many installers. Even though manufacturers still recommend nail spacing in the 1 1/2” to 2” I have found in practice that nailing once every 8” to 10” and one on each end is more than sufficient to hold it securely in place. Trust me and save the nails. You’ll want to use them same special coppered or bronze nails as with spring bronze for installation.
Pros
- Easy to keep perfectly straight at installation
- Excellent for sealing 1/8” to 1/2” gaps
- Available in more narrow 1/2” width for tight spaces
- Simplified nailing compared to other options
Cons
- Generates more waste due to pre-cut sizes
- Will not fit gaps smaller than 1/8”
- Requires caution to transport without bending or damage
How To: Install V-Bronze
There is very little difference in the installation techniques between spring bronze and v-bronze except for the nailing patterns. With v-bronze you can follow the exact installation instructions above, but use the image below of a properly nailing setup as a guide for you.

Interlocking Metal Weatherstripping
Interlocking metal weatherstripping (sometimes called integrated metal weatherstripping) is the mac daddy of the weatherstripping world. It is extremely effective, very long lasting, and pretty dang difficult to work with.
Of all the metal weatherstrips mentioned so far this type is by far the best at air-sealing (aka draft blocking). Your return on investment for this type of weatherstripping may be long in coming though since the cost of installation can be steep. Interlocking metal can cost $300-500 to install new as opposed to spring bronze which can run about half that much.
Installing new integrated weatherstripping on a window that did not previously have it is beyond the scope of this post, as it requires precise modification of the sash with routers and very careful templating which in IMHO should be left to a pro.
However, restoring a window with this type of weatherstripping requires some additional knowledge that I can share with you about how to safely remove and reinstall both the sash and weatherstripping without damaging the weatherstripping. That way you can reuse it and reap the benefits. Let’s look at some of the tools you need to get the job done properly.
Tools Needed:
- Hammer
- Trim Pry Bar
- 5-in-1 Tool
- Needle Nose Pliers
- Nail Set
- Cat’s Paw Pry Bar
If you’re a more visual learner, and who isn’t these days , then you can see the whole removal process in action in the video below. I don’t cover the whole restoration process of the window jamb and sash in this post or video, but you can watch the whole step by step process in my intensive, self-paced teachable course called The Window Course where you get all the goods on restoring historic windows.
How to Remove Window Sash
It would seem that a sash with this type of weatherstripping are permanently stuck in the jamb since it appears to be trapped in the weatherstripping fins on the sides, but that is not the case. There are just a few more steps before you can remove the sash without damaging it.
The first step to any of this is to have both sash cut free of excess paint or caulk, because the sash need to be able to be moved up and down during this process to access the nails on the metal weatherstrips. So, start with getting the sash at least somewhat moveable again if they are stuck, and then you can proceed with removal.
If you’re not sure how to do that then checkout my resource page DIY Window Restoration for detailed instructions. In this post my focus is on the special consideration for working around this unique metal weatherstripping.
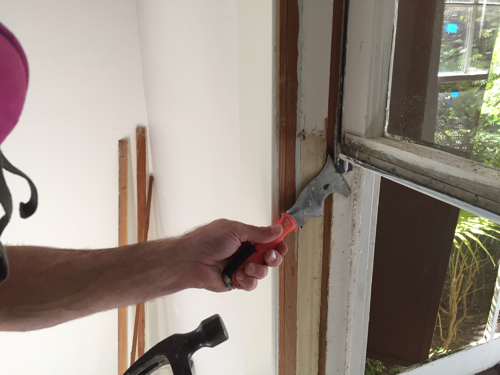
Step #1 Remove Stops
Just like on any other other sash, remove both interior stops by scoring the paint and prying them off the jamb.
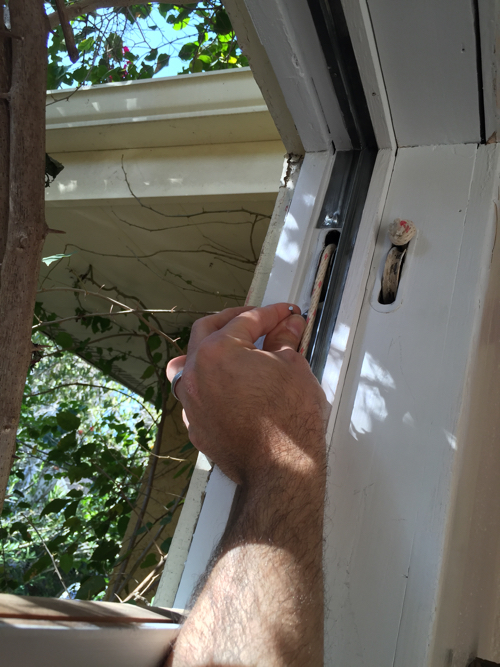
Step #2 Remove Lower Sash & Weatherstrip
Make sure the bottom sash is in the lowest position possible so that you can access the the top portion of the metal weatherstrip on each side of the bottom sash. You should see one small nail at the top of the metal. Slide your flat pry bar or 5-in-1 behind the weatherstrip in this area and gently pry the metal out so that the nail pulls out from the surface a bit. Then, push the metal back, leaving the head of the nail proud of the surface enough that you can pry it off with your cat’s paw pry bar or a pair of needle nose pliers.
You have to be gentle with this weatherstripping because it is very thin zinc, which is relatively soft and can tear and bend easily.
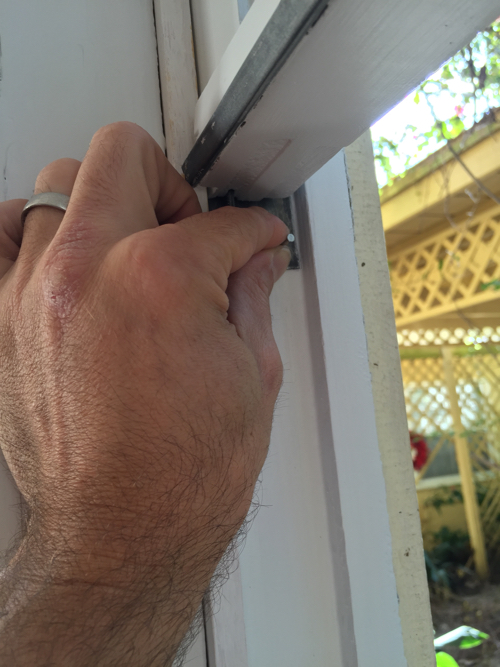
Once the top nail is removed on both the right and left side of the jamb, raise the lower sash up enough to reveal the lower nails (usually just one or two toward the bottom) and follow the same procedure above to pull the nails out.
If you can’t get these nails to pry out, then the fail safe option is to use your nail punch to punch them into the wood through the weatherstrip so that the weatherstrip is now free of the nails. It may have a small nail hole in it, but that won’t affect the performance.
Once both weatherstrips are free, you should be able to slide them up over the stool and get the sash out of the jamb along with the weatherstrips. Cut or disconnect the ropes and your bottom sash is free. Label everything so that you know where it goes when you reinstall.
Step #3 Remove Upper Sash & Weatherstrip
Start by removing the parting bead on both side of the jamb, then make sure the top sash is in the uppermost position and using the same procedure above, remove the two lower nails from the weatherstrip on each jamb. There should be enough space to use a cat’s paw to pull the nails out once they are clear enough from the surface.
Lower the upper sash to reveal the one or two upper nails, which will be located near the top of the jamb and around the pulley. Pry and remove these nails the same as before from both sides.
Cut or disconnect the ropes and remove the upper sash from the jamb along with the weatherstrips. Be carful that the weatherstrip does not fall, as it can be harmful to you or to the sill, stool, or hardwood flooring upon impact. Mark the location on the backs of each piece.
Step #4 Restoration of Weatherstripping
Once you have the sash out, you are ready to follow the sash restoration process that I teach in The Window Course with a couple of additions. There will likely be an interlocking piece of metal weatherstripping on the meeting rail of both sash that mates when the sash are closed.
I leave these in place because there is no reason to remove them. They can be cleaned up and realigned to make sure that they fit into each other without kinks or other problems. These can be easily bent if you’re not careful and before installation, double check to make sure that they are still lined up and free of any paint or other gunk that would impede operation.
I also leave the piece of weatherstrip on the top of the jamb and on the sill to be cleaned of paint in place and sanded smooth again. There is no reason to remove it and it usually causes more issues when it is removed because you’ll need realign everything later.

I also take this time to clean up the old weatherstripping with 0000 steel wool to clean off any paint or dirt and make them more attractive and ease the operation when they are reinstalled. Bend back any kinks and get them ready to go back in.
Step #5 Install Upper Sash & Weatherstrip
Installation is made much easier with a helper to hold things in place. You can do it on your own, but it sometimes feels like you need three hands.
Start by installing both the upper and lower sash weatherstrips on one side of the jamb first (only do one side!) Nail them back where they went using the same or similar sized nails as they were originally attached with and nail in the same locations roughly. Then, install the parting bead on that same side.
Attach the ropes to the upper sash on both sides. Tack the rope in place on the sash with a nail for added security to keep it from pulling out.
While holding the loose piece of weatherstrip in the groove along the edge of the sash, slide the sash into the weatherstrip previously nailed onto jamb and pivot the sash into place against the blind stop. The loose weatherstrip should be pushed to the top of the jamb and fit against the weatherstrip on jamb header. Nail off the top of the weatherstrip at the top and around the pulley like it was previously attached.
Raise the sash all the way up and nail the bottom portion of the weatherstrip. Insert the remaining parting bead and test the operation of the top sash.
Step #6 Install Lower Sash & Weatherstrip
Following much the same procedure as above, attach both ropes to the lower sash and tack the rope in place with a nail for security.
While holding the loose piece of weatherstrip in the groove along the edge of the sash, slide the sash into the weatherstrip previously nailed onto the jamb and pivot the sash into place against the parting bead. This time, the loose weatherstrip should be pushed to the bottom of the jamb and fit against the weatherstrip on the sill. Nail off the bottom of the weatherstrip where it was previously attached.
Lower the sash all the way to the sill and put a single nail in the top of the bottom weatherstrip. This one is usually a tight fit, so a nail set is best for getting this nail fully set.
Check that all nails are fully set but not punching through any of the metal weatherstripping.
Install the two interior stops and then test the operation of both sash to ensure that you’ve got a smooth up and down. If you need to tweak the fit of the interlocking pieces on the meeting rail so the sash close fully, this is a good time. Also, it’s possible that the alignment is not perfect for the sill and header piece of weatherstripping that you left in place. They may also need to be tweaked a bit as well.
Lock Strip Metal
This unique little piece of weatherstripping is designed specifically to seal the lock set on a door since you cannot install spring bronze, v-bronze, or interlocking metal in this place. Lock strip 27b (not the coolest name, but it works) comes in lengths of 1-3 feet and needs only 2-4 nails depending on the length of piece you use.
The installation is pretty effective at sealing this joint and not getting in the way of the operation of the door, but I have also used it effectively to weatherstripping double hung windows too. Let me tell you how I do it.
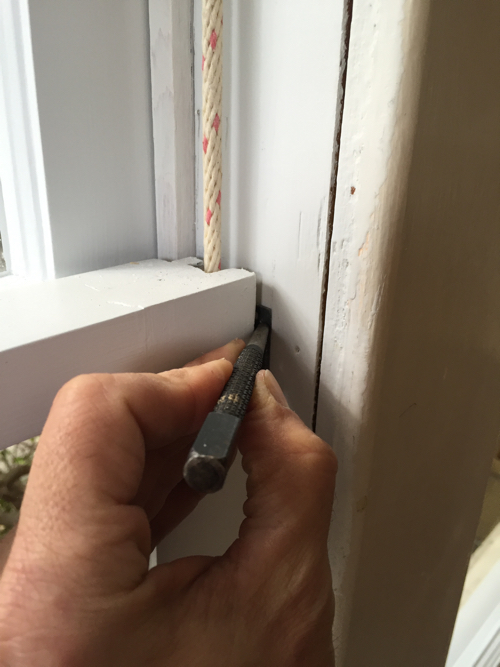
Sometimes double-hung windows get “slop” in them meaning they are too loose front to back. Spring bronze and v-bronze can resolve side to side slop but not front to back. That’s where the lock strip comes in.
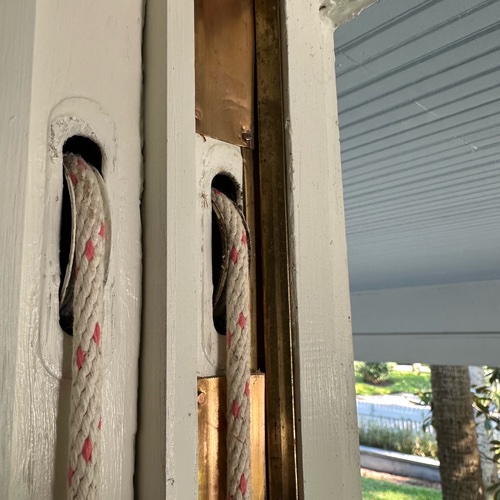
You can install install a length of lock strip on the window jamb on the backside of the blindstop like in the picture above to resolve the front to back slop and also seal against the pulleys which no other weatherstripping can effectively do.
I haven’t tested the efficiency of it, but I would venture to say that it could be used in place of any other type of metal weatherstripping to effectively seal wood windows with minimal effort. I’ll be testing it soon and let you know the results.
Final Thoughts
For the money, metal weatherstripping really is the best you can get. It’s as effective in year one as in year 100 and there aren’t many products that can make that claim and live up to the hype. If you’ve got wood windows or doors I would recommend using any of these products to seal them up and achieve the incredible efficiency these windows and doors really are capable of.
For historic windows and doors you can find all your weatherstripping needs as well as any other old house tools and supplies in The Craftsman Store so stop by and take a look around to make your restoration project easier today.

Founder & Editor-in-Chief
I love old houses, working with my hands, and teaching others the excitment of doing it yourself! Everything is teachable if you only give it the chance.
I installed one piece of bronze weatherstripping on the vertical (hinge side) of my front door jamb. I carefully “sprung” it and it looks good and seals perfectly. How do I eliminate/reduce the unpleasant noise it makes when the door is being closed? It’s a metallic crinkling noise. If I add the weatherstripping on the top and latch side it’s really going to sound obnoxious.
I have the same problem on my windows. Crinkly and squeeky every time I open or close them. They’re also windows are also quite stiff. Does this go away over time one the stripping is broken in?
You do this all the way around the door frame? (Minus the threshold, of course)
That’s right Austin!
ALL the way around except for the threshold? Taking a closer look at the photos, I don’t see it over the hinges. I installed mine in one long piece on the hinge side of the jamb and had annoying noise problems from it “oil canning.” I’ll try it again but will not run it over the hinges.
I often find it over the hinges but I prefer not to because I have found it to bind and then it makes it impossible to remove the hinge for any reason without destroying the weatherstripping.
Thanks, Scott. I tried a second time on the hinge side of the jamb, this time not covering the hinges. My thought was that the lack of unsupported weatherstripping there would prevent the “oilcanning” noise. I wasn’t successful. I then decided to practice attaching spring bronze weatherstripping to a less-noticeable doorway but those attempts on the hinge-side and top were no better despite my varying the technique of nailing the whole strip loosely with a couple of nails at the middle and bottom then returning to the top to pound a nail in tightly in every hole. I also tried loosely taping the bottom end of the strip to the jamb to keep it under control while putting nails in tightly beginning at the top. Nothing helped. I’m 62 and have been successfully doing handyman jobs since I was a kid but this is my first attempt at using spring bronze. A hardware store clerk said to start at the top and nail each pre-punched hole, being sure that the metal was very tight before proceeding to the next. I’ll try that.
Chepp, you can do it! It can be a little tricky, but I know you can do it.
I discovered my problem: as I nailed in the spring bronze, it curved (about 1/4″ in 3′) toward the nailing edge. I successfully installed it by starting at the center and locating it about 1/8″ (half the curve distance) closer to the exterior. I carefully nailed alternately toward the top and bottom and did NOT try to keep the nailed edge straight. By letting the nailing edge go where it wanted to go it didn’t distort the flange area and thus didn’t have the oilcanning noise problem. No one will notice that the nailed edge isn’t perfectly straight (1/8″ off over 1-1/2′).
Yay!
I no longer install the flat bronze on the hinge side. Hinges cannot be maintained and tightened, and often hinges are decorative and therefore should not be covered. Install a V-shaped bronze, 1/2 inch in most cases, between the doorstop and the hinge, with the open side of the V-shape toward the exterior. Of course, flat bronze can be cut around hinges as shown in this article, but then you have huge gaps through which drafts can pull, which defeats the entire purpose of weatherstripping. V-shaped bronze solves all of these problems.
Can or should this be used on big push out bay windows? They have a bracket hinge on top and bottom with a handle turn-latch on the inside.
It can be used on almost any type of window.
I messed up and installed the bronze in the wrong place! I thought I could pull out the nails and bronze together with pliers. But the Kilian bronze just tore into pieces with the nails unmoved. After cutting my thumb on a bit of ripped brass under a nail, I realized I have no idea how to get the nails out! Any ideas?!
Ouch! I’ve done it too Sarah and it’s no fun. I usually year the bronze off which leaves the nails in place and then take a nail set and set the nails back flush with the surface or counter sink and fill them. They are so small it’s almost impossible to get them out.
I’m sure you’ve long since solve this problem, but if you drive a thin, flat, prybar underneath the bronze and up to the head of the nail and pry outward, the bronze and nail normally come off together. Where nails are left in the wood after bronze removal I use a pair of electrical side cuts with a sharp point, push it under the head of the nail into the wood, and pry. The nail comes out easily. Fill pry-gouges with wood filler or cover with new bronze.
Driving the head of a nail into the wood increases the likelihood that you will hit the head of the nail with yet another nail when you are installing the actual bronze afterward, bending the new nail over and damaging your new bronze, causing you to have to remove it yet again 🙁
My old spring brass weatherstripping had nails every 6-8 inches. Why do you place them at 1.5-2 in.?
Is your weatherstripping spring bronze or integrated metal weatherstripping that fits into a channel on the sash? If so that explains the difference. If not I guess someone just installed it with fewer nails. The manufacturer recommends at minimum 2″ so that’s what we do.
Thanks, Scott. Previous weatherstripping was spring brass, and was probably installed in mid 1960’s.
The entry door on our 1920s Gainesville, FL bungalow has a metallic spring-type weatherstripping installed on hinge side and top door jam. The latch side of the door does not close tightly against the door stop. I suspect the problem may be that the weatherstripping covers the hinges and prohibits them from closing tightly. Is there something else I should look for before I start cutting the weatherstripping around the hinges?
It could be any number of things John. If you can watch the weatherstripping as the door closes to try to see what is binding it might give you some clues.
I’m having this problem, too. Were you able to resolve the issue?
I used a single piece of bronze across the entire hinge side of the doorframe. If the problem is the bronze, that’s the best way to remove the bronze from over the hinges?
Otherwise, is there a way to determine what else might be causing the problem? I can see that the door no longer fits quite flush with the jamb on the lock side. I’m sure one cause could be the bronze over the hinges.
Thanks!
Thanks for all this great information!
What if we have some old paint inside the window frame? Some of our windows are painted and look a bit “alligatory.” Can I put the weatherstripping over the paint?
Marly, you can, but since the paint is failing underneath I would recommend pairing first to protect the wood long term.
Good deal. I will hold off for now on the painted ones and focus on the bare wood ones.
I have a curved wooden door that leaks a ton of air but gaps are not even and door swells during the summer so fit is much tighter during warm weather. I have been looking at spring bronze weather stripping but am wondering if there is a max curvature it can be installed around and if it will interfere with door closure during the summer months when door is swollen.
Vicki, I would plan down the jamb so that it is level all the way around and then install weatherstripping. Spring bronze can be installed on a curved door, but it has to have kerfs cut into it to make the bend without kinking. Whatever you do it will bind in the summer until you shave the jamb down evenly though.
Hi, you reply to mrs vicki curved door weatherstripping has me puzzled? Plane down a curved door jamb? don’t get it? Metal can be installed on a curve jamb, takes time and patience. Please clarify.
Sarantos, if the door is sticking then the curved door itself should be planed down to fit the jamb. As for installation of spring bronze on a curved jamb check the picture at this url. http://ep.yimg.com/ca/I/kilian_2270_313404318
It shows how the bronze should be notched to allow for the curve.
My door and jamb(?) is 1 3/4 inches thick. Is that the width of weather stripping I should use? Or should I use the 1 3/8 inch stripping?
The rule of thumb is to use the same thickness weatherstripping as the door or window you’re working on. So 1 3/4″ is great though you can get away with a smaller size with no harm if you already have some.
How do provide for lockset opening? I have cold air coming in.
Richard, there is a piece that is designed for the locket area from Kilian’s. Here’s the link: http://www.kilianhardware.com/sprinbronloc.html
Do you sell or recommend a spring bronze product for the jam side of a steel door & frame ? Which adhesive would you recommend ? Considering J-B Weld.
CR Haven’t tried on a steel door so I’m not sure.
Preparing to install bronze weather-stripping on our arched door frame. Any suggestions regarding avoiding kinking?
how do we avoid kinking bronze weather stripping on our arched door frame?
Cut kerfs into the bronze every few inches or more depending on how tight the curve is.
Thanks,
RWS
Alright, I managed to put the bronze up around my front door, it’s in good shape. But, there’s still a gap around the latch and the deadbolt portions that I’ve skipped. Is there something I can do with the remaining few feet of bronze (bend it, etc) to block the cold air coming in through the small sections near the latch/bolt sections?
Try this product. Works great! http://www.kilianhardware.com/sprinbronloc.html
Some good information Scott!. Just a quick tip on a good way to put more “spring” into the bronze is to run something narrow( I usually use the tip of a nail set) down the crease of the bronze. It will cause the bronze to spring outward with good tension on it and avoid pulling at the nails.
Doors can be very tricky also as the tolerance may not be there for spring bronze (and you won’t find that out till you install it). I prefer a kerfed in wood stop with a gasket seal. This allows you to work with warped doors also.
Great tips Steve!
Scott-
We have an old 1927 Georgian Colonial in the SF Bay Area. The over sized front door is original to the house and I’ve been working hard to save it. However, since 1927 the house has settled and the door no longer hangs plumb, the door itself might even have a little warp to it. Due to extensive other repair work, I currently don’t have the funds (or desire) to remove the door stops and framing. What I did do was have the door removed, painted AND had the old interlocking bronze strips removed from the door jambs, as the door was no longer able to close easily due to the interlocking bronze no longer matching up (due to door/door frame movement). I left the bronze mates on the door sides and header b/c it would have been too extensive to remove them from the door. I wouldn’t think they would interfere with any weatherstripping we now apply. Although the door now opens and closes easily, I now have varying gaps along the sides of the door. I thought I would install the spring bronze you have referenced here, but wonder if it is good to use with varying gap widths? My alternative is to use a Pemko gasket product, S773. I’d love to hear your thoughts.
I meant to ask one more question: What about when it comes time to re-paint the door jamb? Do you take it off and re-nail it into the same holes? Or just paint it? Or just paint carefully around it? We have the original spring bronze on part of the front door, and it has been painted a billion times and seems a bit brittle (not as flexible) as a result. But it does still seem to work, so maybe painting is ok?
Though paint won’t ruin the bronze I would try to avoid painting it because it does lessen its effectiveness. Don’t try to remove it once it is nailed in. You’ll destroy the bronze and it’s almost impossible to get the little nails out.
Hi Scott,
My door swings out (outswing door!). Should I reverse the nailing pattern for the spring bronze?
I’m really hoping my 1 3/4″ spring bronze will fill the 1/2″ gaps around my door!
Thanks for your thoughts
Sarah, the weather stripping should be nailed on whichever side the door closes from. If it opens in then nail on the inside. If it opens out then nail on the outside.
That must have sounded like a really stupid question! What I meant was, on an outswing door, should the nails (rather than the sprung bit) be toward the outside or inside of the strip. It only makes sense to me to put them towards the outside, so the sprung part is not caught when the door closes. I just wanted to double-check that there isn’t a totally different way to do an outswing door.
Not stupid at all. Yes, on an out swing door the nailed portion should be to the outside.
Trying Spring Bronze later today on my tudor-style arched door. What should I do about the hinges, just skip it and continue? Was thinking of having one continuous piece. What do you do about the strike/latch side of the door?
Skip the hinges. If you weatherstrip over them they will bind. For the latch area there is a piece you can buy from Kilian’s Hardware online to cover that. It’s not entirely necessary, but if you really wanna seal the door up well, buy the latch kit and install it too. Good luck today!
Thanks. Haven’t tackled it yet. Still scraping/sanding/etc, takes a long time when you spend more time chasing around the kids, there’s just not enough hours in the day.
I’ll look into the latch piece, thanks.
I’m a little concerned at this point that the door will be too snug – it seems like it’s rubbing near the upper right corner. Either way, about another week or two and we’ll be good to go with this.
Thanks again for the advice.
Have you ever used any products from accurateweatherstrip.com
Their window weather stripping seems to be a good long term solution. My only worry is attempting something like this with no prior experience. Would you recommend trying it on a practice window?
Max, I have not installed any of their weatherstripping, but we have serviced windows with the interlocking weather stripping. In my opinion, the performance is better with interlocking but the installation is much more precise and difficult. I would definitely practice on an extra sash until you feel confident. Once you start cutting channels into your old windows you wanna know what you’re doing.
I think you read my mind sometimes! I was just looking into weatherstripping our doors before it starts getting cool. Great post!
Glad to help Toni!