

I’ve been posting for years on this blog about DIY window restoration. It’s something I’m extremely passionate about and I love the process because it is so straight forward and very attainable by any DIYer. By restoring your own windows you can save tens of thousands of dollars and avoid the The Replacement Window Myth trap that catches so many owners of old houses.
Once you’ve learned the benefits of restoring your own windows I promise you’ll never listen to the replacement culture again. It’s impossible to live in a lie when the truth has been known.
I’ve written 2 books on the topic of window restoration with Old Windows Made Easy and my more comprehensive follow up Old Windows In-Depth, so I wanted to collect all the scattered posts and information I’ve learned over the years into one epic guide/post for you to bookmark as a reference. Of course, buying one of my books is always a more comprehensive way to learn the content, but next to that I aim to make this post the most comprehensive guide on the internet for the DIYer or aspiring window restorer.
I’ve also launched a service with my other company Austin Historical called DIY Assist where we send you a care package of the tools and supplies you need to restore your windows as well as providing hours of coaching, with me or one of my Window Pros, to really help you get the job done! You can purchase one of our DIY Assist Kits by clicking here.
For those wanting to go it alone I’ll walk you through the whole process from start to finish in order with videos throughout to help you learn the skills and tips you need. You can also purchase all the tools and supplies you need to restore your windows in the Window Supplies section of my store. Let get started with a quick dive into the “Why” of window restoration first and then we’ll get our feet wet on the “How”
Why Restore Your Old Windows?
I could write another book on just this topic! The basic idea is that historic wood and steel windows are really made to last unlike modern replacement windows which are built with elements that are designed to quickly become obsolete and fail resulting in a continuous cycle of replacement.
It’s the simplicity of historic windows that is their strength. Wood, putty and glass. That’s really all a historic window is! And when you use old-growth wood like most of these windows did that wood can last indefinitely due to its extraordinary ability to resist decay or damage. Glass never wears out (save for a stray baseball) and even when it does break it is readily available and can be easily and inexpensively replaced. Double-paned glass is not the same. It has a very finite lifespan (usually 10-20 years and then it must be replaced once the seals fail and it fogs up and looses it’s effectiveness).
The same goes for the rope and pulley or simple hinges used on old windows. When the balance system fails on a historic window that means replacing a length of sash rope which is a whole lot easier then hunting down a replacement spring balance thingy that one window company discontinued making 12 years ago when they changed models. The more complicated these windows become the easier they are to foul up.
Lastly, let’s talk about the environmental impact. Throwing dozens of old windows in the landfill for new units made from vinyl or some other non-renewable material isn’t a good choice for the planet. You may think that the improved energy benefits of new windows will more than balance out the waste, but I’ve disproved that theory quite comfortably in this post. Not to mention that a study by the Window Preservation Standards Collaborative showed conclusively that weatherstripped historic windows with storms can be easily made to exceed the 2012 energy code requirements.
Now that you know why you should restore your old windows let’s get into the nitty gritty. I’m assuming you like getting your hands dirty because while window restoration isn’t technically difficult it is labor intensive and requires you to get dirty!
Tools
There are links throughout this post to the individual tools I use in the window restoration process. Some are available in our store and other you can find on Amazon. Below you’ll find a list of the Amazon listed tools and supplies to simplify the buying process for you if you want to pick up some of these tools yourself.
Step 1 Lead Safety
Old window built before 1978 have a good chance of containing lead paint. You can either test for paint using a simple lead test or you can assume it has lead and work safely as I’ll prescribe below. This is especially important for pregnant women and children under six whose bodies are affected much more seriously by lead poisoning. Please be safe.
Working Outdoors
Outdoor containment isn’t nearly as difficult so we’ll talk about that first. The goal here is the keep lead paint from getting into the dirt and plantings around the house that little children might be tempted to play in. You want to be able to wrap everything up and not be picking pieces of old paint out of the dirt for the rest of the day.
- Choose a relatively calm day with low wind to do exterior work.
- Lay down 6 mil plastic within a 10 foot perimeter of the area you are working.
- For extra safety place some stakes and caution tape or rope to mark off the work area and keep passersby from entering it.
- Pro Tip: Staple the plastic to a 2×4 and lay that right up against the building. This will keep the plastic from bunching up or leaving gaps right next to the building. This is where the most debris will fall so you want it covered well!
- When finished mist with water and roll up the plastic (keeping the small debris like paint chips inside it) and place it in a contractor bag or other thick walled plastic trash bag. Roll the neck of the bag into a gooseneck and tape it shut.
- Using a HEPA vacuum, clean off work surfaces and wipe them down with TSP to make sure they are free of any remaining dust.
- Dispose of the bag with normal trash. It does not need to be disposed of as hazardous waste contrary to what a lot of people think.
Working Indoors
This is where things are more complicated and you need to be more vigilant about your containment and cleanup.
- Remove any furniture within 6 feet of your proposed work area.
- Tape down 6 mil. plastic in a 6′ perimeter around your work area to protect the floor.
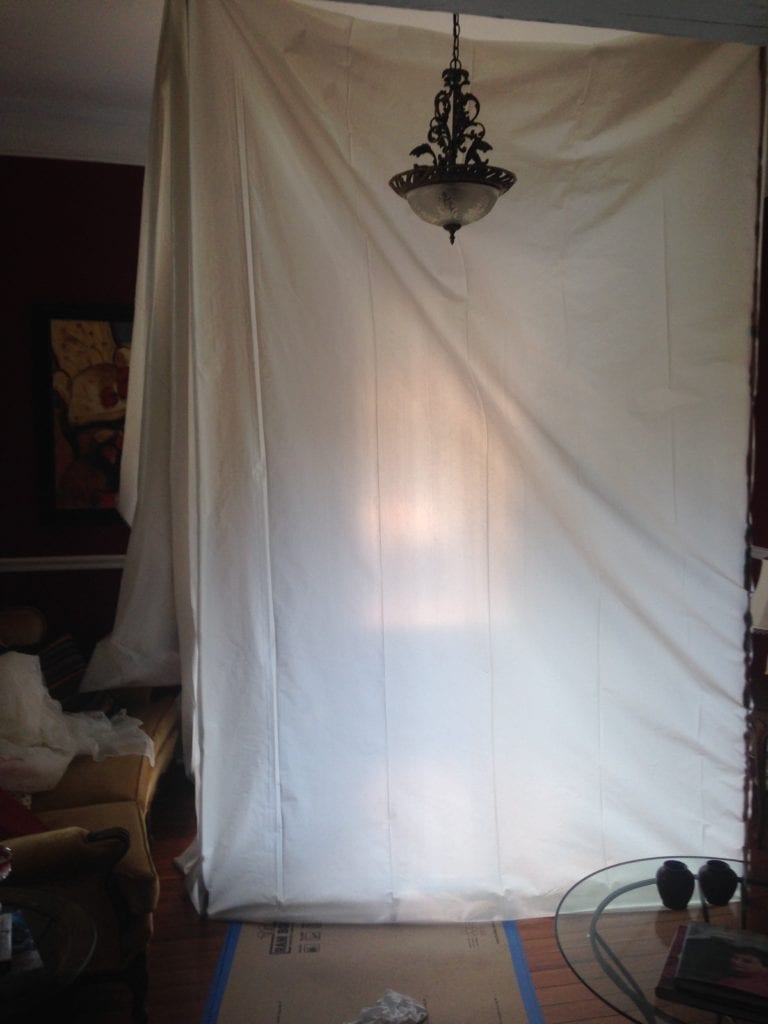
- You can use painter’s tape and plastic from floor to ceiling but I prefer using a zip wall system to quickly stretch plastic from floor to ceiling. It’s much easier and unlike tape which can start falling down, the zip wall holds everything tight. You can also get zippers that attach to the plastic to create an easy access door in and out of the work area. Trust me on this, it’s worth the extra expense if you are doing more than one day’s worth of work.
- Plastic or completely tape over any HVAC vents or returns within the enclosed area and turn off the HVAC system while you are working. This may seem like overkill, but you don’t want to be circulating lead containing air around the house.
- Tape over any electrical outlets as well since dust can settle into those little crevices. It will make cleanup much easier.
- Set a damp towel on the floor just outside the entrance to the work area. This will prevent you from tracking any dust or debris out of the work area as you need to come and go.
- Once you’ve finished with all the work, mist down all the plastic, roll it up dirty side in and place it in a contractor bag or other thick walled plastic trash bag. Roll the neck of the bag into a gooseneck and tape it shut.
- Using a HEPA vacuum clean up ALL the surfaces (walls, floors, trim, etc.)
- Wipe down ALL the surfaces with a rag moistened with TSP. You may have to do this a couple times until the rag comes out clean. Think of the white glove test.
PPE (Personal Protective Equipment)
Lead safe work practices are not just about protecting the other people living in the house. You need to protect yourself since you’ll be front and center making dust and tearing things apart. There are lots of options to keep you safe and a lot of it is personal preference, but I’ll give you the basics that you need to address before starting any project.
- Goggles or safety glasses – These aren’t specific to lead hazards, but you should protect your most vulnerable and important feature when doing any work.
- Respirator – A standard dust mask won’t cut it. You’ll need at minimum a P100 or N100 respirator. They make disposable masks that work great or the respirator I use is a bit more resilient and you can find it here if you’re interested.
- Coveralls – A full body suit isn’t necessary if you aren’t doing this as a career, but it can still be helpful to keep your clothes free of lead dust. If you don’t wear a suit then be sure that you wash any contaminated clothing separately and keep it away from any children.
- Shower – What’s the first thing you do when you’re done working? Take a shower and wash off thoroughly. You want any traces of lead safely washed down the drain before you do anything else.
Low-Dust Work Techniques
Last but not least, you need to work safely. Some techniques create way too much dust. Others can vaporize lead rendering your respirator worthless. Moral of the story…work safe. Here are some major Do’s and Don’t’s when working with lead paint.
Don’t
- Use grinders, power sanders, planers, sand blasting or other abrasive power tools without a HEPA vac attachment.
- Use high-heat paint removal (torches, heat guns, electric heat plates, etc.)
- Wet surfaces when using power tools due to the risk of electrical shock.
Do
- Use HEPA vac attachments and dust collection shrouds with any power tools.
- Use low-heat infrared paint removers (Speedheater Cobra, Silent Paint Remover or similar)
- Use chemical paint strippers.
- Wet surfaces prior to using pneumatic tools or hand scraping to help control dust.
- Use steam heat for paint removal.
I do want to clarify a couple things about using heat for paint removal. Low temperatures can be safe for paint removal. Anything below about 1,000° F is generally considered safe for lead paint removal. Temperatures above that point can cause the lead to vaporize which creates an enormous health hazard.
Not to mention that using high temperature paint removal techniques can also lead to house fires. Not just in the moment, but sometimes hours later smoldering building components can finally burst into flame. In my opinion, high heat means high danger!
Step 2 Remove Window Sash
The first thing you need to do in order to restore or repair your double-hung windows is get the sash out of the jamb. You can do some of the work in place f, but for the most thorough restoration removing the sash is best. Depending on how much built up paint and caulk there is, this may be simple or difficult. Get both the bottom and top sash out before moving onto anything else.
Remove the Stop

The first thing you need to do in order to restore or repair your double-hung windows is get the sash out of the jamb. Depending on how much built up paint and caulk there is, this may be simple or difficult. Get both the bottom and top sash out before moving onto anything else.
The first piece to remove is the stop. This is a small piece of trim that is usually nailed in place along the side of the jamb. Some stops are screwed in place, which will have to be unscrewed and then gently pried off. You want to avoid breaking the stops since it can be hard to find matching profiles today, though if they do break, they can be replaced with stock moldings available to most lumber yards or home stores.
The window stop was designed to be removed to service the window, so don’t worry that you are doing something wrong by prying this piece off. What makes it difficult is usually decades of excess paint or unnecessary extra nails by an overzealous handyman.
To get your sash out, you only need to remove the stop on one side, but you can remove both if you want to clean them up more thoroughly.
- Gently score the paint between the stop and, the jamb and the stool and the sash with a razor knife being careful not to gouge the wood. Don’t cut too deeply, just enough to cut through the paint bond.
- Using a trim pry bar or firm putty knife, gently pry the stop away from the jamb. Some stops will be installed using screws and washers instead of finish nails. These must be unscrewed.
- Remove any remaining nails from the stop with a nail puller by pulling them through the back side of the stop.
- Scrape the backside of the stop that runs against the sash with a carbide scraper to clean away any built up paint or caulk.
- Number the back of the stop to go with the corresponding window and set aside for reinstallation later.
- Pull any remaining nails that may be left in the jamb.
Remove the Bottom Sash
The bottom sash is the most inside sash and so it must be removed first before you can gain access to the top sash. The bottom sash is usually much easier to remove than the top sash so it’s the place to start.
While you can cut the paint free on the exterior, it’s usually easiest to simply focus on the interior when it comes to the bottom sash and let the majority of the exterior paint buildup break off as you remove the sash.
If your bottom sash is not painted shut, then that eliminates all this cutting of paint and caulk and it is that much easier to remove.
- Cut the paint seal between the bottom sash and the remaining stop and possibly between the bottom sash and stool if necessary.
- Insert a firm putty knife in between the meeting rails and gently pry the sash loose to break the paint seal. Lift the sash above the stool to remove it.
- Swing the side of the lower sash where the interior stop was removed inward to access the rope mortise on the side of the sash.
- Remove the knotted rope from the rope mortise, being careful not to let the sash drop or the rope (which is attached to the hidden weights) fly out of your grasp. Sometimes the rope may be nailed into the side of the sash. This nail will require removal in order to get the knot out.
- Gently allow the rope knot to rest against the pulley. If the knot isn’t big enough to keep the rope from falling back into the pocket, tie a larger knot.
- Repeat the process on the other side of the bottom sash.
- If you are doing multiple windows, number the sash on the side so that it can be reinstalled into the proper window later.
- Scrape, slice or sand away unnecessary paint buildup on sash that may prevent movement.
Remove Parting Bead

The easiest way to remove the parting bead is to have the top sash lowered all the way to the sill. So, that means cutting it free of paint and caulk.
The parting bead may be painted and caulked so much that it looks like it should not be removed, but it is a separate piece that was designed to be removed in order to remove the top sash.
Parting bead can be eternally frustrating, but duck-billed vise grips are its nemesis. Some parting bead will be nailed in place and others will be simply pressure fit. Either way requires the parting bead to be pulled straight out of the channel it rests in and then removed (often in pieces).
- Cut parting bead free of paint or caulk at top sash using a razor knife or window zipper.
- Work the sash up and down until you can lower it all the way down to the sill.
- Starting at the top and working your way down, use duck billed vise grips to grasp the parting bead and wiggle it back and forth to work it loose.
- Cut and fit new parting beads if necessary.
- Scrape excess paint from parting beads.
- Prep parting beads for paint and reinstallation.

Remove Top Sash
Ah, the top sash. Most people don’t believe that this part of the window ever moved, but on double-hung windows, they are most definitely mistaken. There are single-hung windows where the top sash is stationary and will not move so before you get too deeply into this work make sure that your windows are not single-hung.
Top sashes are usually so gummed up that they are almost impossible to move without major effort. When cut free of paint, the top sash will move all the way down to the sill, but getting it there is a challenge. If you have serious paint building up and the sash barely budges, keep working it up and down to try to gain as much motion as possible.
If the top sash absolutely won’t go down to the sill, it can still come out as long as you can have it lowered enough to reveal the pulleys. If the pulley is revealed and your parting bead is out, go ahead and try to swing the side out and remove the sash from the jamb.
- Cut all paint seals around top sash with a razor knife or sash saw. The sash saw is good because it has little files that sand away the paint buildup in the paint joint once the paint seal is broken.
- Move the top sash all the way down to the window sill. If the sash will not move due to paint build up, you can continue, but the parting bead will be more difficult to remove and will likely come out in pieces.
- After the parting bead is out of one side, swing that side of the sash inward and remove the ropes as with the bottom sash.
- Be sure to number the sash.
- Scrape, slice or sand away unnecessary paint buildup on blind stop and jamb that may prevent smooth movement of the sash.
That’s it! You’ve now removed your sashes and can work on them at your leisure and put them right back in the jamb whenever you are ready. Make sure you have some plywood cut to size to cover the opening or a storm window in case you plan to keep them out for a longer time to do your work. Check out the video below to see the whole process in action.
Step 3 Restore the Jamb
This part is pretty straight forward unless you have serious repairs to do to your jamb. In most cases the process simply involves scraping the built up paint and caulk off the jamb and then priming and painting things so you have a smooth surface for your sash to fit within and operate smoothly on. Too much built up paint prevents the proper operation of any window so getting down to smooth surface is imperative if you want your window to operate fully.
I use a ProScraper vacuum scraper for the process to keep things clean and safe from lead paint and recommend the same tool to anyone restoring their windows. The process is shown in depth in the video below.
Step 4 Replacing Sash Ropes
Good sash rope will last 60+ years, and when you are restoring your windows it s a great time to replace those ropes. Use a high quality cotton rope like Samson Spot Cord. Do not use synthetic rope like nylon because they will stretch over time and they do not hold up to the UV damage imposed on them. I’ve seen synthetic ropes fail as soon as 10 years old down here in Florida due to the sunlight exposure they receive, they simply turn to powder.
The earlier video shows you the process for replacing ropes, but the basic process is cut them to length which you can measure by running the rope from the top of the pulley to the sill before making your cut. Then tie a simple knot on one end and feed it into the pulley and down the weight pocket where you will tie it to the sash weight with a bow knot. If you have trouble feeding the rope down the pocket try these four hacks to make the work easier.
If you don’t have weight pocket access doors on your jamb then I feel your pain. If that is the case you’ll need to cut your own pocket doors which I’ve outlined in this post. It’s an extra step, but worth it to make future repairs easier.
Step 5 Deglazing
You’ve got the jamb ready for the sash so now it’s time to work on the old sash. The first step is deglazing which means getting the old glass out so you can repair the sash properly. I prefer using a steam box to soften the putty like in my old video below, but you can also just use a chisel and hammer to get rid of your putty.
Once the putty is out there are also small metal glazing points embedded into the wood that hold the glass in place. Make sure to remove those first before you try to get the glass out or you’ll end up with lots of broken or stubborn glass. They are small and hard to see since they were embedded into the putty, but trust me they are there on every side of the glass and they have to come out.
Step 6 Paint Removal
There are a lot of techniques for stripping the paint from a window sash but removing most if not all the paint is important to make your next paint job last longer and look better. My preferred method, especially for a DIYer, is to use a ProScraper just like you did with the jamb, but there are two other tools that work great for paint removal.
The first is The Speedheater Cobra which is an infrared paint stripper. It works fast and keeps temps low enough that the lead paint isn’t a hazard. It’s an expensive tool but it makes short work of multiple layers of old paint on any wood surface. Watch it in action here.
The second tool is another expensive tool and it is by far the fastest paint stripper I’ve used but it can be dangerous if you’re not careful. The Paint Shaver is basically grinder with a spinning head of carbide scrapers that shave the surface of paint off. If not dialed in properly it can also shave the wood off or your finger. It’s fast but use it with caution. Watch it action here.
Step 7 Wood Repair
If you’ve got broken or rotten wood then now is the time to repair it. If you’re a good carpenter then making some dutchman repairs or milling new parts might be the way you go, but for the DIYer using a wood epoxy like Abatron is usually my suggestion. Abatron makes a great 2 part system called LiquidWood and WoodEpox that are a structural epoxy that can be used to rebuild any damaged or missing wood. They even make a convenient kit that includes everything you need.
The basic premise here is to dig out the rotten/damage wood and replace it with the epoxy which, once cured, can be shaped and sanded to replicate the damaged sections. Once the repairs are complete you want to prime your sash using an oil-based wood primer and get ready for glazing. The video below will show you how to process works.
Step 8 Glazing
You’ve got a repaired sash that has been primed so that means you’re ready to clean your glass and glaze your sash. You can use a glass scraper and some glass cleaner to remove the residue from your glass and give it a good polishing before reinstalling it.
Bed the Glass
Bedding the glass refers to installing the glass back into the sash in a bed of putty. This helps air seal the glass and prevents water from getting behind the glass due to condensation. Insert the glass into the opening gently and apply firm pressure around the edges. This will cause excess putty to squeeze out the inside.
Once you have the glass, in insert your glazing points (I prefer the diamond points because they are easier to hide behind the putty line). Make sure they are firmly in place and the glass is where you want it to be before setting your points. Make sure the glass is evenly set into the puttied glazing rabbet and you only leave a thin film of putty on the interior side of the glass.
- Dry fit glass into sash to determine the correct orientation. Trim glass if needed.
- Bed a small amount of Sarco Type-M (or similar) putty in glazing rabbets and gently press glass into bedding. Only press the glass around the edges, especially on large pieces. Pressing on the center of the glass can stress it too much and cause it to break.
- Use a point driver or putty knife to insert at least one glazing point into each side of glass and an additional point every 12″. (Be sure to set point far enough back so that it lays behind the glazing rabbet.)
- Remove excess putty from inside of sash and tool interior putty flush and smooth with profile.
You can watch the process in the video below.
Finish Glaze
Properly installed finish glazing putty should be installed at a 45° angle with mitered corners to allow it to shed water effectively. I won’t lie that this can take some practice to get just right. But perfectly glazed windows are not necessary for the putty to do its work.
When you first get your putty out, mix it thoroughly to ensure the oils are spread throughout the whole batch of putty. If the putty is cold, you can knead it a bit to help it gain some workability. My preferred putty is my own glazing putty called Austin’s Glazier’s Putty or my other favorite is Sarco Type M putty.

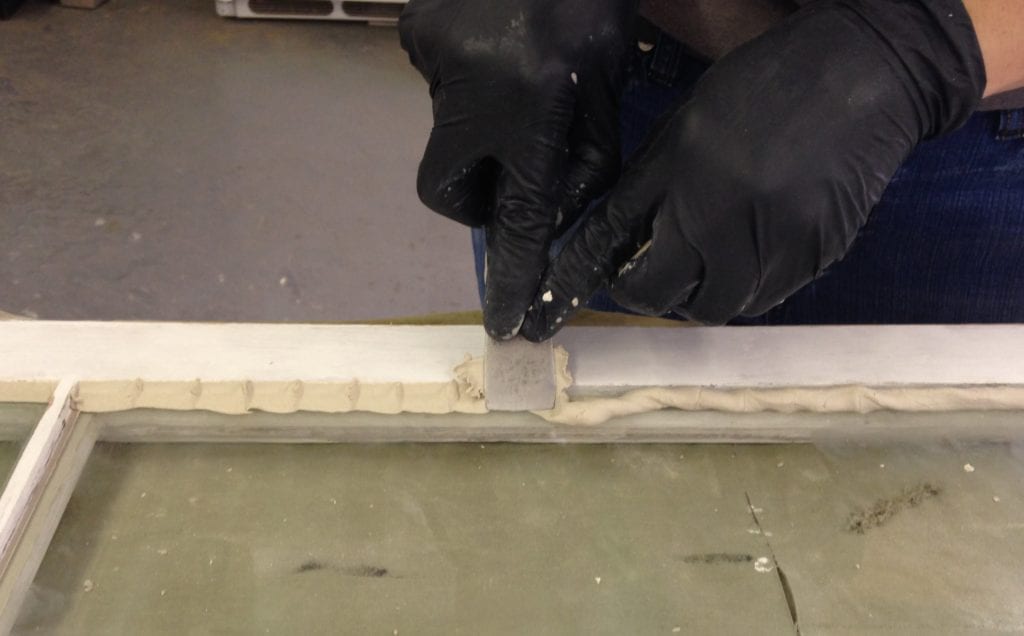
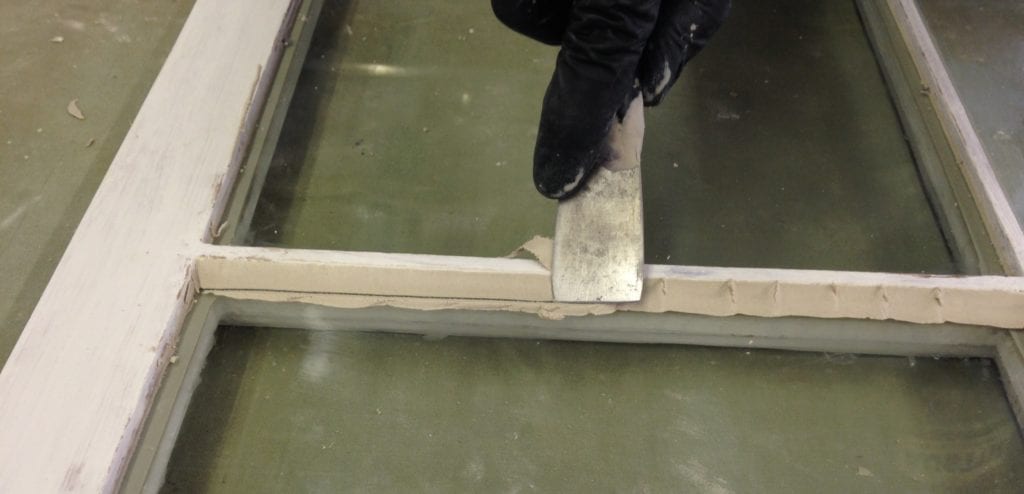
- Place putty into glazing rabbet.
- Pack putty firmly in the glazing rabbet and glass junction to get a good seal.
- Using a putty knife tool, finish glazing at a 45° angle to smooth finish with clean mitered corners.
- Remove excess putty.
- Using an old paint brush, apply whiting to inside and outside of glass. Work in thoroughly to remove oil spots from glass being careful not to disturb putty. Blow off remaining whiting.

Once your windows have been glazed, the putty will need some time to skin over before painting. Some putties require weeks, Austin’s and Sarco take about 3-5 days with temps above 60 degrees.
It depends on the putty and the paint type. Always check the manufacturer’s recommendations for the putty you are using and keep in mind that weather conditions will also cause curing time to vary. The finished product should look like the picture here with clean crisp corners.
Step 9 Painting
Painting your window sash is very important. The paint protects all your hard work and makes sure the repairs will last. Without proper painting the epoxy and putty won’t last very long. With proper paint you can easily get 20-30 years out of your putty before it needs replenishing. I have a few basic rules for painting window sash that I’ll outline below.
Don’t Paint the Sides

The sides of the sash that slide up and down in the jambs should be left bare. No primer and no paint. This may sound odd, but it has been in practice for well over 200 years. These areas are not seen or readily exposed to the elements so there is no cosmetic reason to paint them, but there is a more practical reason NOT to paint them. By leaving these areas bare you allow both rails (horizontal parts of the sash frame) and both stiles (vertical parts of the sash frame) to expel moisture.
In addition, these parts of the sash slide against the window jamb and if they are coated with paint (especially latex paint) they will stick and be extremely difficult to open and close. Leave it bare.With these sections bare, the entire sash is able to dry out if it should happen to get wet. Bare wood breathes much, much better than primed and painted wood.
Don’t Paint the Bottom or Top
For the same reasons as above the top of the upper sash and bottom of the lower sash should not be primed or painted either. These parts are not visible when the window is closed and therefore not exposed to the elements. Again, this will aid in the window’s ability to dry out. Not much else to say about this, so let’s move on.
Apply 2 Coats of Quality Paint
Whether you decide to go with oil-based paint or water-based doesn’t matter to me. The point is the get at least two coats of paint on the inside and outside. Don’t skimp on this paint either. Use a top-notch enamel paint. I prefer Sherwin-Williams Porch & Floor because it is an easy to work with water-based paint and since it is formulated for floors it gets very hard, very quickly.
The technique for painting your window sash is difficult to describe in a blog post, so I’ve put together a short video to show you how it should be done.
Finishing Up
Once the windows are painted let them sit aside and cure for at least a few days. This may sound pretty elementary and I’m sure you would never try to put windows with wet paint back in, right? It’s not about the windows being dry. It’s about the paint having time to cure.
Water-based and oil-based paints can take up to 30 days to fully cure. Until that time the paint is more prone to being damaged by scuffs, nicks, and water. Don’t try to wipe down new latex paint or clean it until that 30 days has passed. Otherwise, you run the risk of messing up your paint job.
Step 10 Restore the Hardware
While your paint is curing it’s a great time to restore the hardware and this is personally one of my favorite parts of the process. It’s so simple and the before and after is amazing.
The process I use is to boil the paint off in an old crock pot and then simply brush it off with a stiff bristle brush. It only takes some water and some dish soap or simple green for about four hours before the paint is falling off. You can then finish it off with some steel wool or a wire wheel to really get the shine up on that old hardware. Once again you’ve got a video below to show you how the whole thing works.
Step 11 Reassemble Your Window
I go through the whole process of putting the sash back into the jamb in the first video in this post called How To: Remove and Install Window Sash, but I’ll outline the order below because it is important to get this right.
Install the Top Sash
The top sash always goes in first. Attach the ropes to sides of the sash in the rope mortises and make sure it operates smoothly. If things are working well then it’s time to set your parting bead in place.
Set Parting Bead
The parting bead is what keeps the two sash apart, hence the name. Install the top parting bead first by pressing it into the channel in the jamb. It may take a beater block to convince it to go to its home if it’s tight or you may need to use a couple 18 ga. brad nails to hold it in place if it’s too loose. If it fits snuggly the nails are unnecessary and I stay away from them unless absolutely necessary.
Once the top is set move the top sash all the way down to the sill and set the parting beads on the side back into place. When these are in you are ready for the bottom sash.
Install the Bottom Sash
Set the bottom sash the same way you did the top sash. Attach the ropes on either side and test the operation. If it functions smoothly then you can proceed.
Install the Stops
Install the interior stops leaving space for a putty knife to fit between the bottom sash and the stop. This small gap keeps air infiltration to a minimum but allows enough space for the sash to operate smoothly. Attach the stop with four or five 18 ga. nails and test the operation of everything. If you’ve got a smooth well balanced window you can put your hardware on and sit back and enjoy your new old window.
Final Thoughts
When you think about how many windows a typical old house has the thought of restoring all of them may be frightening. I understand that completely, but what is more frightening is sometimes the cost of hiring a company to do the restoration for you. The materials needed are so minimal that you can restore a typical window for less than $50 vs. the restoration cost of a professional at $1,000 to $2,000. That makes DIY window restoration a very good idea!
If you’re going to DIY it then I really encourage you to pick up a copy of my book Old Windows In-Depth so you can have all the information at your finger tips and ready to go. That one book will pay it for itself in the first day I promise! Good luck and happy restoring!


Founder & Editor-in-Chief
I love old houses, working with my hands, and teaching others the excitment of doing it yourself! Everything is teachable if you only give it the chance.
We decided it was time to take action, and we called in a professional to assess the situation. They recommended sliding window repairs, which involved replacing worn-out tracks and rollers, as well as addressing any weatherstripping issues. I was amazed at the difference it made.
My issue is that my house is an English Tudor with the gorgeous individual diamond panes that are leaking like a sieve. Someone put external plexiglass “storm windows” in at some point but they are just a piece of plexiglass screwed on to the frame outside. I’d like to take those off and put an extra piece of glass behind the original glass or make a glass sandwich to protect the diamond panes and make them more insulated but not sure how. Also everything has been painted to within an inch of its existence. They are just so gorgeous. Super duper inefficient but gorgeous.
Can I paint the inside of the window before reglazing? That would be easier, but the putty base below the glass won’t be covered in paint if I paint before glazing the inside.
I am finally restoring the windows on our third floor of our 150 year old house. All the windows were not painted on the top, bottom, sides and about 3/8″ from the vertical edges of each sash. I BLOpentined the whole window but don’t plan on painting the same 3/8″ along the vertical edges as 150 years of use suggest this is OK and should reduce sticking. Is this acceptable?
What if you prefer the look of natural wood instead of paint? How does that change the process and materials needed?
Bernard,
Thank you for your question. Please take a look at Scott’s Patreon Page https://www.patreon.com/thecraftsmanblog. You can choose from a membership that suits your needs to gain access to answers to questions related to your specific projects.
The Craftsman Blog Team
Hi Scott, Thank you so much for posting this content. We’ve got a 1906 house and the windows look very similar to those in the above videos. Some of our panes are cracked. not to mention, I would love to use some more modern low e glass in our south-facing windows. Have you ever done this? Any pointers or pitfalls to share? Thank you!
I have a 151 year old house. I am intrigued by your posts as I’ve been reading. We were surprised when we moved in here and our home inspector said that we would not improve our home much with replacement windows. He performed a blower door test and we found that the majority of loss was through the floors! So we began to work from there. These windows are over 6 ft tall and would require special order. Fortunately they are too large for vinyl. This is a brick home and so there is no insulation between the two layers of brick, and there’s a large airspace around each window. We have found that it is extremely difficult to try and pry any area of the window frame loose…without totally destroying the sill, frame or trim pieces. I would love to restore them and get them operable again. What should I try next?
I am repairing the exterior of our old 1900 windows. We have replaced all the glass and glazed and repaired the frames. But we did not strip the old paint. I am in the process of priming and painting. For the most part, the sides and the 1/4″ edge of the fronts along the sides are all bare with linseed oil, or some original black stain. I have taped off the 1/4 ” edges to not paint them, so it will continue to slide easily and not stick. Is that a good idea? It seems that the paint would just rub off anyway. I see that you painted right to the edges. Not sure what is best to do.
I have looked and looked and can’t find a contact for you.
I want to keep my old wood windows. They are double hung with spiral balances which I have detached from the frame but it seems that the jamb slides are integral to the whole system because I can’t figure out a way to remove the sash.
I’d appreciate any help you can give me.
Also thinking about purchasing double pane glass to replace the existing glass so I can get rid of the ugly storm windows. I will be contacting Bi-Glass Systems tomorrow.
I bought this 1947 house because of the solid wood floors (under linoleum of course) and the windows. My husband wants to buy new windows 🙁
Is there any place to get information on windows with metal came divided light? I want to learn to repair my own windows but can’t find anything on working with “leaded glass” vs wood divided light.
Our 1930s home has metal bands instead of ropes attached to weights. Have you seen this ? Any ideas or comments on maintenance/replacing missing ?
I learned so much from reading you website and I bought your book in preparation for restoring 16 double hung windows at my house in Virginia. However, my windows are from 1955 and have thumb levers at the top of the upper sash and bottom of the lower sash instead of ropes and weights. The channels on the left side are deeper so I think they’re meant to be disassembled on that side (They are not the Anderson spring bar kind, my neighbor has those). Do you have any posts about these?
If using the SW Porch and Floor paint- how many days should I let it cure before putting the window back together? Also- I LOVE this paint!!! The perfect finish!
I am restoring the windows and exterior window frames on an 1812 federal house in Pennsylvania. I have found and learned a ton about window restoration and exterior restoration, but not enough and not specifically about the exterior window frame. The exterior is brick (three layers thick) and some of the window frames at the top (the decorative header?) are rotten. I have done epoxy repairs on small areas, but there are a few of these that are beyond repair and need to be removed and replaced. Are there any resources to help me?
Hi Lori! Here is a link for a step by step Window Restoration:
DIY Window Restoration
Scott, if I use your glazing putty to reglaze my windows (just purchased some from your site), do I need to seal the wood first with shellac or is that only when you use a linseed oil-based putty?
Reading through this post gives me a fair amount of pause. I live in a 1938 brick bungalow in Florida with all original windows. There’s no way I could take it a window and leave it out for more than a few hours without being inundated by mosquitoes. How do you seal up the bug portal while repairing the window and waiting for the paint to cure? Also how many hours does repairing a single window normally take? This would have to be a weekend project for me and I’m afraid of taking apart a window and never finishing.
You can board up the window like I do with 1/2 plywood while the sash are out for restoration. Just cut to fit and screw into the jamb then patch the holes when your finished. It usually takes about 18-30 labor hours per window to restore the frame and sash fully.
Hi Scott,
e love your blog. Thank you for all the great info. I have a question/comment. I have read all the wood, sash window repair guides you have. All of your guides only address glazing the windows with putty. Ours are glazed with glazing sticks/strips. We were wondering do you just replace the sticks, or are there other steps to follow?
This is pretty rare but it does happen. Rather than the putty you can simply remove the wood glazing bead and nail it back in place with 18 ga. nails.
Hi Scott,
I’m restoring old windows in my 1921 Craftsman home. I’ve stripped all the old paint down to wood.
Also stripped inside jambs and exterior trim.
I was planning to treat sashes first with linseed oil, then use an oil-based primer, followed by 2 coats of a good quality enamel (either SW Porch & Floor, or SW ProClassic water based Acrylic-Alkyd).
Trying to not use oil based paint if I don’t need too… but willing to for the best outcome.
Does this sound reasonable for sashes? Do you recommend a water based enamel (one of the above) for all my other interior trim throughout the house, or is there a better product?
Also, for the exterior. Should a prep with linseed oil and oil based primer as well?
And, what paint would you recommend for exterior trim?
Thanks in advance.
That sounds like a good plan. Sherwin Williams and Ben Moore make lots of great paints so any by them for exterior use should work fine.
I have a 1911 bungalow. Sadly, most of the windows on the first floor were replaced by picture windows in the 60’s. I have been buying vintage window sashes from a local salvage store to restore the original look of the home. I was hoping to find a resource on how to put old windows back into an historic home. How to rebuild the entire jamb to fit the windows I have found. Does one of the books go into this in greater detail?
Thanks.
It does not, but I’ll put it on the list to create some content around that area soon.
I really like your idea. I like our old windows, the weights are super cool. However, our rooms with lots of old windows get cold!! It really helps to have double/triple pain glass for insulation. Do you have any ideas on how to resolve insulation?
April,
We live in Maine in a 1930 house with nothing but the original wooden double-hung windows, and there are lots of windows in our house. I am happy to report that we don’t have any draft problems.
I would say there are 3 reasons for this: 1) each pane of glass is bedded & glazed well in the putty 2) the original interlacing zinc weather stripping (or any good weather stripping, preferably metal, like zinc, copper or bronze) is intact & functional, and 3) there are storm windows on the outside (we have triple-track storms that allow for easy opening/closing with screens that slide down in the warmer months, which is very nice).
There are a couple good studies that demonstrate that old wooden windows in good working order with storm windows on the outside have an insulation value that is as good as new contemporary double/triple pane glass windows.
Hope this helps.
Well said Timmy!
Install storm windows
Weatherstrip sash
Check if trim needs to be caulked
Air leaks are your enemy and insulated glass will not make up for a lack of weatherstripping. Replacement windows are not installed in a manner to address all your problems. Many of the installers who will do full frame windows in old openings won’t take the time to install them correctly.