
The results from year 4 of my wood filler and epoxy test are now ready! Four years ago I took five of the most popular and readily available wood patching products and applied them to the same piece of wood. I then set that piece of cypress out in my backyard and left it alone for the next four years to see how they held up.
I wanted to stack up some basic wood fillers against some high end epoxies and see how they would do in the worst case scenario under the most brutal Florida conditions with intense sun and drenching rains all summer.
At year four, the wood is beginning to deteriorate quickly and I’m beginning to wonder if my patches will outlive the wood they have called home for these last few years. Check out the results and pictures below to see how each patch has faired.
The five products I tested here are Abatron WoodEpox, MH Ready Patch, JB Weld KwikWood, Minwax Wood Filler, Minwax High Performance Wood Filler.
The Test Conditions
To make this test as scientific as possible, I’ve outlined the rules and conditions below.
I drilled out a 1/2″ deep hole with rough edges to try to simulate a chipped or gouged board and filled the hole above the surface with filler, after which, the patches were sanded level. Here are the conditions:
- The wood fillers and epoxies were all mixed and applied according to the manufacturer’s specifications.
- The wood usde was a piece of 1 1/2″ thick rough sawn cypress.
- The sample was laid horizontally outside.
- The wood and fillers/epoxies received no pre-treatment, primer or paint other than WoodEpox which was used as per the manufacturer’s instructions with LiquidWood prior to application.
All of the fillers and epoxies were applied and left to cure/dry until they were ready to sand smooth. I ranked the fillers in my original post regarding ease of application, ease of sanding, and drying time.
The sample board was left outside uncovered laying horizontally. I will qualify this by saying that all of these manufacturer’s recommend that their products be primed and painted even though I have left all of them without any primer or paint.
This test will clearly show different results than if I had painted the repairs, but I decided that seeing how a product would stand up to unprotected exposure and on a horizontal surface would show results more quickly and accurately as to which product has the greatest staying power.
Check out the previous years’ posts below to follow the progress of the fillers:
- The Wood Filler & Epoxy Test (Year 1)
- The Wood Filler & Epoxy Test (Year 2)
- The Wood Filler & Epoxy Test (Year 3)
WoodEpox
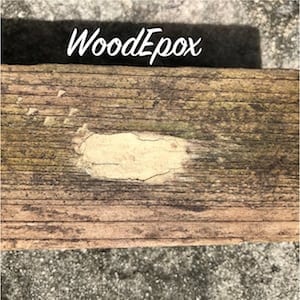
Product Info: 2-part epoxy filler
Test Results: Year four has brought minimal changes to the WoodEpox. The cracking around the perimeter of the patch is about the same size as year three where it runs parallel to the wood grain, but where the patch is against the end grain of the wood it has held up better. I can only assume that is because there is less movement of end grain versus edge grain.
No discoloring unlike in previous years and less algae growth as well, but, I have come to believe that is just depending on the amount and frequency of rain we get here. Even the little nail hole patches have held strong and refused to be pushed off the wood surface, which is a positive indicator to me.
The patch still feels firmly adhered to the wood and does not move when handled.
Ready Patch
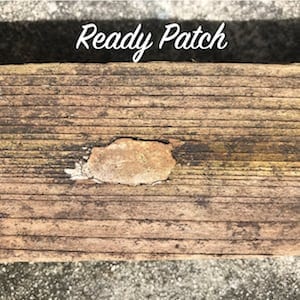
Product Info: Spackling Compound
Test Results: In year four, the perimeter cracking has stayed about the same with roughly 95-100% of the perimeter separated from the wood. The patch is still solid to the touch and does move much, if at all, when prodded.
The one notable change in the patch this year has been that the surface has become rougher, which explains the brownish color compared to other years. It now has a gritty feel comparable to 220-grit sandpaper, whereas in past years it has been smooth.
KwikWood
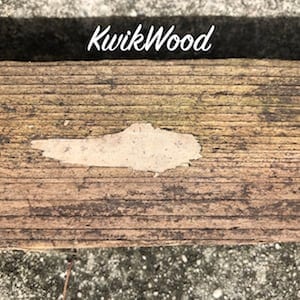
Product Info: 2-part epoxy filler
Test Results: KwikWood honestly still looks like it did the day it was installed. It must have some self cleaning system I’m not aware of or my kids go out and wipe it off every week. The cracks around the perimeter are still very minimal and the patch doesn’t move when touched.
For large repairs, this product isn’t particular feasible since it is expensive and come in small containers, but for small spots like this, I’m definitely a fan. The surface is also smooth and flush with the wood surface around it.
Minwax Wood Filler
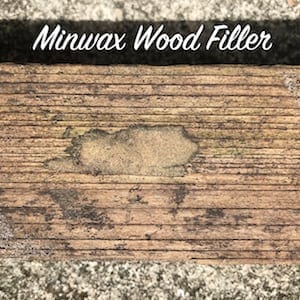
Product Info: Water-based wood filler
Test Results: Once again, the darkhorse of this test doesn’t disappoint. With the least cracking around the perimeter, this basic wood filler has really blown me away that is has performed better than the high end epoxies. Granted, this is not a structural epoxy and could never perform the kind of tasks required of WoodEpox, but for basic hole filling, why would I not use this?
The surface is a little gritty like the Ready Patch, which would make it stand out underneath a coat of paint, but other than that, this filler is rockin’ and rollin’!
Minwax High Performance Wood Filler
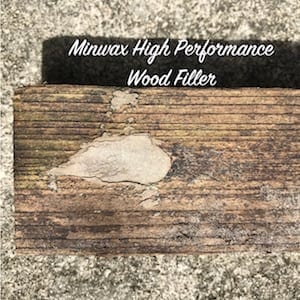
Product Info: 2-part styrene/resin filler
Test Results: The cracking around the perimeter of the patch has almost completed itself here with about 95-100% separated especially along the edge grain of the wood. Much like the Kwikwood, the surface of this resin filler (which is a similar makeup to Bondo) remains clean and free of any algae of mildew.
The patch still feel firm in the wood with little to no movement. This patch has also had the very small chip size patches that surround it hold on to the wood and not fall away.
Final Thoughts
It seems that in year four, just like year three, there were minimal changes. Most of the big changes were in the first couple years with the perimeter of the patches pulling away from the wood and then there have been a couple years of stabilization. This year, the biggest changes seem to have been to the Ready Patch and Minwax Wood Filler surfaces with textures getting rough. We’ll have to see if that means next year we’ll find more seriously degrading materials.
If you have found this test helpful consider purchasing any of these wood fillers by clicking any of the links on their names through my Amazon affiliate links to help support the blog. It costs you nothing, Amazon just gives us a little commission for sending you their way.


Founder & Editor-in-Chief
I love old houses, working with my hands, and teaching others the excitment of doing it yourself! Everything is teachable if you only give it the chance.
Just a comment from experience… LiquidWood does not seem to do well in an unpainted state, I think UV radiation degrades it over time. That is not a problem with the Liquid Wood, really, just a problem with a person who gets a project started and then doesn’t finish it before winter…or the next winter.
Also, the Wood Epox, as mentioned, recommends using LiquidWood first to consolidate/solidify the edge of the wood to be repaired. MinWax makes something called a “Wood Hardener”. Any thoughts on using that in a similar fashion with the other products and minimizing the amount of decayed wood that needs to be excavated?
Since the patio cracked, is it time to test Sakrete concrete caulk? I used some yesterday. Wear gloves !
I wish you better luck than I had with Quikrete concrete crack filler. It clogs almost immediately and when clog is cleared it continues to run out and create a real mess. What should have been a 1/2 hr. job turned into an 1 1/2 job with the mess it created.
Be interesting to see your results with different manufacturers product.