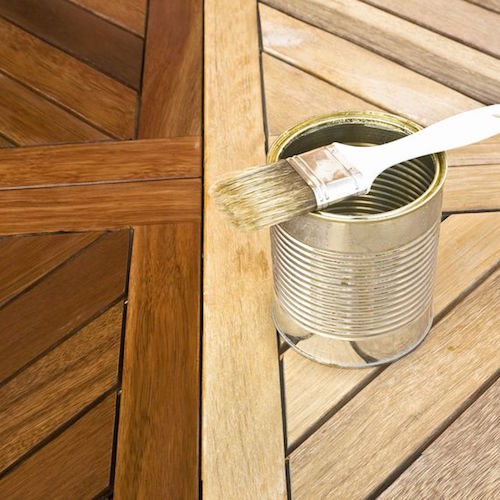
 You could fill a library with the different ways of finishing wood. There are oils and lacquers, urethanes and stains, sealers and varnishes. Some are wiped on, some are sprayed, while still others are brushed on. I could fill a book on just this subject alone so this post will be more of a primer to get you pointed in the right direction.
Finishing wood is as much of an art as it is a science. Each finish can come out completely different depending on a multitude of factors like the type of wood it is applied to, the ambient temperature and humidity, air flow or lack thereof, thickness of application, age of the finish.
Don’t be intimidated by all this. The best advice I can give you on the subject of finishing wood is to experiment. Get a piece of similar wood and try applying the treatment you are thinking about. If it doesn’t come out right, try tweaking your application and the conditions to see if you can make it work. If it’s beyond your abilities, then try a different technique.
Below is a list of the most typical types of wood finish used in old houses and some professional tips on how to work with each properly. Some are easier than others, so don’t get discouraged. There is a finish that will work for you!
Polyurethane (Varnish)
Polyurethane (a type of varnish) is one of the most commonly used wood finishes today. It excels in high traffic areas like floors where it forms an incredibly hard and resilient coating that can handle just about anything. There are exterior versions of polyurethane call “spar varnish” which are a bit softer than their interior cousins. This softness allows them to remain flexible in the large temperature swings that occur outdoors. A regular polyurethane will crack and fail after a couple short years in brutal exterior settings, whereas a spar urethane can last a decade or so with care.
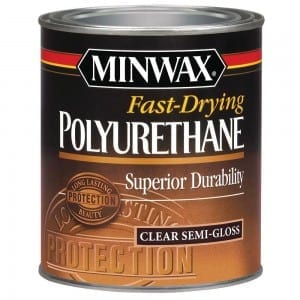
Polyurethane works best for floors though it also excels on doors and woodwork. The downside of this finish is that it leaves the wood feeling like it has a thick plastic coating on it. Good for hardwood floors that need the protection, but maybe not for furniture that you want to feel silky smooth. You can read more in my post All About Polyurethane.
Tips:
- Ease of Application: Moderate
- Clean up and Thinning: Mineral Spirits or Paint Thinner
- Solvent: None (once cured, it cannot be removed except with sanding or scraping)
- Sheen: Available in Satin, Semi-Gloss, Gloss
- Recommended Application: Never shake the can, stir only to avoid bubbles in the finish. Apply 3 coats with a natural bristle brush or lamb’s wool pad (refer to manufacturer’s recommendations for drying times but usually leave about 12-24 hrs between coats) with light sanding between each coat. Sanding between coats provides for a smooth finish and is imperative for the successive coats to adhere to each other.
Lacquer
Laquer is a quick drying finish that is most typical on commercial furniture and cabinets today. Lacquer paints (essentially a tinted, opaque lacquer) are a typical finish for most cabinetry. Lacquer goes on in very thin coats and is almost exclusively sprayed on with HVLP (High Volume Low Pressure) sprayers since it dries so quickly. Without spraying, you’d be stuck with brush marks everywhere.
While it is hard for the amateur to work with lacquers, they do provide an incredibly beautiful and rich finish that is worth the extra work, especially if you are looking to put the finishing touches on a furniture project. Lacquers do have a tendency to yellow over the years, which makes them a bit less desirable for light colored woods.
Tips:
- Easy of Application: Difficult
- Clean Up and Thinning: Lacquer Thinner
- Solvent: Lacquer Thinner (When applied to dried lacquer, Lacquer Thinner will dissolve the finish)
- Sheen: Matte, Low Satin, Satin, Semi-Gloss, High Gloss
- Recommended Application: Multiple coats, especially for clear coats (about 5 or 6 depending on the desired look). Coats dry and are sandable within an hour or two depending on conditions. Sand lightly between coats. Can be “rubbed out” to a silky smooth finish with high grit (400-800 grit) sandpaper.
Shellac
Shellac is an old school finish common on woodwork in old houses. It is a relatively similar product in application to polyurethane, but instead of being made of petrochemicals, it is made from a naturally found resin from the lac bug. Flakes of this resin are dissolved in denatured alcohol and poof you have Shellac. This one of the oldest wood finishes whose history stretches into antiquity.
 It is not quite as hard of a finish as oil based finishes like polyurethane and lacquer, but it is resilient enough for woodwork and trim. Floors are not a great place for this finish. One of the great things about Shellac is that is can be easily touched up without looking like it has been repaired. Applying new Shellac to a damaged area causes the old cured Shellac to re-emulsify (turn back into a liquid state). This great feature (along with the fact that Shellac doesn’t yellow over the years) allows Shellac touch ups to seamless blend in with the original finish.
Shellac was the wood finish of choice until being replaced by lacquer in the 1920s and 1930s.
Tips:
- Ease of Application: Easy
- Clean Up and Thinning: Denatured Alcohol
- Solvent: Denatured Alcohol (When applied to dried Shellac, Denatured Alcohol will dissolve the finish)
- Sheen: Available in multiple sheens, depending on how much of the lac bug flakes are mixed into the denatured alcohol. The more flakes, the more matte the finish.
- Recommended Application: Easy to apply with a brush, pad, sprayer, or wiping cloth. Dries within minutes and can be recoated within 30-60 minutes. Multiple coats are recommended.
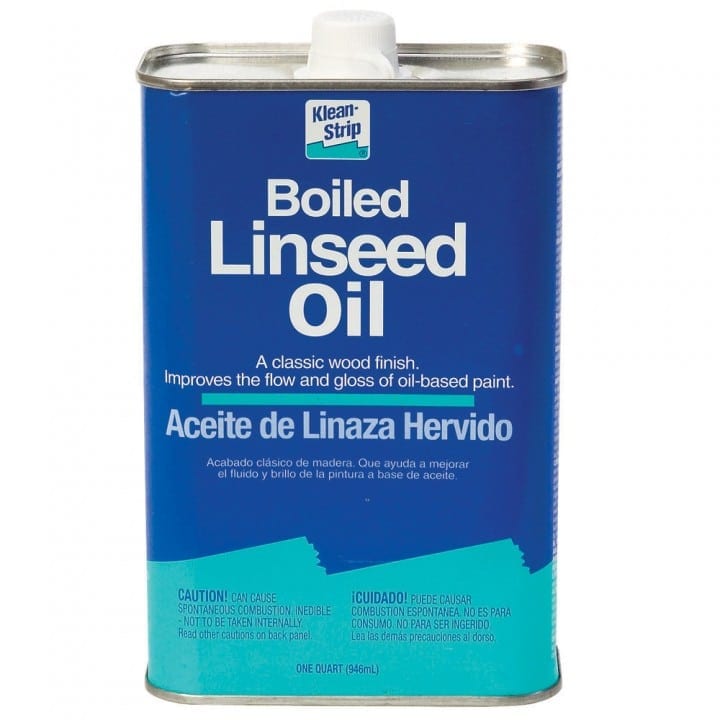
Oil Finishes
Before Shellac became extremely popular in the 19th century, wood finishes were mainly oil and wax. There are several different types of oil finishes available today. Tung Oil, Teak Oil, Antique Oil. All of these are a combination of different oils, resins and solvents to give them faster drying characteristics and more or less protective qualities. Most of these work great, but I prefer to go to the source, and for me that is Boiled Linseed Oil.
Boiled Linseed Oil is a slow-drying penetrating oil finish. Oil finishes like this, penetrate deeply into the wood and require multiple coats applied over several days. While an oil finish doesn’t really add a protective coating on the wood like the other finishes we’ve been discussing it does protect the wood in other ways.
 Oil finishes penetrate deeply into the wood and slowly harden and strengthen the wood from within, which provides protection from water and other spills. Oil finishes also bring out a true richness in certain woods and since they don’t leave a coating on top of the wood, they give a feeling a nearness to the wood that is desirable in pieces that will be handled often. Oil finishes can also be given a beautiful sheen by rubbing them out with very fine sandpaper or 0000 steel wool.
Tips:
- Ease of Application: Easy
- Clean Up and Thinning: Mineral Spirits or Paint Thinner
- Solvent: None
- Sheen: Usually a Satin sheen but the sheen can be altered by the amount it is rubbed out
- Recommended Application: Easiest to apply with a wiping cloth. Drying time can be days between coats depending on environmental conditions. Requires multiple coats until wood will no longer absorb anymore of the oil.
Wax
Popular around the same time as oil finishes, wax is best used as an addition to oil finishes. It provides minimal protection and should be reapplied occasionally to maintain its effectiveness. It’s fine when used in this way, but not recommended as a finish in and of itself.
Oil/Varnish Blend
You can read my earlier post on how to make this simple but effective finish at home. This finish really combines the best of both worlds. It gives you the deep penetrating protection of an oil finish with the protective coating of a varnish. Anything that is remarkably easy to use and effective will always keep a prominent place in my shop and this one is my go to finish for woodwork and antique furniture.
I use a 3 part mix of Boiled Linseed Oil, Polyurethane and Mineral Spirits. I can tailor this mixture to the needs of the project and often begin with a mix that is higher in Boiled Linseed Oil so that it can really penetrate the wood. Then slowly as I build up coats I switch to a mix that is heavier in Polyurethane.
Tips:
- Ease of Application: Very Easy
- Clean Up and Thinning: Mineral Spirits or Paint Thinner
- Solvent: None
- Sheen: The sheen is dependent on the sheen of the polyurethane you use in your mix. Also, more coats provides more sheen. One or two coats usually leaves you with a matte finish.
- Recommended Application: Easiest to apply with a wiping cloth. Wipe on and let sit for about 20 mins so that the finish can soak into the wood. Wipe off any excess and let dry. Drying time can be days between coats depending on environmental conditions. Requires multiple coats to achieve an even finish. Sand moderately with 000 or 0000 steel wool between coats.
Water-based Finishes
In recent years water based finishes like polycrylic and oil-modified polycrylics have been coming on the scene. These finishes, while they have come a long way since their introduction, are not quite ready for primetime if you ask me. While the clean up on these finishes is incredibly easy (wash and go), they do not provide the beauty and long lasting protection that oil-based finishes do.
I have no doubt that they will someday take over the market just as latex paint has pushed oil-based paint to the fringes of the painting industry. But that time has yet come.
Hopefully this has given you enough info to decide which wood finish is for you. There are so many options available to you for your old house that choosing the right finish may be the hardest part.


Founder & Editor-in-Chief
I love old houses, working with my hands, and teaching others the excitment of doing it yourself! Everything is teachable if you only give it the chance.
Hi! I’m hoping you could give some insight on a problem I’m having. I recently had engineered maple floors added to my bedroom in an attempt to match the engineered maple in the living area. The bedroom floors are a lot lighter than the rest and I’m really unhappy with the results. The company used a water based finish and they say the new floors should come close to matching the old ones in 6-12 months. I’m pretty skeptical…
I’m not sure what type finish was used on the original floors. I’m wondering if I should ask them to redo the bedroom finish a slightly tinted oil based? I’m also checking if completely sanding and refinishing the living area is an option, apparently the actual maple can be pretty thin on engineered maple. Or should i just wait and see?? Any insight would be appareciated!
HI Scott, I’m stripping paint from the interior wood trim of my 1910 Craftsman house. I’m having difficulty getting paint from the small nicks and grooves; is it just a matter of use stripper and brush until it’s gone. Also, I’d prefer to leave the wood unstained (which is lighter than what I see after removing just the paint. But there are areas of that seem darker or grayer after I sand (the patina?). Will this show if I just put on a top coat or is a stain necessary to even it all out?
Thanks for any advice. This is completely new to me and I feel a bit overwhelmed!
We have a 160 year old house with lots of raised panel wood. It was very dark and I found that liquor thinner cut it and brought the color back to the light sycamore. There are some bare areas but most still has the original product on it. What Div you suggest I put on it to protect it?
Hello,
Our house is 20 years old wirh Helmlock wood trim. I would like some advise in which products to use I believe a varnish needs to be applied first? We haven’t done anything to the wood and the trim in the bathrooms are dusty and dull…. Help
Looking for some good advice please. I am refinished some old cable spools as outdoor tables. I am using up old cans of finish in different colors that are in our garage. I have an oil based stain & sealer, an outdoor latex based stain & sealer, a plain minwax stain, and finally a can of white bulls eye strain killer. I am using all of them on each piece, in different sections. I was planning on top-coating the whole project with Hellman’s Spar Urethane, for protection & a somewhat unified finish. Good idea or bad idea? Will the urethane be ok over top of all those different bases? Should I sand the base coats first? Thanks in advance for your help!
I live in central Florida and building new home with kiln dried culled wood used for flooring on the fireplace in herringbone design. It turned out beautiful. I like the natural look, but need invisible sealer. What would you suggest.
Thank you in advance, Susan
HI – we are looking at putting a T&G Cypress or Pine ceiling in our Florida room (which is in Florida). Fully enclosed but for 5 months of the year, will not be under air (A/C). Is it possible to use an interior stain followed by Polyurethane or Spar Varnish or will the heat and humidity be too much for it? At this point in time, we are only looking at the interior stain because the color seems best to coordinate with our floor.
That should work just fine. Keep with the spar urethane or spar varnish due to the temp fluctuations though.
Thanks so much. The planks will be under insulation but above that is an attic. I assume I need to stain and varnish both sides of the plank? I understand it is important to stain and varnish before putting them up because of possible shrinking and exposing unstained parts. Obviously I need to make sure the tongue and groove can still join and I’m a little worried about that. Are my assumptions correct and is there anything else I have forgotten?
You can Stain before installation and the varnish after if you want. The staining is most important for appearances in case of shrinking. That way you don’t have to worry about gumming up the tongue.
If I apply your oil/varnish blend to a ‘dance floor’ type set up in my back yard, would it protect the wood and not compromise the natural beauty through seasonal weather? I will have it covered when not in use. The floor is going to be a strong WP lumber foundation with a natural wood top finish. (Thinking cedar but standard birch oak or maple is cheaper. Just picked woodwork up as a online hobby. Now I’m trying apply the beauty of wood everywhere. Love crafting w wood and love this blog. Thanks.
Please help as I have read so much, but still not sure the best method.
I bought a small table loom which the manufacturer says must be “waxed or sealed before assembly”. The wood is silver beech from New Zealand. The maker suggests their own wax polish which has beeswax and tree oils in it which it says is good for new natural timber.
I was worried this method, which I would greatly prefer instead of applying polyurethane, might not work as my home has wide swings in humidity throughout the year (15% in winter to 80% in summer), I am open to any advice. thank you.
If it’s inside that should be just fine.
Thank you!
Hi Scott,
We are installing a cypress select 6″ tongue and grove outdoor porch ceiling in Central Fl. I’m rethinking my original plan of staining then sealing with a spar varnish. The natural wood color is so pretty I can skip the stain as long as the varnished used in non yellowing. Any suggestions would be welcomed.
Thanks,
Anne
I am having the original tongue in groove oak flooring in my 1941 820 sq ft home (sanded and) refinished. I requested a low or no VOC /water-based product for the finish because I have birds and they have very sensitive respiratory systems. Contractor will not guarantee water based finish, said it’s not very durable(he said he is using a water-based Min-Wax product, I don’t know which one). I believe the info on water-based finishes for wood floors was written 3 1/2 yrs ago – do you feel they have improved the product(s) sufficiently during this time? Any and all help is greatly appreciated. Grazie!
Water based finishes are constantly getting better but at the current pace it won’t be for another couple decades before they catch up to oil based finishes.
So sad to hear it will be decades-I’ll be dead by then. What do you recommend for July 2017? I need to get this done this summer.
Grazie!
Did not mean to be rude by saying I’d be dead before 20yrs passes…only truthful. Still would like to know which oil-based finish you would recommend … As you said, there are so many to choose from and I am totally confused! I need and would appreciate your help! Grazie!
I still like an oil-based polyurethane like Minwax. There are other brands and they are all pretty similar to me.
Hello my wife and are renovating a old home from 1900. It’s all post and beam with a lot of old hand hewd beams. We had some carpenter Ants that came out of the ceiling beam. We want to seal it and make it look beautiful. Any recommendations??
Try this post: https://thecraftsmanblog.com/the-7-best-products-to-patch-wood/
I am exposing old hand hewed beams on first floor of 180 yr. old stone home . what would you recommend sealing them with I did manage to get them cleaned of the old paint and plaster
Try a mix of boiled linseed oil, turpentine and satin polyurethane in event parts.
what is the best finish (no shine) tor the old growth Douglas Fir floor?
Take a look at Rubio Monocoat.
I like it, but is there anything cheaper?
You don’t need much of it. Materials wise it’s about the same cost as polyurethane. 1 liter of monocoat surprisingly does about as much as 1.5 gallons of poly.
Hello, we have interior douglas fir tongue and groove ceilings in every room and exposed beams (post and beam construction) in our home. The wood has a pickled look to it and appears to have had a benjamin moore seagull grey stain applied in the mid 90s when it was built according to records. Our wood is drying and cracking (some checking in beams also). I think it is time to reseal, but am daunted at the prospect of how to do so especially since whatever we go with will need to be applied upside down and moving out during the application is not an option. Any ideas on the best way to handle? Is there an option that would not require heavy cleaning/sanding?
Thanks.
I building a custom home for the first time and right now I’m picking what kind of finish I want on the cabinets. I had no idea that there were so many different finishes available. I like the way the lacquer finish looks. http://absolutepaintingmaui.com/painting_services/
Hi Scott,
Your blog is wonderful!! My fiance and I are gutting and renovating an old 1930s lake cottage. Right now we’re tackling the floors and we’re really struggling to find information for what we want to do! Throughout the entire house (except the bathroom) we’re laying 10″ wide knotty pine planks that are kiln-dried but not tongue and groove. We’ll be laying 15 lb underlayment, clear coating the underneath of the planks to help with moisture, and face-nailing the planks.
We want the rustic old farmhouse look with a driftwood-esque finish. We experimented quite a bit with different stains. What we’ve found to get us closest to a driftwood finish is making our own stain. We’ve brewed a batch of very strong black tea and a jar of distilled white vinegar with fine grade (#0000) steel wool that has soaked for three days. We’re brushing on a coat of the black tea directly onto the wood, letting it dry for about 15 minutes and then brushing on a coat of the vinegar/steel wool mixture. We’re letting this sit for about 12 hours to allow the color to fully develop. This gets us to a very dark almost charred look – with a light sand over this, it turns to a nice driftwood-esque gray.
I’m looking for some guidance or thoughts on sealer. We’re finding that a water based poly is changing the color of our stain to more of a brown-mahogany which is beautiful but not what we’re looking for. We just want to seal the floors, protect them from moisture (we live on a lake and there’s just a dirt crawlspace under the floor), but keep the gray stain look and we don’t want a lot of sheen on the floor. We want it to look as natural as possible.
From everything we’ve read – it sounds like a wax paste sealer is our best option to get the gray finish we’re looking for. However, we’re very concerned about the long term look of this, the durability, and the maintenance. We’ve not been able to find a lot of information on these topics in regards to wax. Some people say that the wax discolors (yellows) and changes over time while others say it stays the same or just patinas. We’ve experimented a little with using sanding sealer prior to covering in poly or wax and that has helped slightly with stain discoloration from the sealer.
I really like the idea of wax being more natural and I’ve found some decent information on Briwax. Really not having a lot of luck in finding reviews or information to compare different types of waxes. What are your thoughts on using wax to seal our floors? Do you have any knowledge of what the maintenance is like?
Just a note – there are only two adults in the house and one small dog under 10 lbs. There will not be children in the home; however, there is likely to be a lot of entertaining (shoes off). Rugs will also be placed in high traffic areas.
Thank you!!!!!
We have a large and solid 102 year old Craftsman cottage on a lake with old unfinished fir interior (no insulation) and unfinished maple floors. We plan to ‘winterize’ the right way with foam insulation covered with new fir paneling. Do I need to finish both old and new fir? or is it okay to leave without?
Nancy, the fir can be left unfinished on the interior if you’d like but it will show signs of wear and dirt faster without finish and will be harder to clean. Ultimately it’s up to you.
Your information is very helpful. This is a quality family heirloom for which we feel a heavy preservation responsibility. I would say 90 – 95% of interior hardware and surfaces are original — very minimal updates. Do you have an article(s) that give overall guidance on construction material choice in winterizing such cottages? Roof shingles (composite vs.cedar)? wall shingles (stain or natural)? heating choice (rads vs. forced air)? Lifting and foundation (stone or brick/bloc)? Is it really all personal choice? The windows are inswinging 12-panes for which I am committed to finding a reasonable storm window solution.
I need help i have a house that has all wood trim that has been varnish and i need about 30 gallons of varnish to redo. the problem is that it has to be a matte finish.the customer doesn’t like any other finish but matte. I can’t fine a matte finish any wear please help
Richard I ah e never found a matte finish either. Sanding the varnish with 0000 or 000 steel wool will dull the surface to a matte finish though. It would take some work but might make the client happy.
I have the solution, Armstrong Clark feck stain. I used it on front door set at a beach front home in Orange County and it came out great. Happy to share photos if you have an idea where to post them.
Tonkinois do bio impression oil for base coat,followed by the Tonkinois varnish.
No harmful substances,completely natural.
In my view better than Epifanes.
Jacob
Great tips and blog!
I have a Red Oak double door with 2 outer panels I’m refinishing on the coast in Huntington Beach, CA. Availability of good oil based stain products is limited in CA with the ridiculous VOC laws, and the production oil based stains that are available are not exterior rated. With the amount of detail (trim, corners, etc.) the water based exterior stains simply do not allow the time necessary to get an even coat without blothcing from overlaps.
I have also tried the Sansin EOS stain, but it gums/laps quickly and cannot be overlapped whatsoever without blotching, so it is impossible to work with given the detail of this project.
As a result of these challenges, I’m considering going with a semi-transparent penetrating oil stain such as Penofin or Armstrong Clark. Do you have any feedback on either of these products and/or recommendations for prep and maintenance?
Thanks again for the great blog!