

That’s an interesting question that I don’t think old home owners ask as often as they should. Is stripping paint necessary? It seems simple, right? But the answer is a bit more nuanced. Is it always necessary to strip paint before repainting. No. Will painting on bare wood always yield a better result? Yes.
Now I’m really confusing you, right? The point is that while stripping old paint and coatings from surfaces like windows, doors, trim, and other woodwork will always yield a better final result sometimes the juice isn’t worth the squeeze.
What I’m saying is that while you’ll definitely get a better product with a full strip and restore treatment, the conditions may not justify the massive amount of work stripping paint is. In this post, I’ll look at the specifics and try to give you some tools to help you determine if stripping paint is really necessary in your circumstance.
Lead Safety
If you’re the owner of a house built before 1978 then there’s a very good chance you have lead paint lurking somewhere in your house. Lead paint is health hazard to anyone, but it is especially dangerous to pregnant women and children as well as our family pets who have even more fragile nervous systems than humans.
When dealing with lead paint it’s important that you take precautions to keep everyone safe. I’ve written extensively about lead safe work practices and also the specific risks of lead if you’d like to dive deeper into the topic, but for now I’ll hit the major points.
- Wear a P100 or N100 Mask – No politics involved here. If you are working with lead paint the best way to stay safe is to wear a P100 or N100 mask. N95’s don’t work, dust masks don’t work, surgical masks don’t work. Only a P100 or N100 will keep the lead particles out of your lungs.
- Contain Dust – Seal off any working area completely with plastic to avoid lead containing dust particles from spreading around the room. Tape it off, use Zip poles or whatever it takes to make it look like a scene from ET.
- Use Only HEPA Vacuums – Using a regular shop vacuum or even a vacuum with a HEPA filter is not sufficient. Lead dust will still spread unless you are using a sealed and certified HEPA vacuum. Examples of this include the Festool Dust Extractors.
Use Low Heat
I have read dozens of articles on this topic and tried desperately to find the specific point at which the lead in lead paint vaporizes creating even greater health hazards. There is no specific answer other than a broad range from sources ranging from 621.5°F (which is the melting point of lead) to as high as 1100°F. Many sources like This Old House say 752°F is the vaporization point. Others say 900°F is the vaporization point.
The point is I can’t find a specific temperature to tell you that lead is dangerous to heat above, but I can tell you that keeping the temperature below 621.5°F will without a doubt keep you safe since that is the scientific melting point of lead.
With that in mind using open flames is clearly out of the question, but so should using the majority of heat guns which have temperature settings that range between 700°F and 1100°F.
Chemicals strippers are safe to use since they cut down on dust as well. Infrared strippers keep the temperatures between 400°F and 600°F so they are safe to use. That’s why we have worked to develop a lead safe infrared tool called the IR Paint Stripper. Another safe option is using tools with a vacuum attachment hooked to a HEPA vacuum like the ProScraper and handheld vacuum scraper or the PaintShaver which is a beast of a tool that also connects to a HEPA vacuum all of which we’ll talk about and link to in the tools section below.
When Stripping Paint is Necessary
There are a definitely times when stripping paint is necessary, painful as it may be. Below are some of the times I feel you’ll be best suited in removing all the paint.
Flaking/Alligatoring Paint
If the paint surface is chipping off or extremely rough with alligatoring texture throughout then your paint is pretty much toast and anything you put on top of it won’t last long. Think of old paint as the foundation of a paint house you are about to build. Any new paint will be supported by that foundation and will only last as long as that old paint (the foundation) will last. If you build on a shaky foundation your paint job will likely have a very short life.
Excessive Paint Build Up
If you’ve got excess built up paint you may be missing out. Windows and doors won’t work smoothly and woodwork details are lost. Also there are only so many coats of paint that a surface can hold. I have seen otherwise healthy looking paint peel off in sheets when one more coat was added. The paint was just too thick and like a house of cards it collapsed on itself. If excess paint is causing operational issues or you’re worried about this kind of paint failure then stripping paint is in your future.
Lead Abatement
Sometimes you’re in a situation where a building tests positive for lead paint and it is required to be abated. There are some options for encapsulating lead paint, but usually if you need to remove the lead paint health issue then the only way to do that is by stripping all the paint from the offending surfaces. This is usually not necessary for homeowners, but occasionally for landlords with rental units or in commercial buildings this may be required. You need a special certification and license in most places to complete a lead abatement so keep that in mind.
Switching Finishes
Whether you’re switching from a painted finish to a varnished finish or from oil-based to latex or any combination of these you’ll get better results if you strip the old finishes off and start anew. This doesn’t mean that you need to strip the piece to bare wood though. For example, a client told me that someone had painted latex paint over top of oil without priming first. Well, that latex will not last long even though it looks pretty good right now. He should strip that layer of latex off before doing anything else otherwise his new paint job will not last.
Paint Stripping Options
There are three primary ways you can remove paint (mechanical, chemical, heat) and we’ll talk about all three below.
Chemical Paint Stripping
First, let’s focus on chemical strippers, which are really your best option if you have detailed or ornate moldings to strip since these can’t be easily scraped or sanded without destroying the profiles.
There are dozens of chemical paint strippers on the market today. Some have been around for decades, but in the last 20 years, there have been a lot of less caustic, more earth-friendly options.
In my experience, and in several comparison studies I have read, these less caustic options are much safer, but noticeably less effective than the old “burn your skin off” methylene chloride strippers. Let’s talk about some of my favorites.
CitriStrip
This is really the only chemical paint stripper I consistently use these days. CirtiStrip is a relatively non-toxic, orange scented, yogurt like consistency stripper. It does a good job of softening up paint, though it does take a few hours to work its magic. If you have any more than around 4 layers of paint, you may need a second treatment. It works great on almost any surface including wood and metal.
Peel Away 1
This is one of the more expensive paint strippers out there today, but for good reason. I use this exclusively when we have to remove paint from old brick or stucco where scraping or sanding isn’t feasible. This paint stripper is a two part system where you brush on the paste and cover it with a paper. After the stripper has dried, you simply peel away the paper which pulls the old paint away with it. It’s a great way to contain any mess and remove the paint.
Methylene Chloride
This is the old standby for chemical strippers. Methylene Chloride has been around for decades, is very effective and fast working, and unfortunately it’s also very caustic. The paint softens up in minutes instead of hours with most of the green alternatives. The vapors are overwhelming without an organic vapor respirator so be sure to protect yourself. You’ll need lots of ventilation to be able to use this type of stripper as well.
Other Green Chemical Strippers
There are a lot of options on the market today for chemical paint strippers that I haven’t had the chance to use enough yet to formulate a solid opinion, but I wanted to mention some of them with the disclaimer that I can’t tell you honestly how they work or if they are worth your money. But so you know, here are the ones I’m currently testing.
- Blue Bear Paint & Urethane Stripper – Made from soybeans, this is another safe option for paint removal.
- Star 10 – Another soy based option and the manufacturer is awesome at answering any questions
- Lead Out – A cool product the strips paint and renders lead paint completely harmless when applied
Mechanical Paint Stripping
This may be the least exciting method of paint removal, but I have found it to be one of the best ways to remove decades of old paint quickly and cleanly. There are lots of tools you can use here to help get the job done quickly and safely and you don’t have to worry about the mess that chemicals can make.
ProScraper
This is an ingenious hollow-bodied scraper that attaches to your shop vacuum hose. It comes with a changeable 2-sided carbide blade. This little thing is fantastic for scraping flat surfaces! The dust and debris is almost non-existent when used with a good vacuum and because of that it is an EPA approved method for removing lead paint. I sell them in my store which is one of the few places you can buy one of these scrapers in the US.
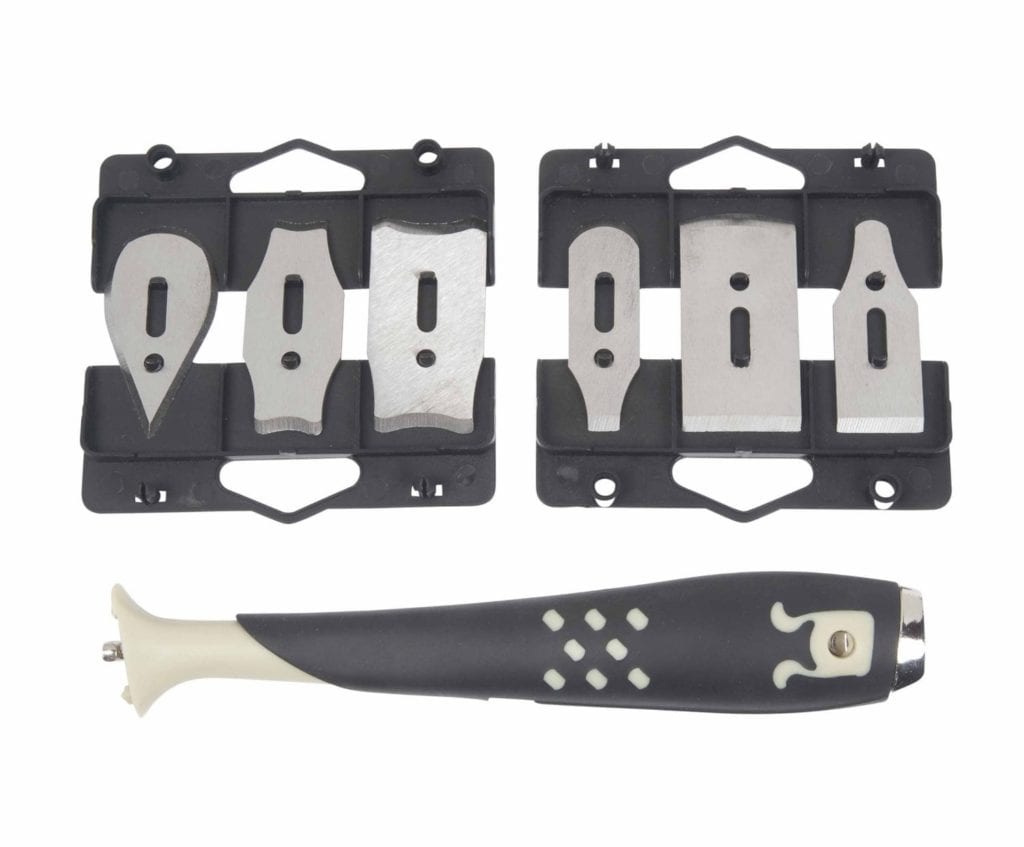
Hyde Contour Scraper
This versatile scraper comes with six different contoured steel blades. Each blade has two different profiles so you get a total of 12 different shapes and sizes to scrape almost any molding profile! It has a quick change feature that makes it easy to move between blades when you need. We use this almost exclusively in my shop for the detailed work that profiles on windows and doors demand.
Stanley Glass Scraper
You have to remove paint from more than wood if you plan on restoring your old windows and this tool is the best for the job. It takes a simple single edge razor and scrapes glass without scratching it. Make your life a little easier and wet the glass first with some water or glass cleaner and then scrape away.
Sandpaper
It’s not new and it’s not exciting, but there is a reason it has been around since the cavemen roamed the earth. It works. Once you’re done with your scraping, the surface will need to be sanded lightly to remove any paint you missed and to level everything out. I prefer paper that has an adhesive backing so I can cut off pieces and stick them to sanding blocks of various shapes and sizes to fit whatever need my project may call for.
Paint Shaver Pro
A beast of a machine, the Paint Shaver Pro is an angle grinder with carbide scraper blades attached to a spinning head that attaches to a HEPA vacuum that literally does exactly what its name implies…it shaves the paint. There is a steep learning curve since this tool is very serious and you can easily shave the wood off with the paint, but once you have it dialed in and have a feel for the tool it can be fast, fast, fast. It comes at a steep expense though. Pick one up for between $600 and $900 depending on the features. You can get free shipping if you tell them you heard about it on The Craftsman Blog so keep that in mind if you go that route!
Heat Paint Stripping
We talked a little bit about using heat earlier, and this is a very popular way to remove dozens of layers of paint. If done correctly it can be both effective and safe. I’ll give you just a few of the most common tools that I have used.
IR Paint Stripper
This is the infrared paint stripper that I partnered to produce. It uses a ceramic plate infrared heating element with a hardened plastic housing and rotating grip. It can strip a dozen layers of paint down to bare wood quickly (about 8-12 seconds) without scorching the wood or breaking the glass which is common with other heat guns or infrared heaters. It is an excellent choice for DIYers and works great for windows, doors, and even siding. Its low price point at around $130 also makes it a very approachable infrared tool.
Speedheater Cobra
A professional grade, and very powerful, infrared tool the Cobra is small and versatile at about half the size of the IR Paint Stripper it excels at getting into small spaces and with windows. With 700 watts of power it is one of the most powerful IR tools on the market. With that power also comes a tendency to break glass or char wood if you are not careful or experienced. It’s price tag at around $450 is significant.
Speedheater Original
The grandaddy of infrared, the Speedheater Original, is the largest IR tool that I have seen on the market. Like its smaller cousin the Cobra it uses glass IR bulbs which are very effective but can be fragile. This tool can be paired with an arm system that holds the tool for you while you scrape, doubling your production time. This big boy works best with siding or other large flat surfaces and costs around $500.
Heat Gun
The old standby for removing paint with heat, heat guns are everywhere. With dozens of companies making brands that have untold variations and features. Be careful when picking a heat gun because if they heat to temps above 600°F (most do) then you run the risk of vaporizing the lead in the paint unlike with the lower temps of infrared tools.
Steam Heat
Lower the heat and add some moisture and you get an old school and effective form of paint removal that helps eliminate excess dust (which is what makes stripping lead paint dangerous). Using a steam box or simply a garment steamer to soften the paint and make stripping paint easier is a great option that is extremely simple and very safe.
I hope this has helped you understand all the options out there. There are quite a few ways to skin the paint stripping cat so don’t get hung up on only one technique. Also, keep in mind that stripping paint may not always be required. Sometimes all it needs is some good sanding and cleaning before applying a fresh coat of paint to make things look great again.


Founder & Editor-in-Chief
I love old houses, working with my hands, and teaching others the excitment of doing it yourself! Everything is teachable if you only give it the chance.
Hey, a couple of points if I may.
As far as the citristrip not working, I had that problem with using IR, turns out the “primer” was a thin coat of “plaster”, the same material that artists use on a canvas before they paint, I am blanking on what it is called. I guess there is no problem stripping it down to that if one understands what it is one is feeling with. But maybe that was not the issue with this piece.
The Peel Away 1, is that the one with NaOH (sodium hydroxide) that you have to neutralize with vinegar? In my experience one has to be very careful scraping because it softens the wood and gouging is easy.
For concave or flat shapes, there are carbide scrapers (with convex blades) that outperform steel, but only Hyde has concave blades for convex surfaces (and carbide blades cannot be sharpened by a file but need diamond).