
 An attic is often the easiest place to add onto your house. No foundations or setbacks to worry about. Everything is already in place, you just have to transform an empty space into your vision.
Create an extra bedroom, a master suite, a media room, a play room or anything you can imagine for much less than the cost of an addition.
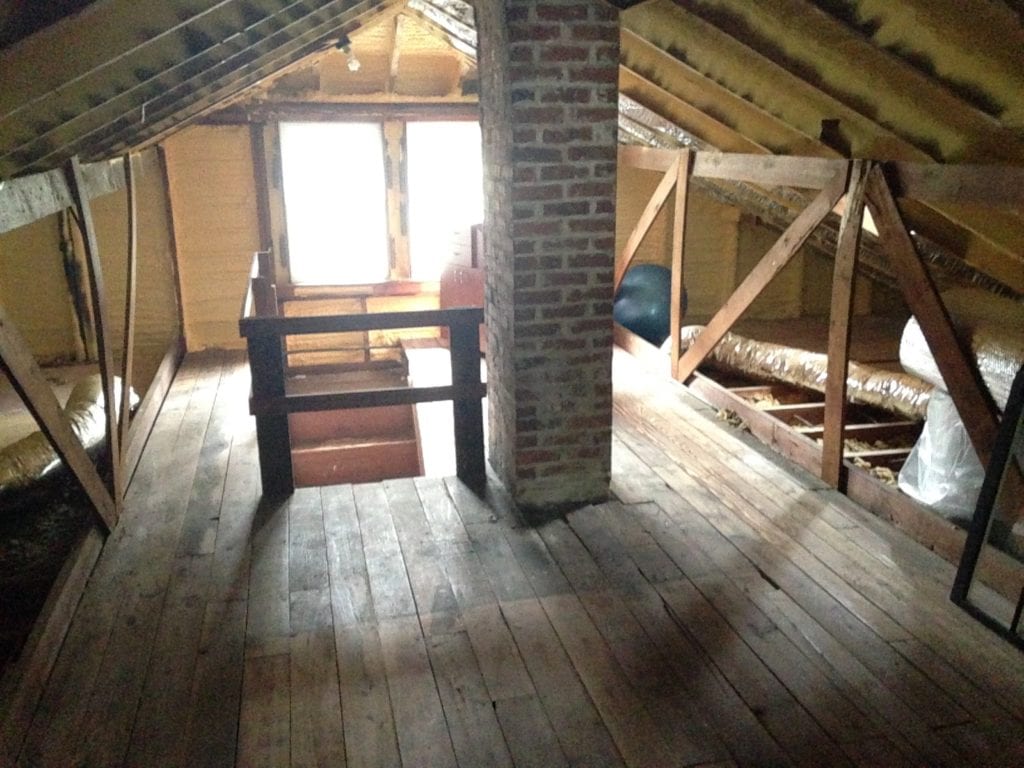
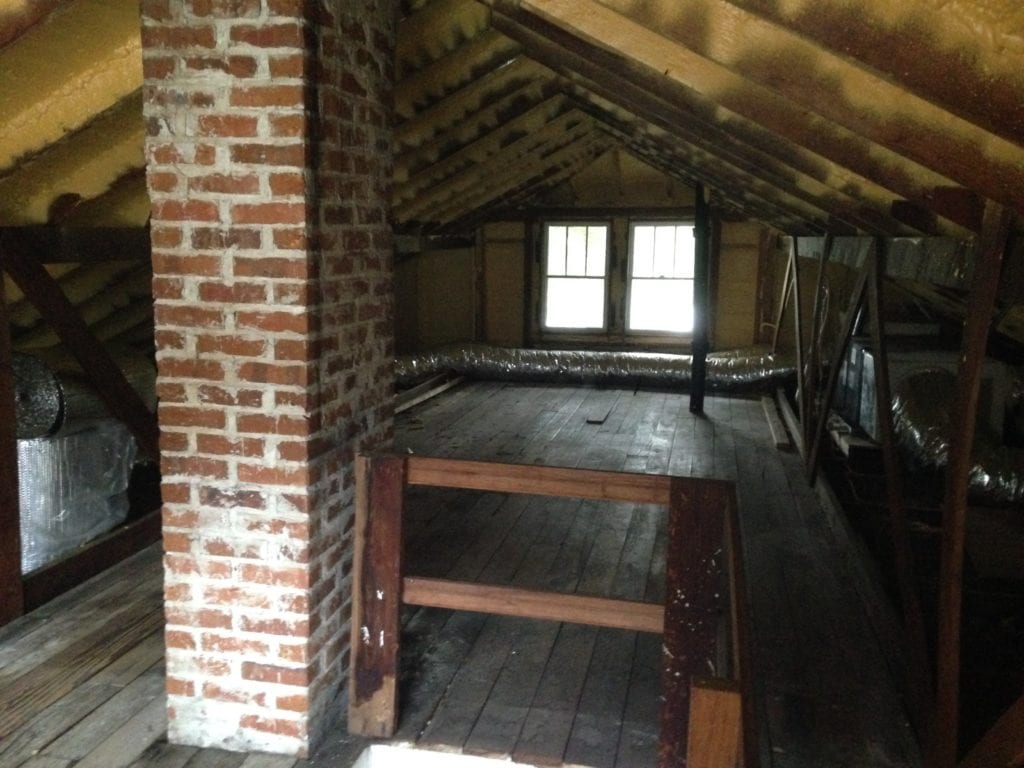
My own old house was blessed with an unfinished attic when we bought it, and I knew someday we would turn what was just a messy storage space into a livable room.
The moment came when we discovered we were expecting our 2nd child. I had nine months to figure out a plan, and I couldn’t break the bank doing it either.
While I’ve shared some bits and pieces of the project with you already, I’m finally ready to reveal how to turn an attic into a bedroom with you today!
Make a Plan
Figuring out exactly what you want to do is so important before you start putting up walls and finishing out a space. Think about the layout, where the outlets and light switches will go, the size of your vanity, etc, etc.
The list goes on and on, but you need to know the sizes and locations of everything you want to include before you start so you can plan accordingly.
With an attic bedroom, you will likely be fighting for every inch of space you can get so coming up with some clever ideas to save room can make the room go from passable to incredible.
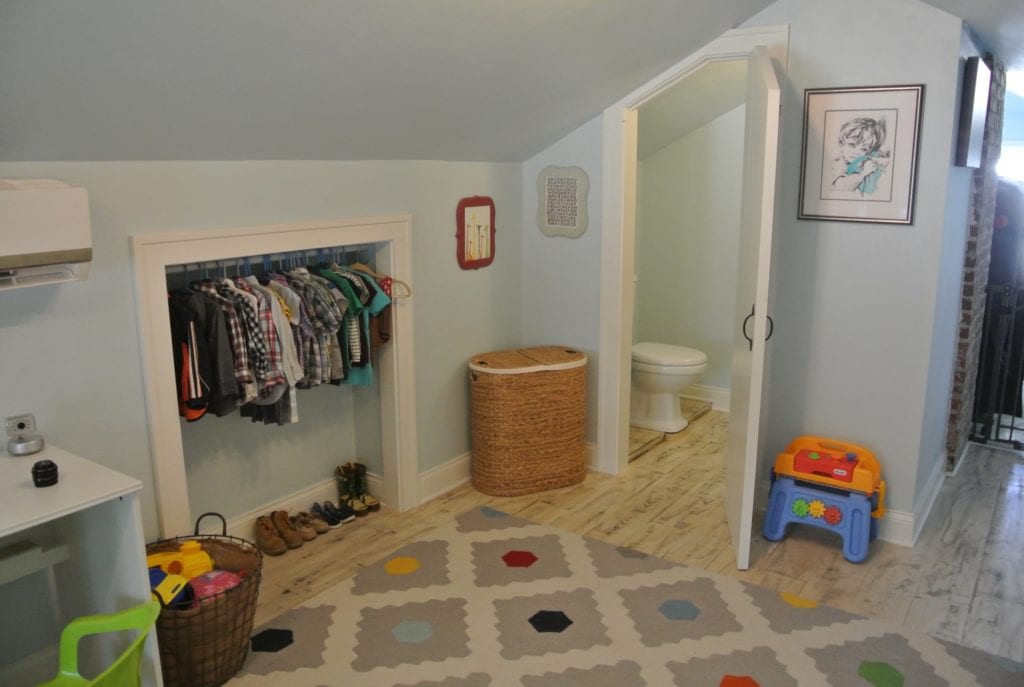
We wanted to include room for both of our boys and a half bath to save us from midnight potty trips down the steep stairs. We also knew we needed plenty of storage for the things that we “collect” over the years and never seem to get rid of.
So, in a small room, how do you fit 2 beds and a bathroom and still have room to play and headroom for the adults? Here’s the what we came up with. I’ve also included a photo gallery of the whole project at the end.
The Layout

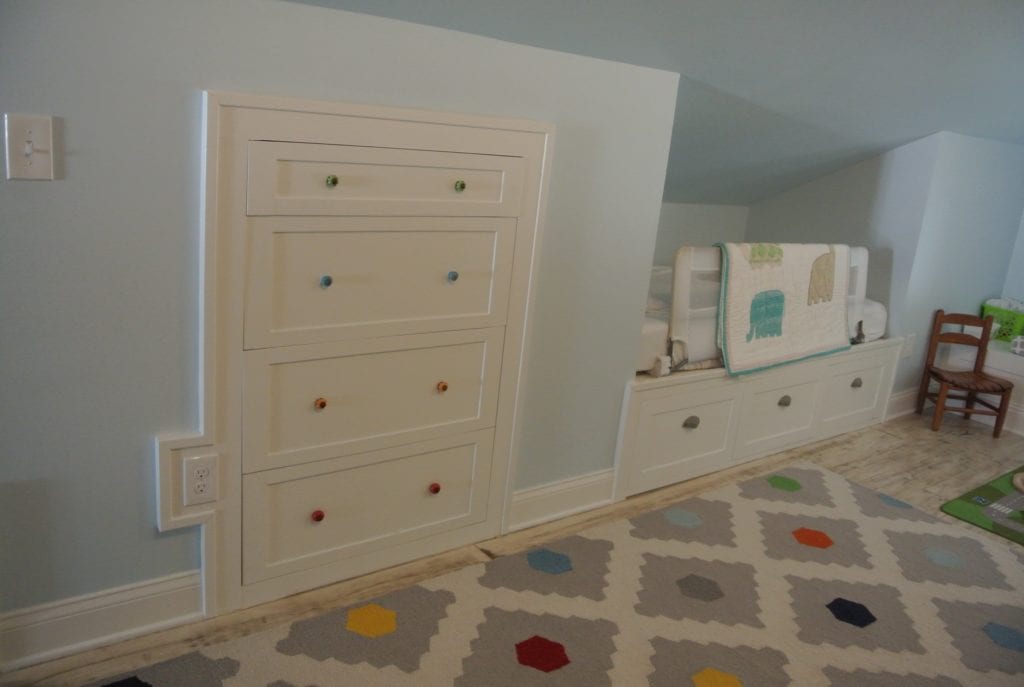
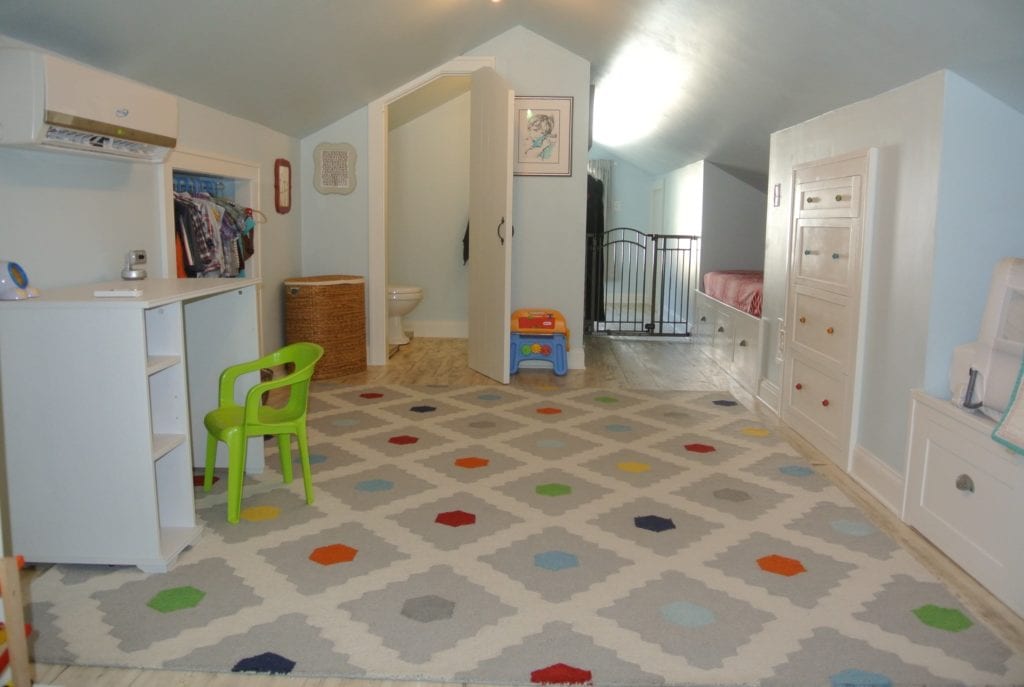
We tucked 2 beds into the knee wall on one side to keep the room open. We framed out the openings and built huge drawers underneath the beds to utilize as much storage space as we could, otherwise that was just lost space.
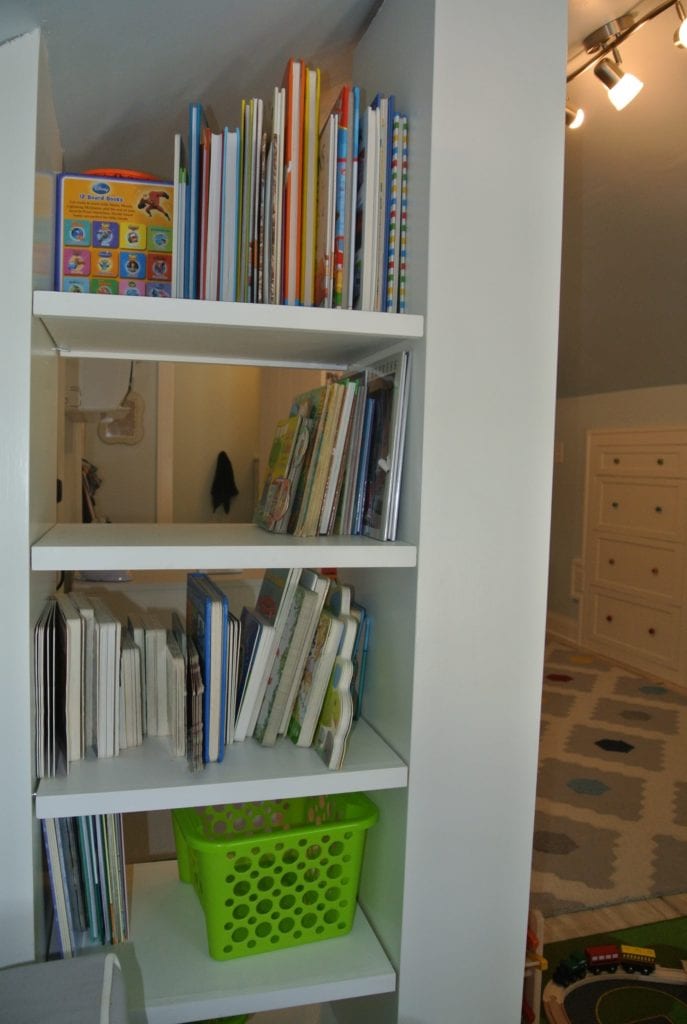
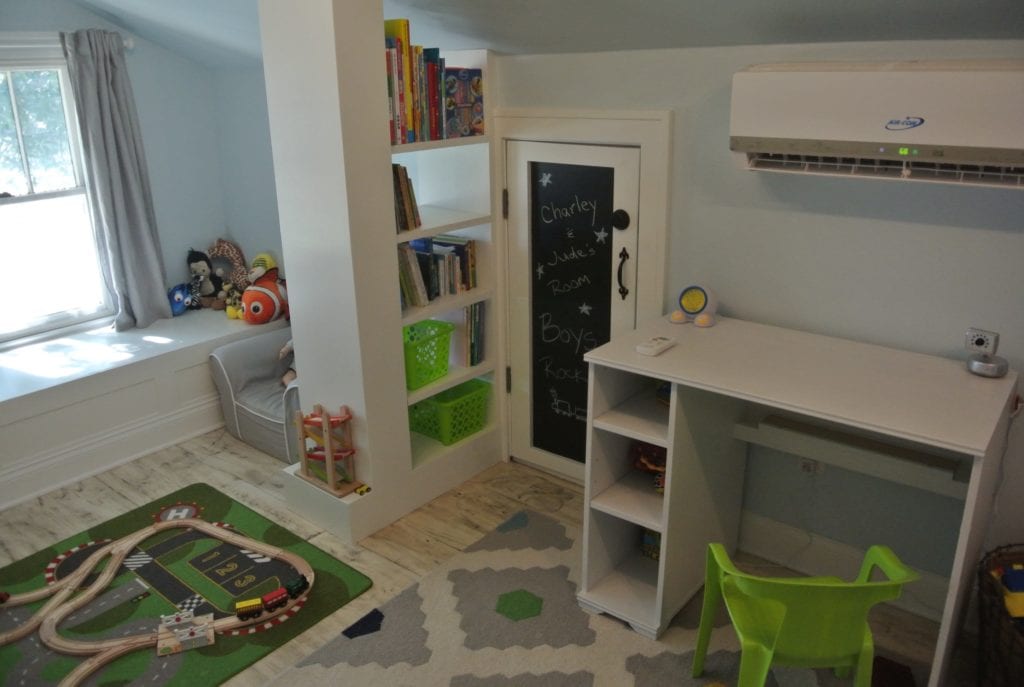
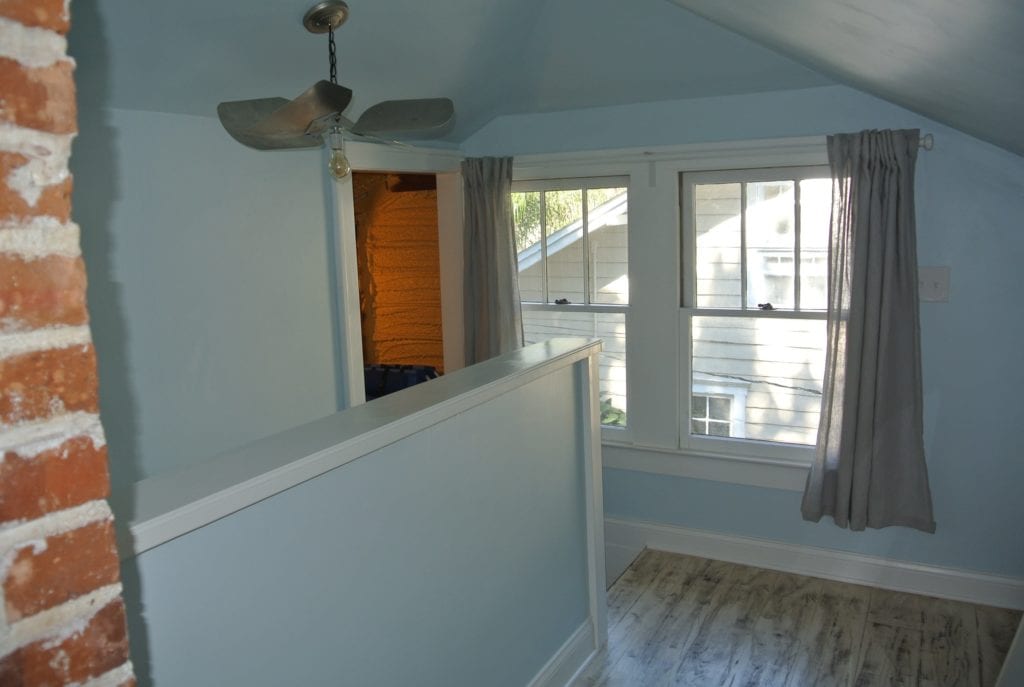
There was a chimney in the middle of the room as well as a vent stack that was going to be a real pain to move. We decided to incorporate the chimney into the bathroom wall (leaving the brick exposed on both sides of course!). Then for the vent stack, we cleverly hid it inside a built in bookshelf that also created a little reading nook for the boys in their cushy chair.
We really struggled between doing a half or full bath and for expense and space, we decided to go with the half bath. Installing a half bath is much simpler!
Keep in mind that adding a tub on a second story is not always feasible because of the huge additional weight it adds (especially when full of water) Always be careful that your house can support that extra weight, because most times, it was never designed to.
Insulation
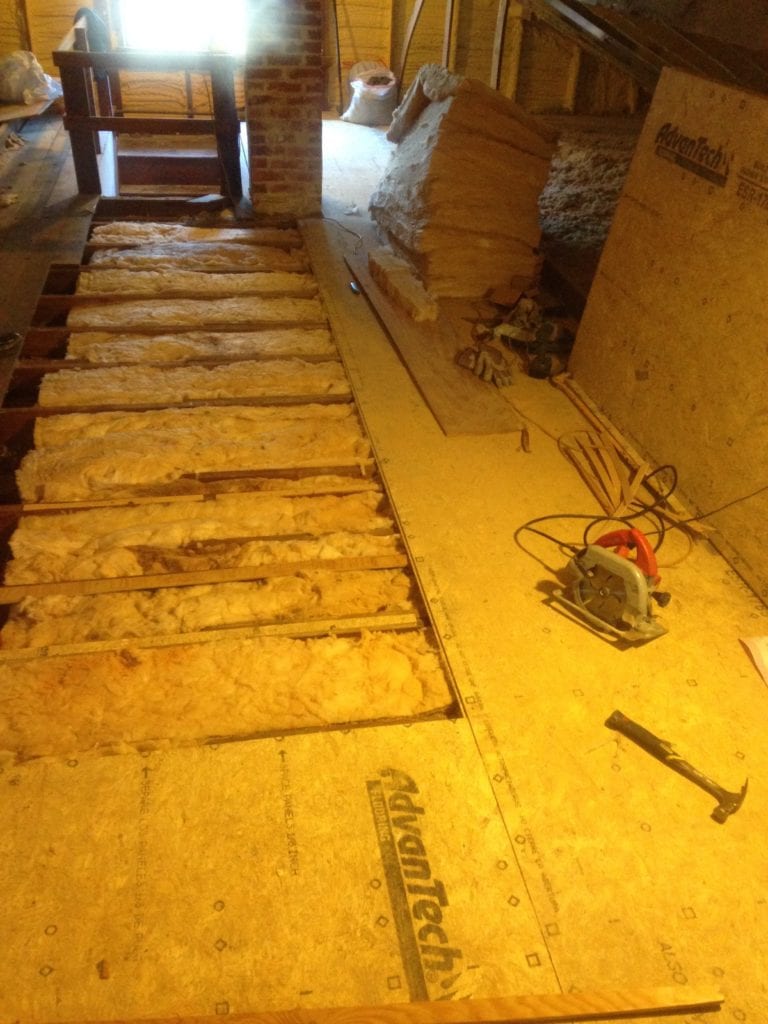
We had already installed 1″ of spray foam on the underside of the roof and the exterior walls in the attic years ago, and to finish it off we added as much blown-in cellulose in the areas that would be hard to reach once the walls were up. This has made a big difference in our utility bills.
Next, we installed R-13 and R-19 un-faced batts wherever we could on the exterior walls and ceiling of what would be the new climate controlled room.
I also added acoustic insulation on the floor to keep the romping around a little quieter downstairs.
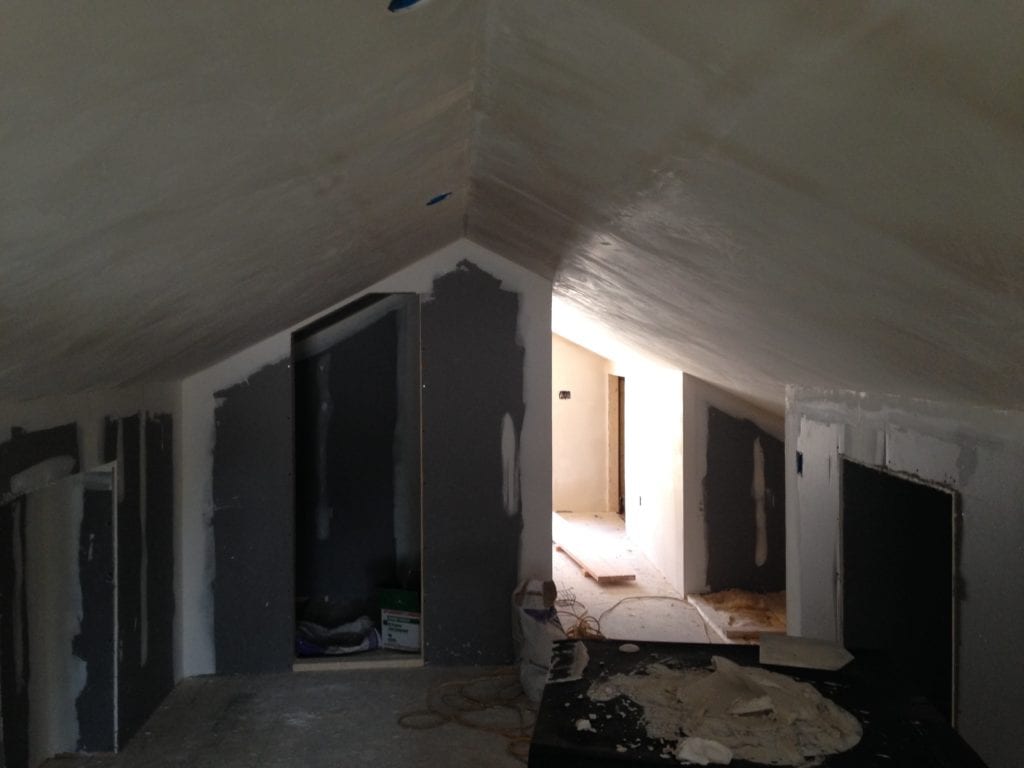
Trim & Plaster
It was important to me that our finished attic matched what was downstairs in our 1929 bungalow. So, the walls were plasterboard with a veneer coat of plaster to match the textures downstairs.

Then for the trim, I put in the same molding profiles as downstairs. Baseboards, casings, windows, everything was trimmed to the exact patterns and dimension as they are downstairs. That’s the only way to make everything fit properly and look like it belongs.
To save space, we also built a dresser into the wall between the two beds. All the drawers and dressers were shaker style front, which are a pretty timeless, yet period appropriate style. We used soft close slides and simple knobs from Hobby Lobby.
The Floors
We had some real fun here thanks to my wife’s creativity. We wanted something old looking but didn’t want to haul the drum sander up stairs and go through refinishing 300 SF of flooring.
To start, I pulled out the old 1×4 floor boards throughout and brought them back to my shop for future salvage projects. They were just too chippy and full of gaps to work for a little boy’s room.
I then put down 3/4″ Advantech subfloor and had a lot of work to level out the floors throughout the attic. Next was laying down an acoustic underlayment so that we wouldn’t be disturbed by the heavy footsteps of our boys.
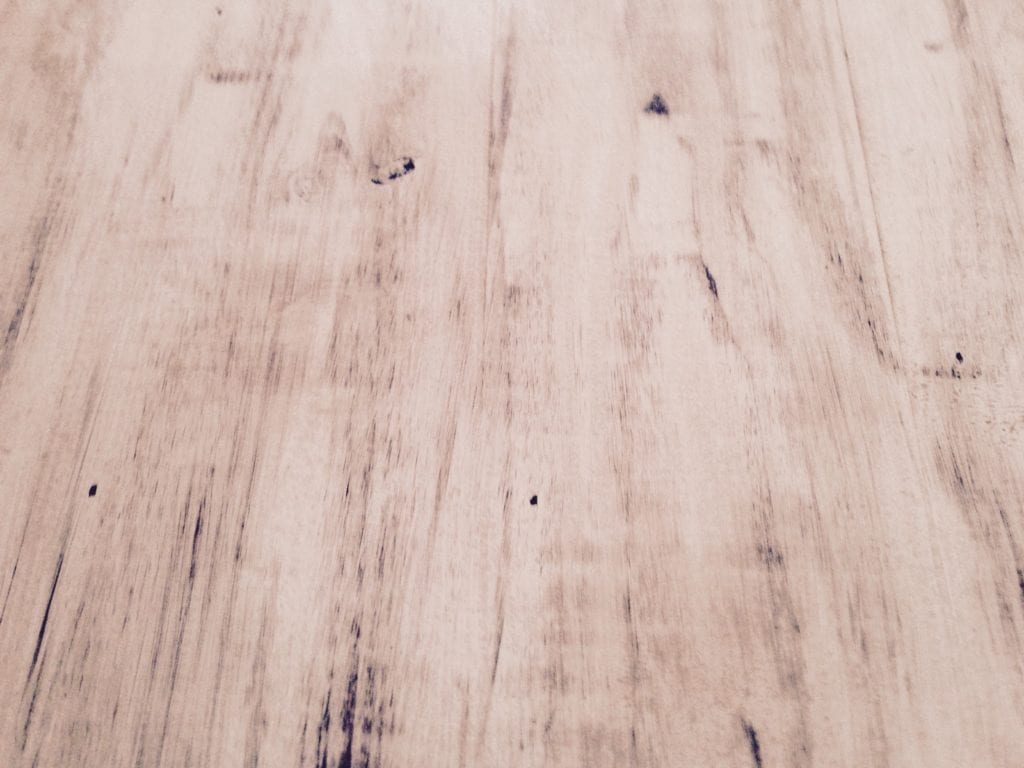
Then came the finish floor which was the creative part! I bought 1×8 select yellow pine, tongue and groove siding and laid it down upside down so that it looked like regular flooring. This was MUCH cheaper than buying pine flooring this size and is a little more rustic in appearance which is what we were going for.
The floors were finished with a very cool and very simple finishing process that made them look antique and distressed. I documented the process in How To: Make Distressed Wood Floors.
The Bathroom
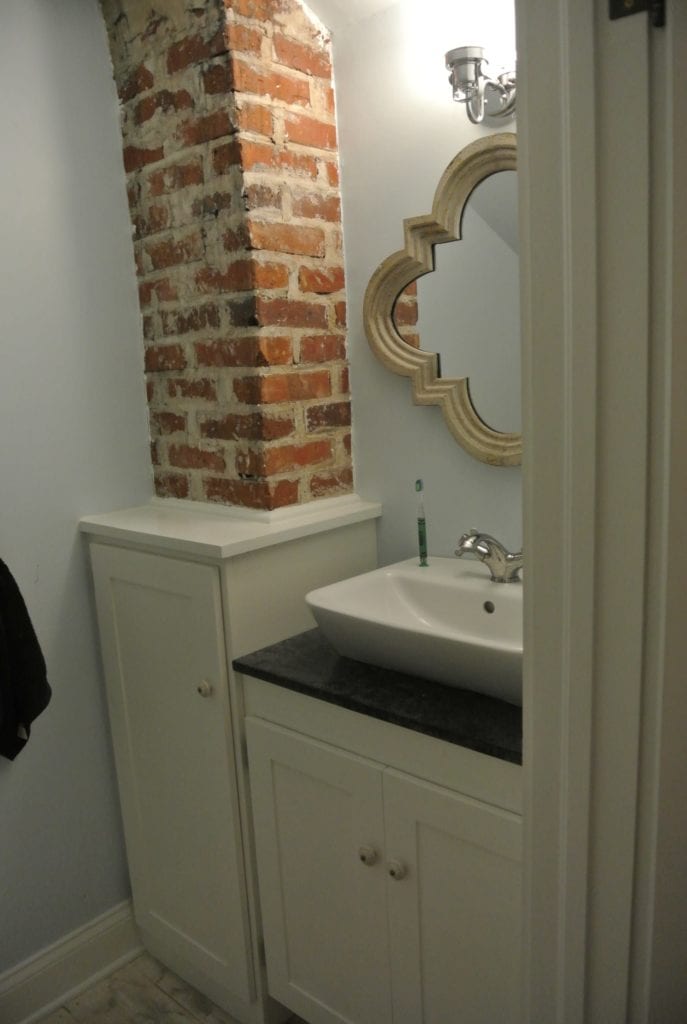
We followed the same cabinet design for the bathroom, doing a shaker style vanity topped with a piece of soapstone I got at the Habitat for Humanity ReStore for $10!
The sink was a challenge to find one small enough to fit, but luckily IKEA had what we needed and we found a great faucet there to boot.
Then there was a the toilet…I hated dealing with this sinking toilet! The drain line for the toilet was going to make us potentially raise all the floors up about 6 inches which was not possible because of the headroom problem in an attic.
We searched and searched for solution and then my plumber had a moment of brilliance. He suggested a rear discharge toilet which I had never heard of, but apparently they are popular in Europe. Instead of the drain line coming out the bottom, it shoots the waste out the backside about 8 inches high so we would have room to run the drain line without raising the floors or putting the toilet on a huge platform.
We finished the little bath off with a mirror and knobs from Hobby Lobby again.
Details
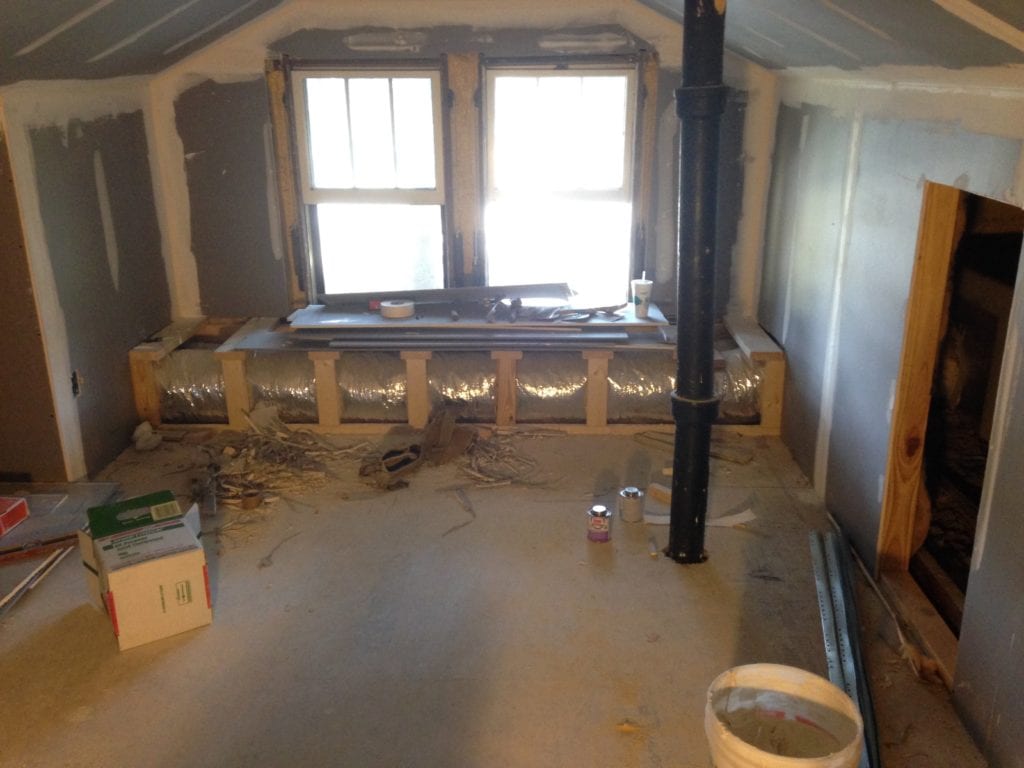
There were a lot of little things we added, like a room width window seat which looks like it was on purpose, but is really there to allow for the duct work for the HVAC.
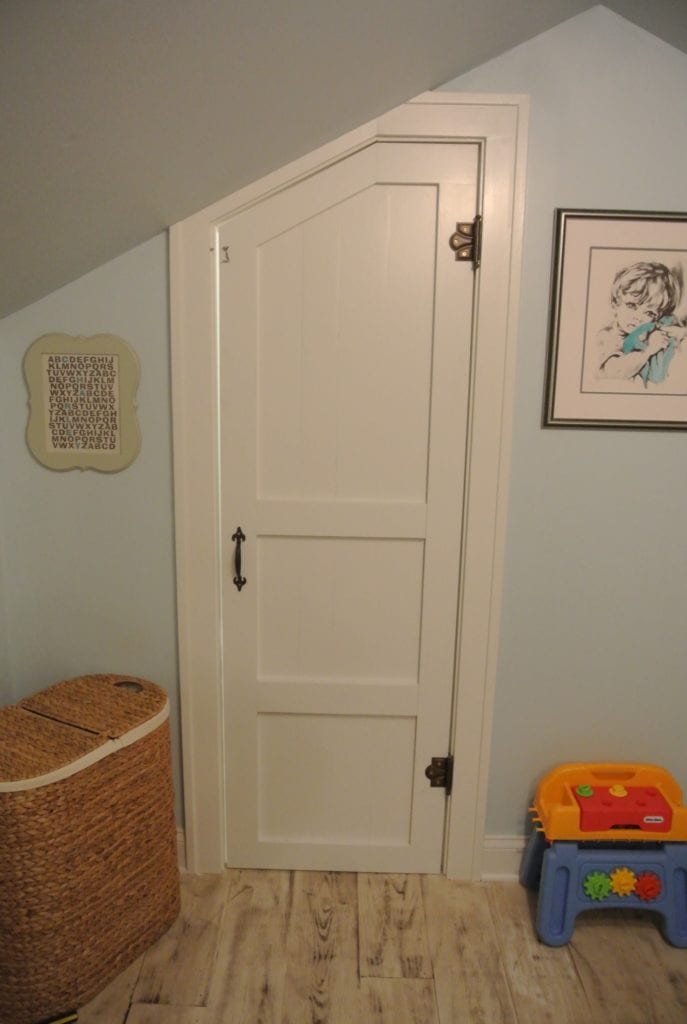
We also added a chalk board door to access the mechanicals installed in the attic so that nothing is trapped behind the walls. The door adds a little whimsy to what would otherwise be a boring utilitarian door.
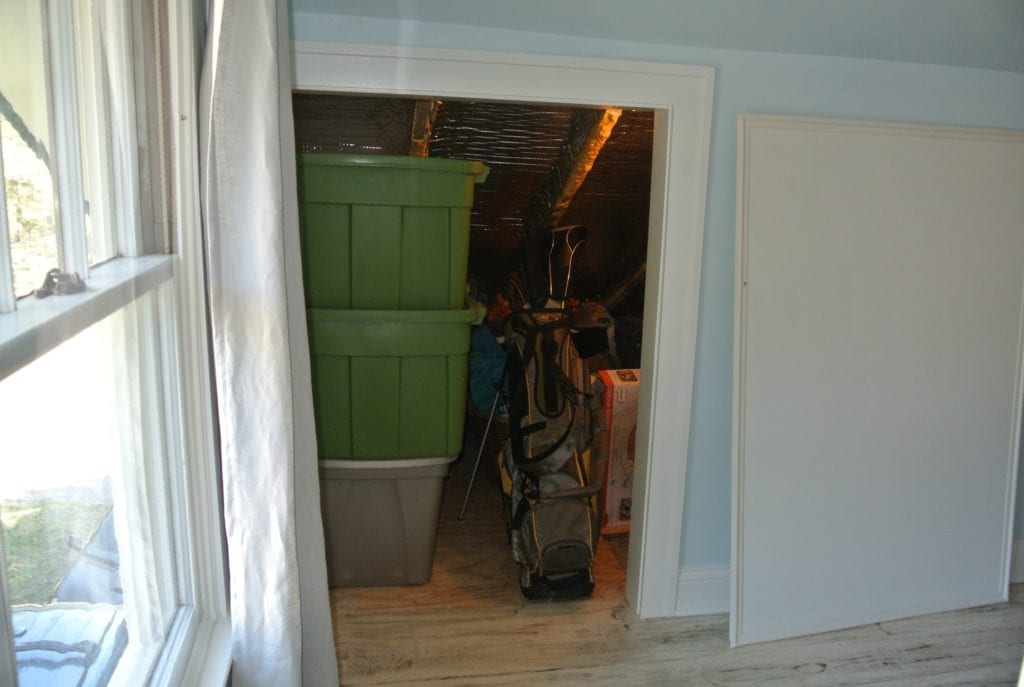
We also created two more doors to the storage portion of the attic outside of the boys main play area. Since these doors access the unconditioned attic, I struggled with a way to make them air tight.
I settled on a inexpensive option that worked great! Since the doors aren’t accessed often I installed Indow sleep panels in the openings. Indow are meant to be installed in windows, but they work perfect here because they form almost a perfect airtight seal. Read more about them in my post 3 Reasons I Chose Indow Windows.
To keep the room warm in the winter and cool in the summer, we installed a mini-split system. For small additions these work great and cost very little to add. We only spent about $850 total for the unit and installation costs.
The End Result
The project cost us just over $10,000 and that is with me doing most of the work for free. But it left us with a great room for our boys to grow into over the years.
The room is cozy and bright and full of space to run and set up sprawling train sets. We were able to turn an empty space into an extra 320 SF of play and sleep space with a vintage feel that adds a lot more value to our home than the $10,000 we put into it, and you can do the same.


Founder & Editor-in-Chief
I love old houses, working with my hands, and teaching others the excitment of doing it yourself! Everything is teachable if you only give it the chance.
I love this post. I’m curious what the rise and run of your stairs ended up being and if they were already existing stairs. We don’t have a great spot for stairs up to our attic and are debating steep stairs or a ships ladder type of access for our teenager to have his own bedroom finally.
Hi Scott
Our attic doesn’t have plumbing. How difficult is it to get plumbing up there to create a bathroom?
Not too bad really. A licensed plumber can handle it easily without too much damage in most cases.
Can you do this to an attic that has pull down stairs from the ceiling entrance? I think it’s called a crawl space but it’s high enough . It just Jana’s no entry points except the pull down stairs I. A closet and the other in the garage. This is probably a super dumb question.
You can but your functionality will definitely be improved with a full staircase.
Hi Scott,
I’m curious about the chimney that was in the center of the attic. Was it removed or worked into the design. I have a similar issue with my attic that I’m turnng into my bedroom.
Thanks,
Jennifer
Hi Jennifer,
It was worked into the design in the corner of the bathroom/staircase. 🙂 Best of luck to you!
-Alyssa at The Craftsman Blog
Do you by chance have photos of your staircase? Our spaces look very similar. We have an existing staircase but it is very steep and I don’t see how we could get around not relocating it. Thank you!
I would love to see staircase photos as well!! We have a very similar space, including a brick chimney and a steep staircase. Not sure how to make it work!
Your attic is awesome. The roof pitch looks similar to mine, a 7/12 pitch. I’m having trouble visualizing my finished space, especially the headroom. Do you mind sharing the height of your peak from the floor, and also the height at which you installed the ceiling? Your father-in-law doesn’t look too crowded, but I don’t know if he a former NBA star or not ; ) Thanks for your help!
I see now in the photos that the “ceiling” goes from the kneewall to the peak, without a horizontal section. It would probably help me more to know the height of the knee walls, and Aldo the floor to ceiling height at the peak. If you know your pitch, that would be great, too. Thank you.
Do you have plans on how everything was placed especially the chimney? We have a 20’s bungalow we are thinking of doing this to. Also, were the stairs already there? It’s hard to figure out a location to put them.
Was there a ridge vent in the attic? If so, how did you work with it? Thanks!
Great job on the remodel! We are about to start on a master bedroom renovation in our attic space which is 31’X13.5′. Our house was built in 1940 and we are concerned that the house may not be able to hold the weight. Would you recommend reinforcing the 2X6 beams?
Molly, each instance is different so definitely have an engineer check if you are unsure. Try to avoid adding a tub which when full adds enormous weight. It really depends on the structure of the house if they will need reinforcing though.
Great job turning your attic into a functional bedroom! Looks great. Thanks for sharing!
What a transformation! It’s incredible to see the basic wood and insulation of an attic turned into a nice, livable room for a child. The acoustic improvements will be a noticeable bonus for years to come as well, I’m sure. Thanks for sharing.
Awesome! I know who I will call when I buy an old house!
Were the stairs already in or did they get added, too? I’m pondering what the best way to add in stairs to our attic would be. Nothing much comes to mind that doesn’t involve losing usable space on the floor below, or building out a sizable dormer.
The stairs were already there albeit very step. Adding stairs is a indeed a big headache and almost always adds a significant cost. Depending on how you plan to use the space there are some creative stair ideas you can find to lessen the footprint though.
Lucky for you. 🙂
I’m torn between an attic project needing stairs and a basement finishing project that would need trenching, waterproofing, likely structural reinforcement if we want to move any of the columns, and better stair alignment to meet current code. Walking into the house, the basement seemed like the easy project but I’m seeing the budget go up quickly as I tease it out.
This is amazing Scott! I absolutely love it!
Very nice and I bet your son loves it. I particularly like the big colorful rug and the creative floor treatment. So many bungalows have nice windows in the attic, so it seems like such a waste to not use the attic.
The toilet type has been around for awhile and is commonly used in basement remodels. Good idea to use it in the attic.
I’m just starting the planning phase of our 600sq ft attic conversion. It is already plummed for a full bath, hvac is in, power is available, etc. one thing that i worry about is ventilation and insulation in the sloped ceiling. Any tips?
Amazing job on both design and execution. You should be proud of the results, especially with a cost of just $10k.
Some neighbors of mine recently gave me a tour of an attic renovation they had contracted out. The results were attractive, but they did not reflect nearly the level of creativity yours did in the way the space was used.
My neighbors expressed particular satisfaction with the bid of their contractor, which was less than half of what another had bid. The “low bid” was a whopping $70,000.
Wow, that’s a lot! Thanks for the compliments.
Great! What were the dimensions of the space?
Thanks! The room is 30′ X 11′