

I’ve been getting a lot of questions lately about lead paint, so I wanted to try to address some of those questions to make folks feel a little safer in their old homes.
If you live in a house built before 1978, you need to know how to test for lead paint, especially if you have littles ones. Lead is toxic to humans. Children under 6 are especially vulnerable to it since their bodies absorb lead at a much greater rate than adults (~50% absorption vs. ~10% in adults).
You can test for lead paint yourself, but you have to know how to do it properly or you may end up with a false negative and health consequences if you decide to renovate without following lead-safe practices.
EPA Approved Lead Test Kits
There are companies and tools that will test, with extreme accuracy the amount of lead in painted surfaces. They can be expensive, but their accuracy is great. While this kind of testing can be helpful, it is not really necessary for most homeowners.
All you really need to know is if there is lead present in the concentrations that the EPA has deemed harmful (> 0.5% lead content). For that, home test kits are more than sufficient. These kits must meet criterion as outline by the EPA in order to be approved for use.
In this post, I’ll walk you through how to use the 3M LeadCheck test kit, which is what I use on all our projects. It is simple to use and affordable. They are available at certain hardware stores or you can get them at a little cheaper price in my Amazon store.
How to Test For Lead Paint
Testing for lead paint with a home test kit is a fairly straight forward process. The important thing to remember is that you need to test ALL the layers of paint and not just the top layer. This is the #1 reason for false negatives!
Step #1 Clean the Surface
Wipe the surface you are going to test with a dampened rag to remove any dust or debris. You want to test the actual paint and not any airborne particles that may have landed in that area.
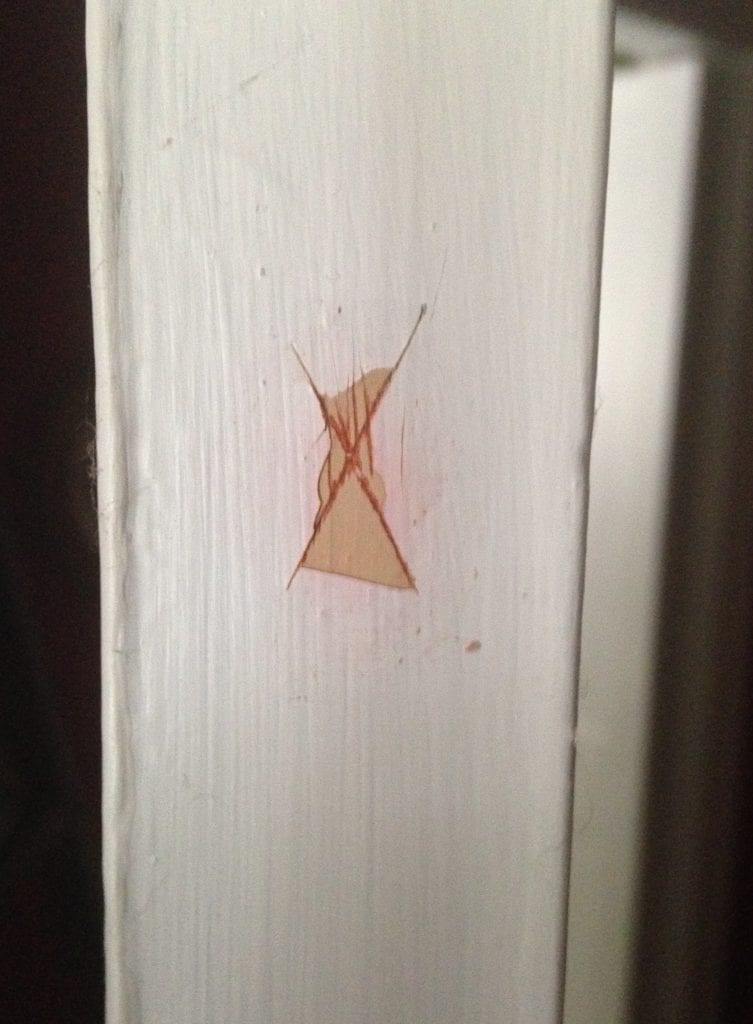
Step #2 Cut the Paint
Using a razor knife, cut an “X” in the paint and peel back the layers of paint so that ALL layers including the original primer are revealed as in the picture to your right.
Step #3 Activate the Swab
Inside the tester, there are two vials of fluid. Crush both thoroughly and shake the tester to ensure that they are mixed. Squeeze the tester with the tip facing down until a small amount of the brownish-orange liquid is visible.
Step #4 Rub on the Surface
Rub the activated tester on the surface in different directions for 30-seconds. If the tester turns pink or red then the test is positive for lead. Just remember the phrase “If it’s red, there’s Lead”
Step #5 Verify the Results
- If the tester did turn pink or red, you are done. You have proof that there is lead present and you should use lead-safe work practices.
- If the tester did NOT turn pink or red you need to verify that it was working properly by rubbing the tester on the test strips provided in the package.
- If the tester does turn red after being used on the test strip then it is a valid test and you can feel safe knowing there is no lead or that if there is lead it is an extremely minimal and safe level (less than 0.5% lead content).
- If the tester does NOT turn red after being used on the test strip then it is a faulty tester and the testing should be repeated using a new tester.
Before you do any renovations, make sure to test the areas you plan to work on for lead paint. Test all the painted surfaces that will be disturbed. If you are hiring a contractor, make sure they are licensed by the EPA for lead-safe practices.
I have installed a handy widget in the sidebar that will allow you to type in your zip code and find an EPA licensed contractor in your area. It will always be there so you can always bookmark this page and use it as a resource anytime you need.


Founder & Editor-in-Chief
I love old houses, working with my hands, and teaching others the excitment of doing it yourself! Everything is teachable if you only give it the chance.
I just came across a problem with testing for lead: I’m redoing an antique bottle capper. I did the lead test and the swab came back red; then I thought, “well, duh, the paint is red. Is The red lead or just paint coming off?”
Just checking-I have an old, painted trunk I tested. (I followed the directions by cleaning and sanding the area first). The swab AND the indicator strip stayed yellow-orange after I first tested. But hours later, they turned pink! What does this mean? Thanks!
Hello. I performed the test and it came out negative. I verified it on the trst confirmation card. However, a few minutes later I went back to the area I tested a a drop that spilled out had turned half pink. What does this tell me?
Me too. Author please answer
I’ve used these 3M swabs on old painted floor joists and they didn’t turn pink. Then, weeks later, the spot I tested began turning pink. Is this a normal reaction, or a delayed indication of lead?
Hi Chris,
I have had the same thing happen in several spots in my (newly-bought but pre-1978) house and have hypothesized it might be due to lead particles in the air &/or air ducst settling on my tested surfaces and slowly turning them light pink. As a precaution, I regularly clean everything (including my hair!) with lead-decontaminating soaps.
*ducts*
Review the written report provided to you upon the testing’s completion, and ask for your inspector or assessor’s recommendations on whether you should seek an abatement professional to remove all lead completely or come up with a strict maintenance plan to prevent exposure.
I agree with you. The lead found in lead-based paint can be hazardous, and has been tied to multiple health problems, particularly for young children (under 6) and pregnant women. Lead paint in the home is a serious health hazard. Lead inspection is a MUST.
Jhoell
Kudos to Mike for protecting himself and family by using low heat infrared to strip your paint instead of high heat guns. Readers, look for safe, UL-listed infrared paint removers not copies which are not safety and quality tested.
Scott, I think I may have already found my answer in your previous post:
Lead Paint: The Whole Story, August 5, 2013.
I typically heat strip paint, which minimizes fine particulate dust, and I use infrared heat that does not vaporize lead as you have written elsewhere,
and I have done it all myself (sh…don’t tell the EPA). And none of our children (youngest now 13) ever tested positive for lead.
Maybe you can’t officially answer this…
I totally understand the need to protect young children from eating peeling lead paint and “teething on windowsills”, and I understand not stripping lead paint in a way that is dusty with children and pregnant women around…
but before newer EPA regs, were there ever any adult professionals that had trouble with lead poisoning from their old practices in scraping?