

Here we are on week two of your free content from my new book Old Windows In-Depth. This week I’ll be sharing the chapter on how to restore varnished window sash, since the process is a little bit different. All of the techniques and materials you’ll need are below and don’t forget- you can pre-order my new book in our store before its official release on May 23rd!
One of the most time consuming things to do in window restoration is to remove paint from the inside profiles of the sash. If your sash are not painted, but rather varnished or shellacked, you have just won the lottery in that regard. No scraping paint on the inside, yay!
You will have to smooth out the surface and clean the old finish off before you can apply anything new. Old shellac is especially bad at darkening considerably over decades of use, so removing it will really improve the appearance of the wood underneath.
Check out my previous post How To : Determine Different Types of Wood Finish to see what was previously applied to your sash. The first step is removing the old finish, whatever it may be, down to bare wood through sanding or solvents. Once you’re certain all of the old finish has been removed, you’re ready to stain the sash.
The Order of Operations
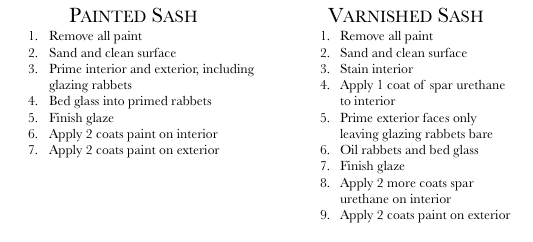
I do things in a slightly different order when restoring a stained and varnished sash than a sash that is fully painted. Once you have gotten the sash prime ready, in that it is repaired and stripped of any old finishes this is where I change the order of things a bit.
On a painted sash, I would normally prime everything at this point, but for a natural interior finish, you want to stain and then apply one coat of varnish on the interior first to protect the finish from any dripping or spilled primer.
The other issue you have when dealing with finishing a natural sash is that we typically prime the glazing rabbets to keep the wood from drawing the oils out of the glazing putty that you bed the glass in, but in this case, it’s too hard to keep a perfectly clean primer line with absolutely no drips onto the interior. Because of that, I recommend leaving the rabbets bare, priming only the exterior faces of the sash. If a little primer sneaks into a glazing rabbet, it’s not a problem unless it runs down onto the interior surface of the sash.
So, how do we handle the issue of the wood drawing the oils out of the putty? There’s a simple fix for that. You wipe the rabbets with a rag dipped in boiled linseed oil right before you apply the bedding putty and set your glass. That gives the wood the oil that it needs and prevents it from pulling it out of the putty and prematurely drying the putty.
I know that is a lot of changes to my typical process, so below is the order of operations for both natural finish interior and painted sash interior so that you can compare them side by side and see how they differ.
Staining Your Sash
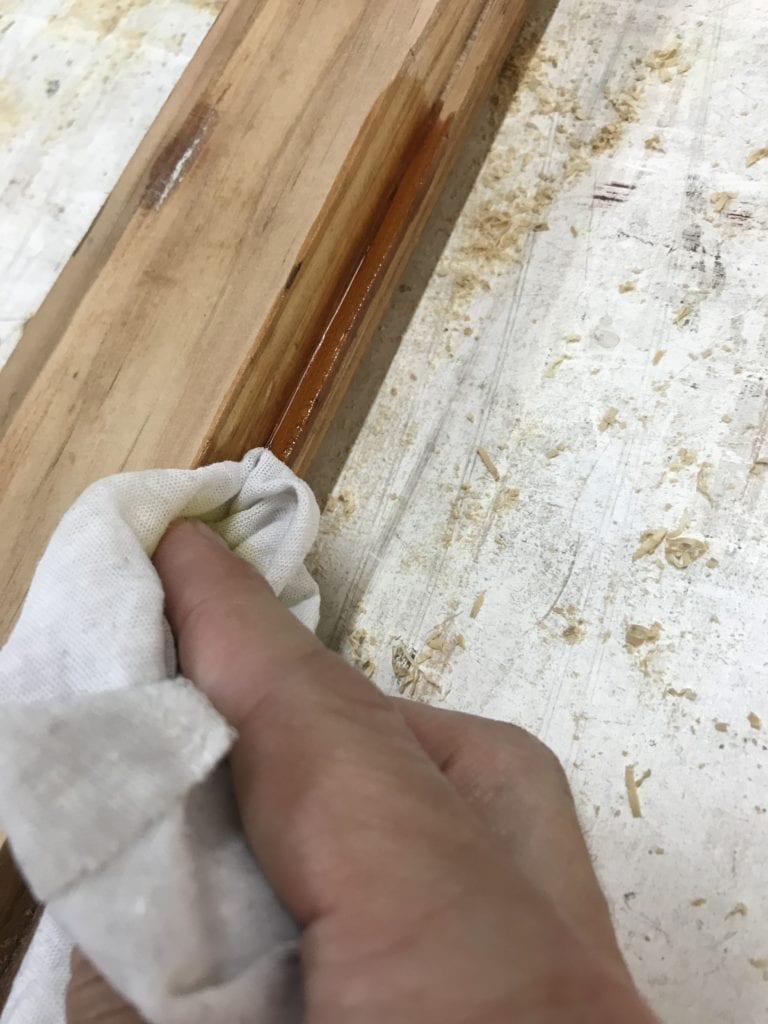
Applying stain is not too complicated, but you have to make sure the wood is completely free of old finish and any sanding dust before applying your stain. If you can safely say the surface is clean and clear, then applying stain is as easy as dipping a rag into the stain of your choice and wiping it onto the interior of the sash.
Let the stain penetrate for just a couple of minutes and then wipe it off with a clean rag. If you want a deeper color, you can apply multiple coats until you reach the color profile that you want. There is a point that the wood won’t really accept anymore stain though, so you can only go so far.
Let the stain dry long enough (usually 6-8 hrs) that when you press a rag onto it, you don’t get any color transfer.
Choosing the Right Varnish
There are a lot of options for varnish on the market today, and just like any product, some are better and easier to work with than others. At the time of this writing, there are two products that I prefer for windows. Helmsman Spar Urethane and Epifanes Spar Varnish are my two favorites and both will work great.
Epifanes is, in my opinion, a superior finish due to its formulation, but it is not as readily available as Helmsman, so the decision is yours. Helmsman seems to be readily available at most hardware store, whereas Epifanes is best found online.
I will also say that there are water-based varnishes and I do not recommend those at this time. The finish is still not up to the same quality as the oil-based products.
Both of the varnishes that I mentioned above are not standard varnish, they are “spar” urethane or varnish, which is a slight tweak to the standard varnish recipe. The long and short of it is that a spar varnish has a couple of characteristics that make it a better choice for windows because it is designed for exterior usage. While your sash interiors are not exposed to the exterior, they are subject to the same heavy UV, weather, and temperature exposure as outdoor wood.
The modified formulation of spar varnishes adds UV blockers to protect the wood and finish. They also have a higher oil content, which creates a softer and more flexible finish that can handle the extreme movement associated with exterior application.
Standard varnishes will not last as long and begin to crack and fail in short order compared to a spar varnish, which will provide a longer service life. Whatever brand you pick is up to you and there are plenty of options, I just recommend that you only use a spar varnish on your window sash.
Applying Varnish
Varnish is sometimes a little intimidating for DIYers to apply, though it is much the same as applying any oil-based paint.
Like I mentioned earlier in the order of operations, you’ll want to apply your first coat of varnish as soon as your stain is dry. This helps protect the natural finish on the inside from any contamination like primer or glazing putty. Once that first coat of varnish is cured, the wood is sealed and protected so that if you happen to have any primer spills or anything else gets on the surface, they can be wiped off much easier.
The second and third coats should be applied after the glass is bed in place and you can cut in the varnish with your brush right up to the glass to cover the glazing putty.
To apply your finish, make sure you have a good quality brush that is intended for use with oil-based paints or stains. This is usually a natural bristle brush, but there are synthetic options available, it just needs to be acceptable for and oil-based finish, which not all brushes are.
Just like any paint, brush it on smoothly and tip off the surface to make sure that your brush marks are minimal. Don’t try to work the varnish too much or you will end up with more brush marks than if you had put it on and left it alone. Another helpful tip is to apply your varnish with the sash laid flat since varnish is thinner than paint. This prevents runs and allows the varnish to lay down better and provide a smoother finish.
You may find it beneficial to thin your varnish with mineral spirits to make a thinner finish, which will lay down easier and help you avoid brush marks. If you do thin your finish by more than 10-15% I would recommend adding a fourth coat since the thickness will not be as sufficient as a full strength coat.
Make sure that you give the varnish ample drying time between coats, and unlike paint, you will need to lightly sand between coats with a 220-grit sponge or paper. Dried varnish is a very slick surface and the sanding between coats gives the next coat some tooth to grip onto. Without sanding, it’s likely you’ll get peeling varnish from a bad bond. After applying the final coat, there is no sanding necessary- just let it cure as long as you can afford (at least 36 hrs.) and then you are ready for installation.


Founder & Editor-in-Chief
I love old houses, working with my hands, and teaching others the excitment of doing it yourself! Everything is teachable if you only give it the chance.
I might change the order of tasks when staining the inside. As a novice, I decided to finish the spar urethane before glazing. That worked well because A.) This was my first window and I’m not great at glazing yet. I got it on both sides and it cleaned off the urethane nicely. B.) I could put the urethane on without worry about getting it on the glass. The other modification I made was priming the rabbets. I used an oil based primer (at the recommendation of another website). I didn’t have linseed oil and the oil based primer served the same purpose. Just my observations. Thanks for the helpful info.
Do you also varnish the the jambs and stops?
Yes I do, but only the exterior portions.
We have a grade 2 listed building in the U.K. that has some beautiful sash windows. However, they can become a massive pain because you can’t just swap them out for something more modern or the town council will be after you! This guide really helps bring them back to life without incurring the wrath of the local council. Thanks!
Hi Russ,
We LOVE hearing when local governments are concerned with preserving historic buildings! I hope you have great luck restoring your sash with this guide. Thank you so much for sharing. 🙂
-Alyssa at The Craftsman Blog
All the trim in my house is shellac that has darkened. Should I just recoat with amber shellac or stain and spar urethane?
Thank you Scott for this information!! I have a mix of stained and painted windows. One thing I noticed on your list procedure for “painted sash” under process step #3 says to prime glazing rabbets. I have only applied linseed oil thinning it with turpentine into the glazing rabbet, not painted with primer. Should I be painting them instead? Still use linseed oil?
Thanks
You can either prime the rabbet or apply linseed oil. Both work fine.
I think you elsewhere wrote about a wipe-on finish that contained varnish and mineral spirits (and I think something else?). Can one use that?
Also, there is a product, forget the name, that one can use on top of varnish to “refresh it”. Can that do a half-reasonable job?
I really don’t want to have to perfect technique for brush-markless varnish application, I am only so coordinated and skilled…
Bob-I’m glad you asked that question. I asked a similar question recently in another older post so I really hope you get your answer. It’ll help me too!
have 1973 wood windows. all good shape. in 2006 – sanded – re-stain and 3 coats oil poly on inside. so I sand poly ? use stripper ? re-doing all my windows. have one pulled out in garage now. The window pains are NOT BACK PUTTIED. GLAZE ON OUTSIDE ONLY….do I haVe to pull ALL GLASS panes out or leave them as
You don’t have to remove the glass for restoration although a window from 1973 is likely built very differently from a historic wood sash like I’m describing.
Maybe I don’t need to bother with and worry about taking out my 1957 casements to glaze. I just can’t get out of my head that once I have them out I may have all kinds of troubles getting them back in. etc.
video please ?