

An old-fashioned plaster ceiling can be a long lived and beautiful thing or it can look like a train wreck depending on how your old house has been treated over the years. The reasons to keep your plaster are numerous and may surprise you.
Over time everything needs a little maintenance and that includes plaster ceilings which take the brunt of gravity’s destructive force constantly working against them.
In this post, I’ll show you how to deal with everything from hairline cracks to sagging plaster ceilings to water damaged plaster and beyond. If you want to keep your plaster ceiling and make it look in tip top shape keep reading.
Fixing Cracks in a Plaster Ceiling
Old lime and gypsum plaster gets harder and harder as decades pass and this rigidity can cause small stress cracks. Sometimes these cracks are small, no more than a hairline crack and other times those cracks can grow quite large. You’ll deal with each type of crack a little differently.
Small Cracks
These pose you no real issue to the structural health of the plaster ceiling and can be left alone unless they bother you.
For these small cracks the easiest solution is to use a 5-in-1 tool to dig any loose plaster out of the cracks very gently and then fill them with a spackling paste or joint compound.
If you have a rough texture or sanded plaster you can add some sand to your spackle or use a sponge to match the texture as closely as possible. For smooth plaster simply fill, sand smooth, prime, and touch up the paint.
Large Cracks
If you have large cracks, the size of a quarter or larger, or converging cracks where you see several cracks running roughly parallel to each other then these are a sign of potential issues.
Parallel cracks are a sign of settling that should be address before doing any plaster repair. Perhaps the settling has occurred years ago and is now stable or maybe it’s ongoing. The latter should be addressed immediately to prevent further damage.
Once you’ve resolved the settling issues check along the sides of the cracks to determine if you have sagging plaster that has come loose from the supporting lath. If it’s loose then skip to the section below on sagging plaster. If the plaster ceiling feels firmly attached to the lath then you can do the same repair as for the small cracks above.
For larger cracks you may need two coats of spackle because of its tendency to shrink as it dries in large gaps so double check before priming and painting.
Fixing a Sagging Plaster Ceiling
Repairs become a bit more complicated when the plaster is sagging. This means that the plaster keys have come loose from the wood or wire lath that supports it which is a big problem for ceilings.
A plaster ceiling can support itself for a while but if enough of the keys come loose the ceiling can eventually unzip itself and come down in one tragic failure like a row of dominoes failing one after the other so this is important to resolve quickly.

The preferred way to resolve this is not by pulling the ceiling down and replacing it with drywall, but rather to reattach the plaster ceiling to the supporting lath.
The old way of doing this was by using plaster washers which are a larger wash the is screwed through the face of the plaster into the lath to mechanically support the plaster. Then to cover the washers you would have to apply a couple coats of plaster over the ceiling building it up as much as 3/16”.
I prefer using a product called Big Wally’s Plaster Magic to reattach sagging plaster in my projects and I’ll walk you through the steps below. Using Plaster Magic prevents having to skim the entire ceiling because it uses a very effective adhesive to reattach the plaster to the lathe meaning no permanent plaster washers.
Before doing any plaster ceiling repair make sure to setup drop clothes and wear eye protection. Here’s a quick list of the tools and supplies you’ll need.
- Big Wally’s Plaster Magic Kit
- Drop Cloth
- Drill
- Impact Driver with Phillips bit
- Caulk Gun
- Rags
- Vacuum
- Pencil
Step 1 Drill Holes
Using the enclosed 3/16” masonry drill bit drill holes 1” to 2” from the crack, when you hit the lath stop (don’t drill thru the lath). Drill additional holes about 3” to 4” apart across the area that is loose or bulging.

Mark any holes that missed the lath to note them for later. If you miss the lath simply move over about 1/2” and drill a new hole. When finished vacuum out the dust from each hole.
Step 2 Condition the Lath
Using the spray bottle of conditioner, spray 3-5 sprays into each hole to condition the lath. Keep a rag handy because the conditioner will run out of the holes.

Wipe off the excess thoroughly and let the conditioner set for 10 minutes. Rinse out the spray nozzle by running water through it and spraying the water until all the conditioner is out of the unit.
Step 3 Inject Adhesive
Trim the adhesive tube nozzle to fit in the drilled holes. Using a caulk gun apply one full pull of adhesive into each hole (you can skip the holes that you circled earlier where the drill missed the lath).

Trigger the caulk gun slowly because the adhesive can squirt out of the holes unexpectedly. Wipe the excess off with a wet rag before it dries.
Step 4 Install Clamps
Install the temporary clamps every 8” to 12” by screwing into the lath through some of the drill holes. Bring the plaster into “soft” contact with the lath and avoid overdriving the clamps which can crush the plaster or cause all the adhesive to squeeze out of the area leaving a weaker bond.

Wipe away any excess adhesive that squeezes out with a wet rag and let the clamps sit for 24 to 48 hrs. Remove them by unscrewing and prying off the clamp with a putty knife.
Step 5 Fill Holes & Cracks
Once the clamps have been removed you can fill the holes and cracks like we discussed above using spackle or joint compound, sanding, and then priming and painting.

The plaster magic is a permanent fix that does not need to redone again. The adhesive will permanently rebuild the bond between the plaster and the lath.
Fixing a Water Damaged Plaster Ceiling
Plumbing leaks are fun, right? Not so much! While plaster ceiling are more resilient to water leaks compared to drywall they are not impervious to its ill effects.
Depending on whether you have lime or gypsum plaster it will respond differently to water damage. Old school lime plasters tend to crack and pull loose after repeated water damage due to the expansion and contraction of the lath which breaks the plaster keys off and usually results in a sagging plaster ceiling which we dealt with above.
Gypsum plaster is not as resistant to water damage and it has a tendency to bubble and turn to a powdery texture. You’ll see this bubbling behind the paint and it can best be dealt with by scrapping away any of the damaged gypsum and skimming the area with a couple fresh coats of joint compound, Sanding smooth, priming, and painting.
If you notice mildew or mold growth in the area it’s best to get rid of the mildew using the steps in this post before patching things to make sure it doesn’t come back.
You may also need to prime using a stain blocking primer like an oil-based interior primer or for very stubborn water stains you may need to upgrade to a shellac based primer to permanently keep the water stains at bay.
Fixing Holes in a Plaster Ceiling
Maybe a chunk of plaster fell off your ceiling or an electrician cut some unfortunate holes and other than the hole the rest of the ceiling is in good shape. If that’s the case, you need a patch.
If the lath is still intact then the patch is very simple. Using some joint compound or patching plaster you can simply fill the void with the patching material. Make sure to wet the wood lath first with a spray bottle before applying any patch to avoid it from drawing the water out of patching materials and causing premature drying.
The video below will show you how I repaired a water damaged ceiling in my own house.
If the lath is missing the patch is bit more complicated, but still very doable for any DIYer. Here’s the short list of tools you need to patch a plaster ceiling when the lath is missing.
- Scrap wood
- Driver or drill
- Drywall screws (varying lengths)
- Drywall or plasterboard (varying thicknesses)
- Bucket
- Drywall knife or trowel
- Sponge
- Setting type joint compound or veneer plaster
- Big Wally’s Patching Plaster
Step 1 Install Supports
If you have a hole (like in the picture) the first thing you need to do is attach support pieces. These supports are just small pieces of scrap wood (1/2″ to 3/4″ thick) that you can attach the patch to.
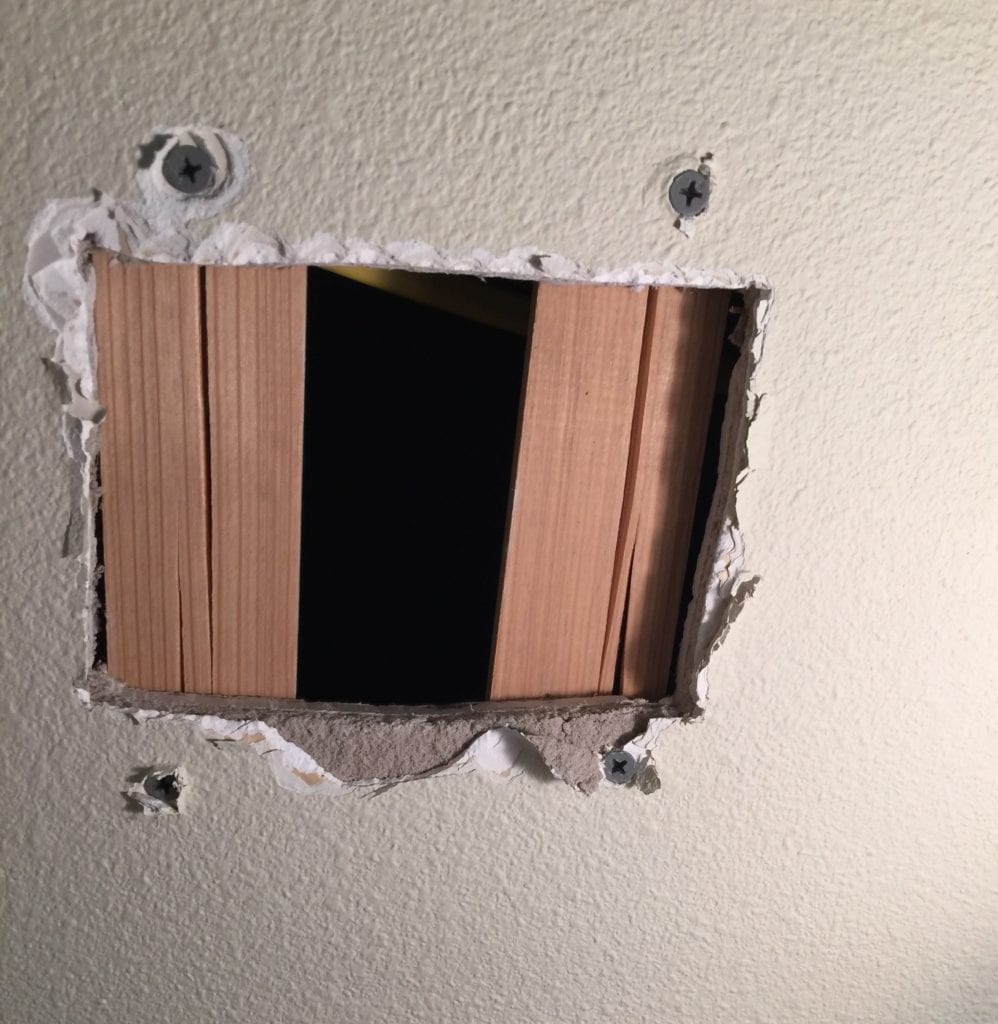
Cut at least 2 pieces (cut more if there is a large area to patch) a few inches longer than the void you have to fill. In this case, I had a hole that was 4″ x 5″ so I cut 2 pieces of wood 7″ long.
Next, slip them into the void and lay them across the opening as you see in the picture. These will be the supports for a piece of drywall or plasterboard we’ll install shortly.
Once you have them in place, attach them with a couple screws into the existing plaster. Make sure to use screws long enough to make it all the way through the plaster and support pieces.
As you screw in, the support piece may be pushed up by the screw. Just back the screw out and try it again. It may take a few times to get the screw to pull the piece tightly to the backside of the plaster, but it will work.
Countersink the heads of the screws into the plaster and don’t leave them proud of the surface, you’ll be covering them later.
Step 2 Attach Patch
Cut a piece of drywall or plasterboard the same size and shape as your void and attach the piece using drywall screws. Screw the patch into the support pieces (or lath) every 6-12″ so that the patch is securely in place.

If you’ve got a complicated and large area to patch, you may have to be a bit of an art student to cut a patch to match, but just do your best. You can always use multiple pieces if you need to.
Depending on how thick your plaster is, you may need differing thicknesses of patching board. For thick plaster, I’ve used 2 pieces of 1/2″ plasterboard stacked on top of each other. Other times it’s a piece of 1/2″ and 1/4″ board. In this case I got away with just one piece of 5/8″ plasterboard.
It really depends on your wall, but the important thing is that the patch should be just a little shy of the thickness of the wall. You don’t want the patch to be the same thickness of thicker than the wall, otherwise it will be visible later.
Step 4 Fill and Smooth
With this technique, you won’t have to make a big sanding mess like with other patches.

Use either veneer plaster, setting-type joint compound, or my favorite Big Wally’s Patching Plaster for the repair. Mix up a batch and cover the patch and screws so that it is just a little proud of the surface of the existing plaster.
As the compound firms up, wipe it down with a damp sponge so that the patch is now completely flush with the surrounding plaster.
Step 5 Add Texture
Depending on whether your wall is textured or not, it’s now time to add the final touch. Whether it’s an orange peel, knockdown, sanded finish or some other type of texture, you can now add that texture to the wall as best as you can to match the existing style.
Final Thoughts
Hopefully, this post has given you some encouragement that you can DIY your plaster ceiling repairs. I’ve got all the supplies you need to repair old plaster in our store and we’re always here to support you if you need some assistance.
If you’re still unsure about doing it yourself consider joining me on Patreon where I work with readers one-on-one to help them with their old house projects like plaster repair. You can decide what level of support you need and let’s start the conversation!


Founder & Editor-in-Chief
I love old houses, working with my hands, and teaching others the excitment of doing it yourself! Everything is teachable if you only give it the chance.
I am glad to read this. I have a friend having some trouble with his ceiling, so I will share this with him.
What is the conditioner that you sprayed in the holes. You don’t show the bottle or say what brand it is or where to get it.
Thank you for giving us an idea of how to repair the plaster ceiling. This is a great help. Excellent article. Keep on posting!
you mention types of plaster. how do you know what you already have in the home and is it best to use the same or is there an upgrade idea that is better?
Super helpful. I have a brother in law who was trying to fix a whole in his ceiling, so I sent him this link. He was considering using a company but I think they were too busy, so he’ll have to do it himself. Thanks.
In such situations, you can glue another layer of drywall. Because cracks can continue to appear.
Not the way to go best open the cracks wet the laths and use plaster and fine triple washed white sand then a white set coat .
If you do want to polish off you can then use a top ready mixed coat that can be sanded.
any other materials I can find locally besides big Wallys?
Stucco?, I see USG products a lot on plaster videos, but can’t find that either.
I’m thinking this product would work for my crack. It’s a 5 foot hairline crack with 1 foot of falling plaster exposing the base (scratch/cement). My house has metal lath at least in the walls so im guessing the ceiling also has metal. Would this product work with a metal lath? I have 2 pictures to show you but unable to upload. As you can tell this type of work is new to me!
This is super helpful! We just passed on buying an 1880 home in an historic district partly due to the large dormer/attic’s multi-angled and many-angled plaster ceilings that looked like melted ice cream ready to drop onto the floor. Literally 12″ sag depth in many places. It looked like a complete overhaul to install insulation and sheetrock. Next time, I won’t be so intimidated. Thanks!
For that last step invoicing texture, does a quality product exist for ceiling knockdown? I tried wall knockdown (in a spray can), and the stuff just dripped to the floor before it dried enough to be knocked down. Awesome post, thanks!
Involving* not invoicing