In my new book, Old Windows Made Easy, I outline the complete process for restoring wood windows. Today, I want to walk you through some of the content in the book for free right here and teach you how to remove window sash.
If you want to learn more about restoring your wood windows, you can Order Your Copy Now!
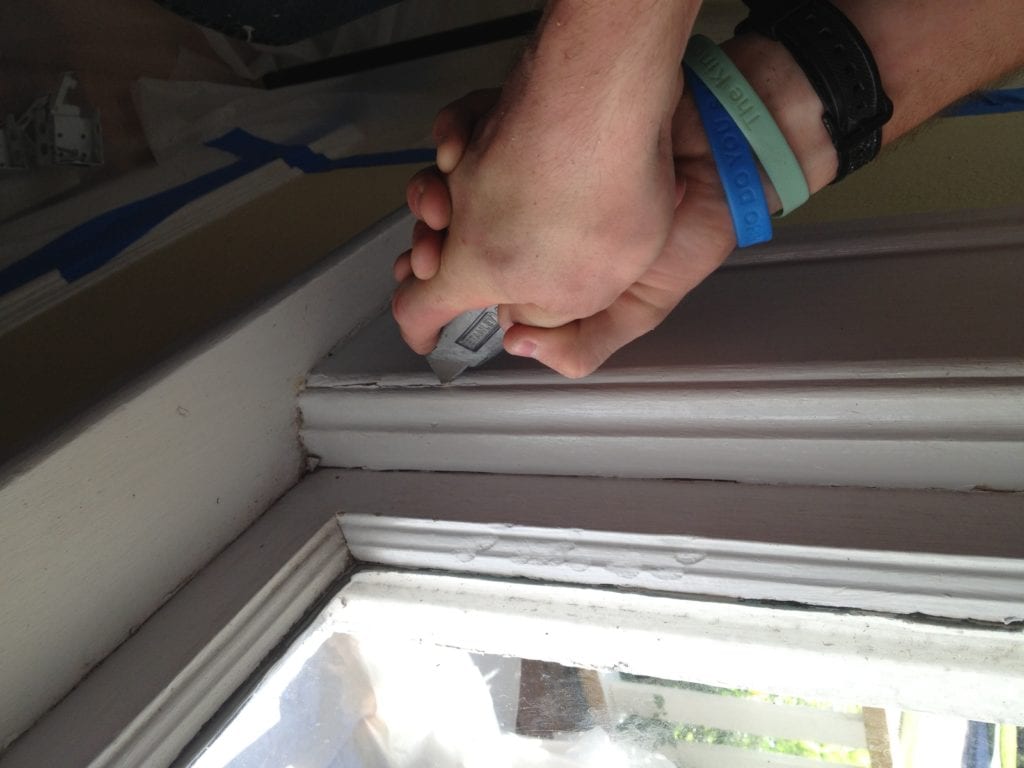
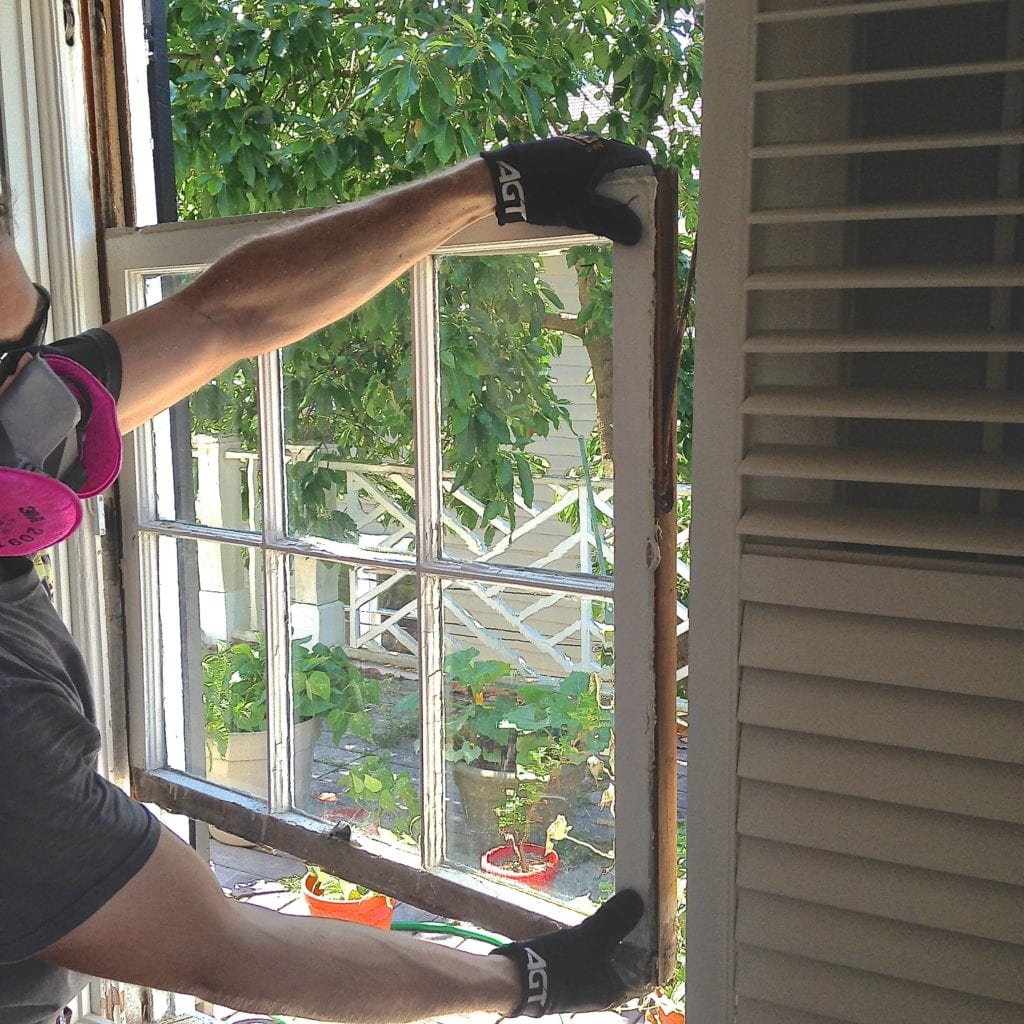
Step 1 Remove the Stop
The first thing you need to do in order to restore or repair your double-hung windows is get the sash out of the jamb. Depending on how much built up paint and caulk there is, this may be simple or difficult. Get both the bottom and top sash out before moving onto anything else.
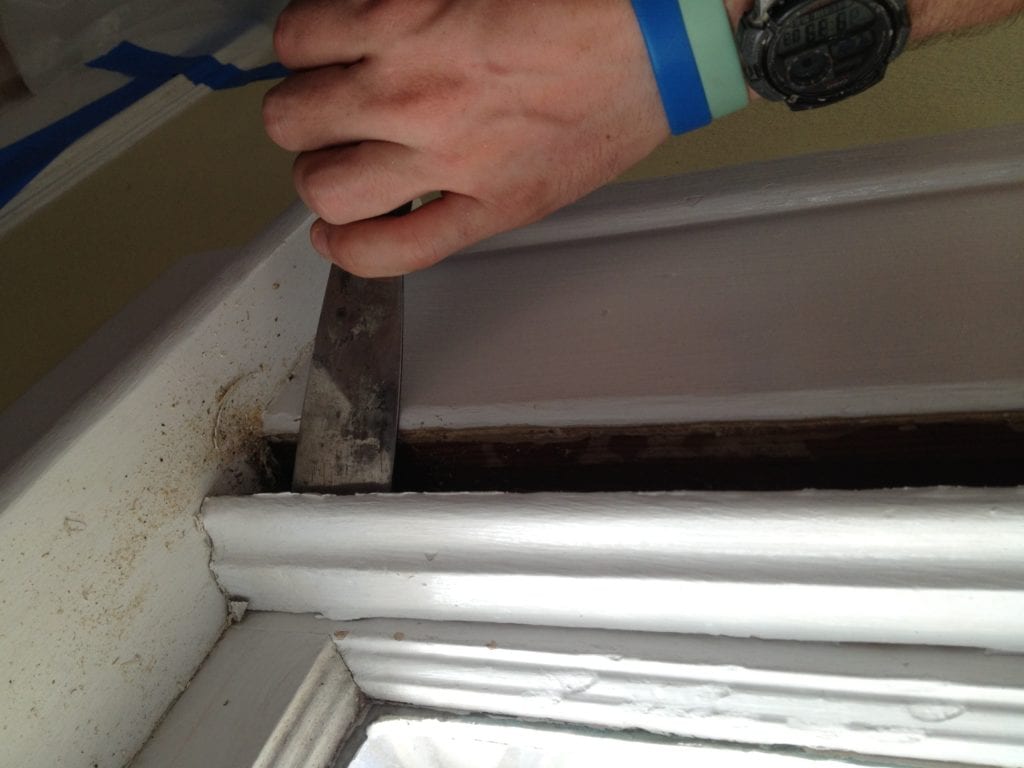
The first piece to remove is the stop. This is a small piece of trim that is usually nailed in place along the side of the jamb. Some stops are screwed in place, which will have to be unscrewed and then gently pried off. You want to avoid breaking the stops since it can be hard to find matching profiles today, though if they do break, they can be replaced with stock moldings available to most lumber yards or home stores.
The window stop was designed to be removed to service the window, so don’t worry that you are doing something wrong by prying this piece off. What makes it difficult is usually decades of excess paint or unnecessary extra nails by an overzealous handyman.
To get your sash out, you only need to remove the stop on one side, but you can remove both if you want to clean them up more thoroughly.
- Gently score the paint between the stop and, the jamb and the stool and the sash with a razor knife being careful not to gouge the wood. Don’t cut too deeply, just enough to cut through the paint bond.
- Using a trim pry bar or firm putty knife, gently pry the stop away from the jamb. Some stops will be installed using screws and washers instead of finish nails. These must be unscrewed.
- Remove any remaining nails from the stop with a nail puller by pulling them through the back side of the stop.
- Scrape the backside of the stop that runs against the sash with a carbide scraper to clean away any built up paint or caulk.
- Number the back of the stop to go with the corresponding window and set aside for reinstallation later.
- Pull any remaining nails that may be left in the jamb.
Step 2 Remove Bottom Sash
The bottom sash is the most inside sash and so it must be removed first before you can gain access to the top sash. The bottom sash is usually much easier to remove than the top sash so it’s the place to start.
While you can cut the paint free on the exterior, it’s usually easiest to simply focus on the interior when it comes to the bottom sash and let the majority of the exterior paint buildup break off as you remove the sash.
If your bottom sash is not painted shut, then that eliminates all this cutting of paint and caulk and it is that much easier to remove.
- Cut the paint seal between the bottom sash and the remaining stop and possibly between the bottom sash and stool if necessary.
- Insert a firm putty knife in between the meeting rails and gently pry the sash loose to break the paint seal. Lift the sash above the stool to remove it.
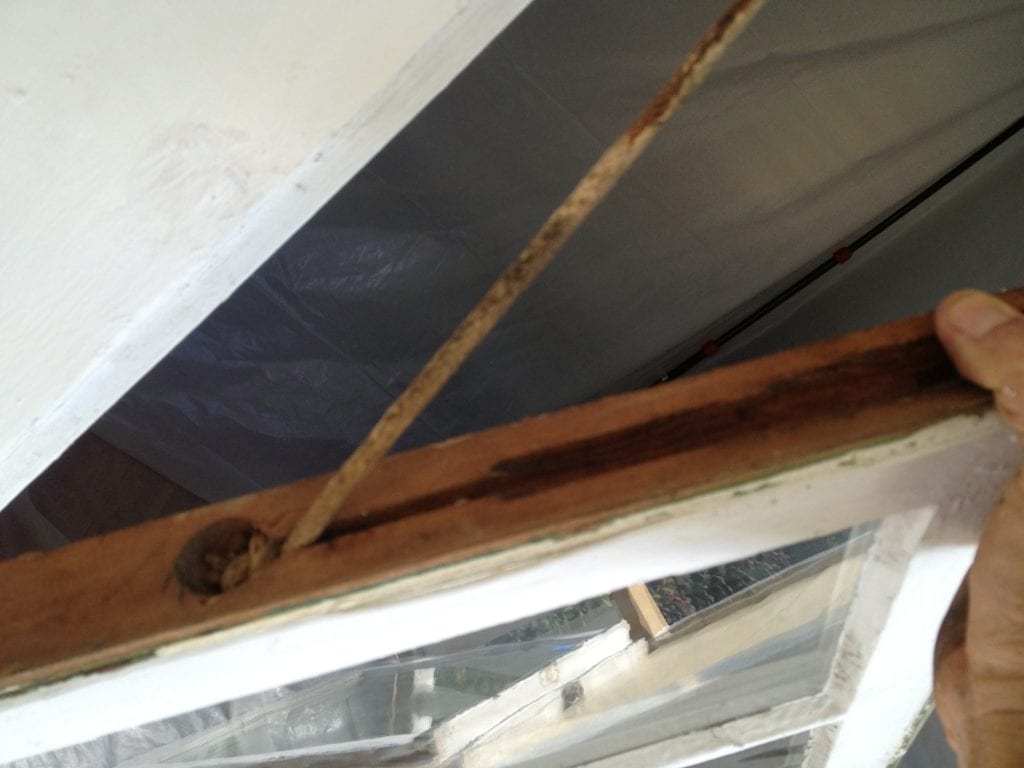
- Swing the side of the lower sash where the interior stop was removed inward to access the rope mortise on the side of the sash.
- Remove the knotted rope from the rope mortise, being careful not to let the sash drop or the rope (which is attached to the hidden weights) fly out of your grasp. Sometimes the rope may be nailed into the side of the sash. This nail will require removal in order to get the knot out.
- Gently allow the rope knot to rest against the pulley. If the knot isn’t big enough to keep the rope from falling back into the pocket, tie a larger knot.
- Repeat the process on the other side of the bottom sash.
- If you are doing multiple windows, number the sash on the side so that it can be reinstalled into the proper window later.
- Scrape, slice or sand away unnecessary paint buildup on sash that may prevent movement.
Step 3 Remove Parting Bead
Step 3 and 4 are pretty much done at the same time because the easiest way to remove the parting bead is to have the top sash lowered all the way to the sill. So, that means cutting it free of paint and caulk.
The parting bead may be painted and caulked so much that it looks like it should not be removed, but it is a separate piece that was designed to be removed in order to remove the top sash.
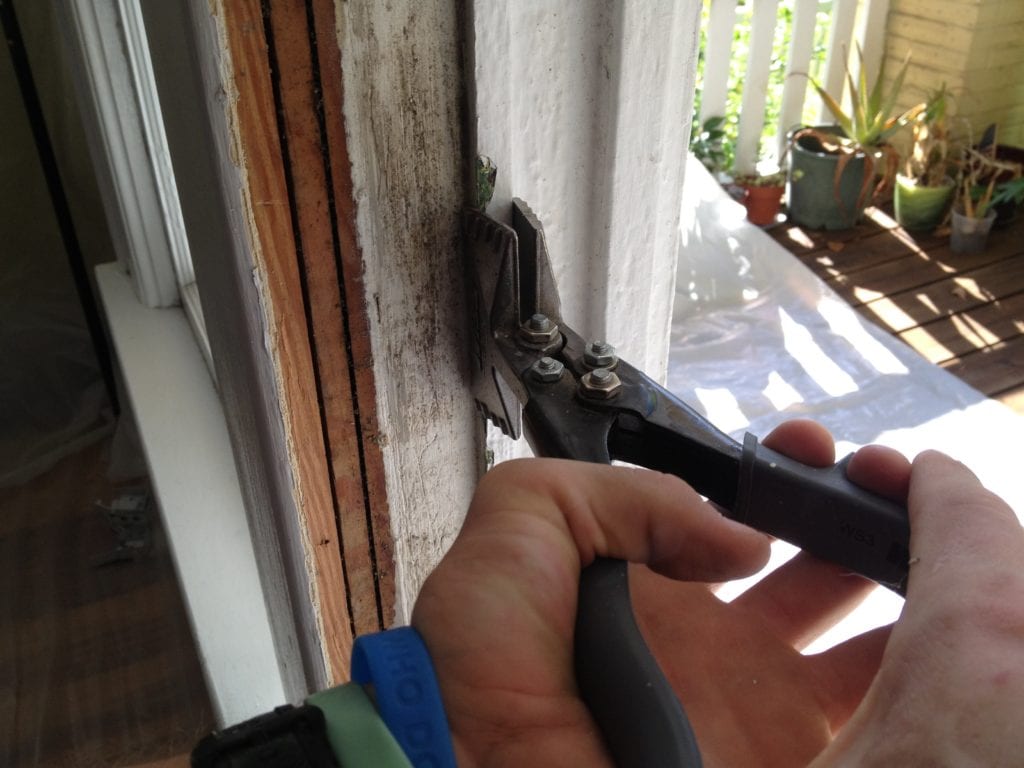
Parting bead can be eternally frustrating, but duck-billed vise grips are its nemesis. Some parting bead will be nailed in place and others will be simply pressure fit. Either way requires the parting bead to be pulled straight out of the channel it rests in and then removed (often in pieces).
- Cut parting bead free of paint or caulk at top sash using a razor knife or window zipper.
- Work the sash up and down until you can lower it all the way down to the sill.
- Starting at the top and working your way down, use duck billed vise grips to grasp the parting bead and wiggle it back and forth to work it loose.
- Cut and fit new parting beads if necessary.
- Scrape excess paint from parting beads.
- Prep parting beads for paint and reinstallation.
Step 4 Remove Top Sash
Ah, the top sash. Most people don’t believe that this part of the window ever moved, but on double-hung windows, they are most definitely mistaken. There are single-hung windows where the top sash is stationary and will not move so before you get too deeply into this work make sure that your windows are not single-hung.
Top sashes are usually so gummed up that they are almost impossible to move without major effort. When cut free of paint, the top sash will move all the way down to the sill, but getting it there is a challenge. If you have serious paint building up and the sash barely budges, keep working it up and down to try to gain as much motion as possible.
If the top sash absolutely won’t go down to the sill, it can still come out as long as you can have it lowered enough to reveal the pulleys. If the pulley is revealed and your parting bead is out, go ahead and try to swing the side out and remove the sash from the jamb.
- Cut all paint seals around top sash with a razor knife or window zipper. The window zipper is good because it has little files that sand away the paint buildup in the paint joint once the paint seal is broken.
- Move the top sash all the way down to the window sill. If the sash will not move due to paint build up, you can continue, but the parting bead will be more difficult to remove and will likely come out in pieces.
- After the parting bead is out of one side, swing that side of the sash inward and remove the ropes as with the bottom sash.
- Be sure to number the sash.
- Scrape, slice or sand away unnecessary paint buildup on blind stop and jamb that may prevent smooth movement of the sash.
That’s it! You’ve now removed your sashes and can work on them at your leisure and put them right back in the jamb whenever you are ready. Make sure you have some plywood cut to size to cover the opening or a storm window in case you plan to keep them pout for a longer time to do your work.
If you found this helpful, you’ll definitely want to order your copy of Old Windows Made Easy. There are a lot more tutorials just like this to help you work your way through the restoration of your old windows.


Founder & Editor-in-Chief
I love old houses, working with my hands, and teaching others the excitment of doing it yourself! Everything is teachable if you only give it the chance.
Hi Scott, working on a home built 1920 has bronze guides mounted on upper & lower sash & window frames, is it nesessery put thes back on when reinstalling the sashes. Watching vids on these windows I am not seeing these guides.
Thanks,
Ken
Those are likely integrated metal weatherstripping. They have to be removed with the sash and they don’t have to go back on but they do make the window much more energy efficient. I’ve outlined the process in my book Old Windows In-Depth which you can find in my store.
Is there a weather strip that would make up the difference?
Spring bronze, love it!
Awesome blog thank you for your reply!!!!
Ken,
I have these SAME guides in my windows! What a pain. I have found it nearly impossible to reinstall the windows with these in place. Or if I somehow got them back in, the window does not function correctly because they’re bent and damaged. Did you take yours out? What did you replace with? And does your top sash now sag? My windows also have springs instead of rope and pulley. Did you find the same with yours?
Hi Scott, Awesome blog! Currently pulling my sash windows out of my old New Zealand villa to renovate. Someone had kindly painted and nailed them in place for me…. Anyway the windows appear top be double hung with a track for the upper window. However I was expecting to see another counter weight for the top window. There is only one weight behind the architrave on each side. the top window looks stuck in place. Is it a possibility that the window and a single sash window, and how would I tell? Thanks
Likely it’s a single hung sash. Check out the post on the blog about single hung windows at https://thecraftsmanblog.com/understanding-single-hung-windows/
Hi Scott, this has been a great resource for me, so thank you! Do you know of any felt based weatherstripping that can be added to help seal the windows? I have the metal interlocking weatherstripping but cold air still seems to seep through in the winter, so i’d love to be able to reinforce with this. Also wondering if that might help the windows slide? Thanks!
Where do you find the drafts coming from. The interlocking weatherstripping is usually very good at blocking drafts. There is a product in my store called StopGap which is a felt weatherstrip that helps seal the meeting rail which is usually the biggest offender of drafts. That might be an easy solution.
It seems to be coming from the bottom of the window. I’ve pulled them all out and am trying to fix them up (with your advice), so hoping I can also replace some of the metal weatherstripping, maybe it isn’t engaging correctly? I also wanted to know if you had advice for removing the weather stripping that is on the window (it is also engaged weather stripping). I plan to replace it with new stripping, but there are tons of nails that are really hard to get out. I would prefer not to nail them in, but will do that if it is the best option.
Scott! Thank you SO much for this blog. I am not a handy woman but have decided I don’t have much choice other than to start the process of restoring the original windows in my 1922 colonial revival. I just started pulling sashes out today, but I’m really struggling with the top sashes ( LAYERS of paint). I’m going to keep reading through your posts. Have you ever considered making videos? 🙂
My 1937 Craftman style house has wire that seems to be wrapped under the window and along the sides where you might expect the typical rope and pulley system to be. On one of the windows the wire seems to be stuck in place so that when you open the window it pokes out along the stop. I need to reglaze all the windows and replace broken panes. Is there a resource that will explain this wire system and where replacement parts can be purchased? BTW, I have just spent about an hour reading your blog. Great questions and response info has been imparted, thanks for what you do.
Hard to say what the balance is from you description but you can always reglaze with the sash in place.
This post is a great help to my customers! I have posted a link on my website to this blog post: https://www.arubawindowrepairmichigan.com/sash-replacement
Many clients of mine are capable of handling a large portion of their sash problems and would rather save money by removing the sash themselves and bringing it to my shop for rework. Works out for the both of us!
Thank you Scott Sidler
Hi Scott,
Just a question about replacing the stops–your post mentions that the profiles can be hard to match today, although they can also be replaced with stock moldings. Many of the windows in our home have the interior stops entirely gone. We have the type of weatherstripping that requires a groove to be routed around the sash, and perhaps someone felt that a stop was no longer necessary in all the windows to keep the sash in place and didn’t bother to replace them.
Do you know of any online resources that carry vintage profiles for window stops? I’d prefer to find something that matches (or gets close to) the profiles of the stops that we still have if possible, rather than go with a new profile from modern stock that doesn’t look similar. A few days ago I found a webpage for a company that seemed to have just the right profile, but foolishly I didn’t save the webpage, and now for the life of me I can’t find it again.
I have an old double hung window, from about 1950 I think. Where we would normally find the rope and weight, there is a long spring mechanism running the height of the sash on both sides of the sashes. Ive removed both the upper and lower sash, and I’d like to remove the spring mechanisms, but I do not see a clear way to do that. Any thoughts?
I intend to make them into window wall mirrors.
I meant to include, the spring mechanisms are built into a top to bottom groove in the sashes, where the rope would be on the rope/weight windows.
Anthony
I can’t get my window sash to come out. There is gray metal weatherstripping on each side that comes up to a couple of inches above the lower sash. I’m assuming this is holding the window in. Also, if I get the window out, i’m worried I won’t be able to get it back in with the weatherstripping. My Dad took one of my windows out once to repair the rope (and he was a carpenter) and he couldn’t get the window back in with the weatherstripping, so the window has no weatherstripping and is kind of loose in the opening. I still have the weatherstripping for that window, so if you can tell me how to put it in, that also would be great.
Any advice would be much appreciated.
Nora, I’ll be putting together a post on how to get the windows out with integrated weatherstripping which is what you more than likely have. Keep an eye out soon.
Our windows have a metal strip that slides into the weatherstripping on the sides of the sash. When my dad took out the window it looks like he damaged the weatherstripping because the two parts won’t slide together. Can I get something (or the same thing) to replace the damaged pieces? The house was built around 1942 and we’re in Minnesota. I love our old windows and want to keep them in good working order.
Accurate weatherstripping is the company that makes most of this type weatherstripping today. Just have your measurements and they should be able to help.
Where is your post on integrated w s and how to remove window w integ w s ?
Just wanted to see if you had any tips for removing the interlocking weatherstripping and upper sash. I’m having trouble removing the small nails used to hold it in place. I’d like to remove the sashes to replace some cracked panes.
If you can’t get the nails removed then try punching them through the soft weatherstripping into the wood to free up the weatherstrip.
Hi DIYers,
I am working on my 1935 era double hung sashes; ropes, a few broken panes, etc. I re-worked many of the windows in my son’s 1925 Craftsman, but did not run into the metal weatherstrip which is holding my lower sashes in.
I found only 2 wire nails, one top and one bottom, which I simply removed with a very small, 6″ pry bar tapped with a hammer. I can even re-use the nails.
Worked great for me.
That’s the way to do it!
Hello,
Love the site! I have a 1850 farmhouse. But all the windows seem to be single not double hung. How do I get the upper sash out? I want to repair these windows
Gary, it depends on the design, but single hung are often held up by the design of the jamb or a piece of wood installed beneath the top sash. Take the bottom sash out first and if you have parting bead then once that is removed and the sash is cut free of paint it may become clear how it should be removed.
we just bought a 1930 stone house on the west coast of Florida. All original windows of 4 vertical panes over one. All tops are painted shut; the latch pieces on the top window all have little blocks of wood under which makes me think the top windows sank? Then they were painted shut? How do I know if they were originally single sash bottom only opening; or double sash?! I want to repair sash cords and paint properly. Thank you!
Scott,
Another bump in the road. I looked all over town for bronze spring weatherseal. Found what I thought was right. It is md Bronze Weatherseal 52000. Upon opening, there is no spring. The directions say its for doors and for the top and bottom of window sashes. It was costly, so before moving on, should I try to return it and keep up my search, or try to use what’s here/ It’s just a bronze strip meant to tack down on one side and manually bend up on the other. I want to get these right.
Hey,
So on further reading, the Bronze Spring is only a “single leaf” also? I presupposed the spring was a v-shaped strip. The stuff I returned to the Hardware store was more expensive, but was pre_drilled, and included nails. (I’m sooo confused)
I’m not familiar with the 52000, but check out Kilians Hardware website and see if it looks similar to what they have which is the type I recommend. One side is nailed down and it should come with some spring already in it which you can of course increase if needed.
Hey, good to find sooneme who agrees with me. GMTA.
Hi, thanks for the great info on your website! I’ve been trying to fix a stuck single-hung (bottom) sash window in an 1887 house. The window is stuck a few inches from the top of the window pane and won’t slide down.It will slide upward those few inches to the top of the pane. When I try to pull w/ force, nothing budges however, but I can hear the weights inside the pane bounce around. It gets stuck just where the pulleys start. I’ve removed the stop, but there is no way to access the weights, as there is no cut outs. From the top of the window, I can barely see the pulleys, which still seem to have rope around them, so I can’t tell if the rope is broken. Could the weights be caught on something on the inside of the window pane? Any suggestions greatly appreciated! Thanks.
Matt, the weights could be stuck on trim nails holding the casings in place which is not uncommon. It’s hard to tell without being there but that would be my first guess.
Many thanks Scott. So that would mean I need to cut into the window pane to find out, correct? If so, I’ll follow your instructions using the circular saw.
You can cut access doors but sine the window is stuck in the top position it may be difficult to discern the problem. To really solve the issue you may have better luck carefully pulling either the interior or exterior side casings off so you can have access to the entire weight pocket.
Thanks Scott. To be clear, the interior side casing is the same thing as the internal wood trim that frames the window? As a layman looking at it I would call it wood trim, if that makes sense, and wouldn’t guess that by taking it off one could get inside the window (but that shows how much I don’t know!). Removing that trim looks to be my only option at this point.
So I removed the internal casings and have access to the weight pocket, and indeed, one weight and pulley is working, the other pulley seems jammed, won’t rotate. I squirted some WD40 around the pulley to see if that helps. I’ve tried to pull the window inward in order to remove it, but unfortunately I can’t pull the sash out as it seems stuck on the pulleys and I don’t want to bend or twist them. Window remains stuck in up position.
Gents,
Struggling with parting beads, hard to find duck bill vise grips. My main issue is that sash cords go into a hole in the top of window frame. Is there a hidden pulley?
There are some hidden pulley systems but it’s rare. If the hole is in the top of the jamb then that is most likely the case though. As for the parting bead, make sure you’ve scored all the paint to help encourage it out. It may end up coming out in pieces and have to be replaced though.
Thanks Scott, going to keep trying to find some hidden pulley info. Thanks to your blog, I went looking for parting beads, and being in New Orleans, found an old line lumber company that would make them out of cypress for 50 cents a foot.
That’s a good deal John.
Scott,
Thanks again for your help. I have talked to a restoration carpenter, who been at it for forty years and hasn’t seen this. The holes in the top of the frame have grommets in them, so the job doesn’t look homemade. Am sending pictures in hopes that one of your forum people have an easy fix. I really don’t want to tear it apart. (Oops, how do I send pictures?)
Thanks, but Eureka, Common Sense won out. Kept threading and finally got it.
What was the solution in your case John?
Just kept patiently threading the new cord thru until it worked. Feeling like a smarter rookie, thanks. Couldn’t figure out how to send pics.
Farmhouse built 1924. Replacing original windows. Sash pulleys are in the wood so tightly that they defy efforts to remove them. There are no screws holding them in place. They were knocked into a form-fit hole by the builders in 1924. How do you approach their removal?
Mark, I hate to hear that your replacing your original windows. If it’s not too late do a little reading on my site and read some of the testing out there. Original Windows with storms last longer, are easier to maintain, and can exceed current energy codes.
If you do decide to remove the pulleys they are likely press-fit pulleys and won’t come out without being destroyed. You can either hammer them flat against the jamb or pry them out with a screwdriver and a hammer. They will be mangled terribly but they will come out eventually.
Yes, the windows are 92 years old and have suffered from heavy condensation water for a long time, both on the inside of the windows and between the windows and their ill-fitting storm windows, and as a result are pretty bad. I do not accept the blame for this as I have come along to this mess after decades of extensive neglect on the part of previous owners. From today’s struggle, I had come to the conclusion that the pulleys will absolutely not come out and need to be hammered into the sash-weight space. Thank you, though, for verifying my suspicions that those pulleys cannot otherwise be extracted without opening the woodwork to get at them from the inside, and that is not something I intend to do.
Nice blog Scott!! You share very good experience with us. If you want this kind of services ten contact us at srsharwdare.com. We are famous in USA for window hardware restoration services.
Thanks Justin! We actually order from your company quite often. Thanks for always providing a good product for us to use!
Hi there,
Thanks for all of the great information on your site! I’m wondering about whether or not to prime/ paint the inside of the jambs and the mouldings that the window sashes slide along. I saw where you reccomended leaving the corresponding surfaces of the sashes as bare wood.
Thanks,
Brandon
Brandon, I try to follow what was there originally, but priming and painting the jambs should be fine as long as you use a good quality enamel and wait for it to cure before putting the sashes back in.
Thanks!
How can you tell if the windows are single hung or double hung?
I have a 1920 Craftsman home, and with your book have started on the windows (starting in the garage). Some of the window sashs sit in a metal sash channel when closed, though the sash channel when open is wood. The window never clears the metal portion, so I can’t see how to remove the sash or access the weights.
Any suggestions?
Ed, it sounds like you are dealing with metal weatherstripping. It may be interlocking type or spring bronze. Either way you’ll have to remove the weatherstripping in order to access the weight doors.
Pull of the stops off first. If it’s spring bronze you’ll be able to swing the sash out of the jamb. If it’s the interlocking type then you need to pull the metal out with the sashes since it has channels cut into the sash that the weatherstrip fits into.
To remove the weatherstrip use a nail punch to punch the few nails thru the metal which will release the weatherstripping from the jamb. Hope that helps!
Thanks. It’s interlocking, with a ridge in the metal running in a channel in the sash. After your comment I now see the small finishing nails in it just at the edge of the interior stop.
Great tips. With regards to the parting bead, removing it can be a giant pain, especially if it’s nailed in place. One thing that I helped me to keep it in one piece is to put a thin towel or even paper towel between the vice grips and the parting bead to prevent gouging and “cushion” it a bit.
The thought of having to remill the parting bead has kept me from doing the whole shebang, but even doing the lower sash is helpful.
I was wondering if you have any advice on old interior varnish finishes on windows. I have some from the 1920s where the finish is as dry and nearly the texture of dust and I’m torn about what to do with them. I really don’t want to coat them with a synthetic poly or anything that won’t last or will gum up with wear.
Kathy, unless you have some very unique parting bead you should be able to find replacements at just about and lumber yard or even Home Depot/Lowes. Interior varnish on windows I prefer Helmsman’s Spar Urethane for protection against the UV. You can alway use a wiping varnish which goes on easier as well.