

Decorating with shiplap seems to be all the rage these days thanks to Fixer Upper and other popular TV shows. Consistently, the most popular post on this blog right now is No Joanna, That’s Not Shiplap which I wrote to poke a little fun at Joanna Gaines for her seemingly constant diagnosis of shiplap, whether a wall is true shiplap or not.
It’s all in good fun, and because of her and Chip, the world has gone shiplap crazy! People ask me all the time where they can find shiplap or if this or that qualifies as shiplap and most commonly, how to make shiplap. I figured answering this last one would help my DIY readers with their shiplap needs the most.
In this post, I’ll show you exactly how you can make shiplap from almost any piece of lumber old or new. You need only have the wood and a table saw. Even if you have only minimal DIY skills, you can make shiplap on your own.
How To Make Shiplap
Select Your Stock
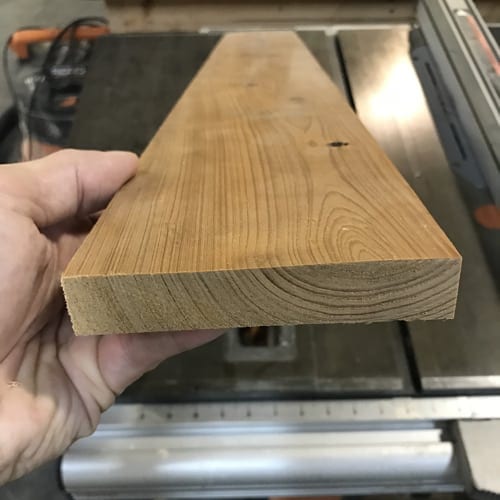
Depending on the final look you want, there are a ton of wood options you can use to make shiplap. Almost any 1x material (nominal 3/4″) is a good choice. You can use select grade for a super smooth look or common grade boards, pine, cedar, really any type of solid wood that suites your needs.
You can also use salvaged boards for that awesome rustic look we love. You can stain or paint or leave it raw. This part is completely up to you and only you. I will say that traditional shiplap is usually between 5″ and 8″ wide, so using boards in that range will yield the most realistic looking results. For these pictures, I used some salvaged 1×6 pecky cypress boards around my shop.
Set Saw Depth
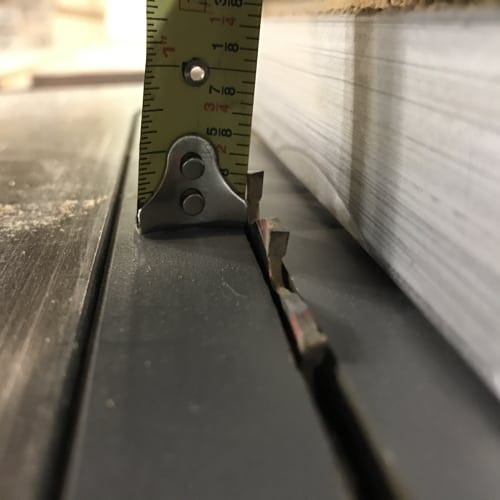
You have to set both the height of your blade and the rip fence to make the 2 cuts necessary for shiplap. Usually, a depth of half the thickness of the board is best. So, for a 3/4″ thick board, that would mean setting the blade height to 3/8″ as well as the rip fence to 3/8″.
If you have a dado blade, then you can do this in one pass. It’s not necessary, though it does make it much faster if you have a lot of shiplap to make. To use a dado, just set the thickness of your dado to the same 3/8″.
Rip Flat
Lay the board flat on the table saw and rip the back face once. Then, flip it over and rip the front face on the opposite end of the board. You should be left with a single saw kerf on opposite sides and faces of the board.
Rip on Edge
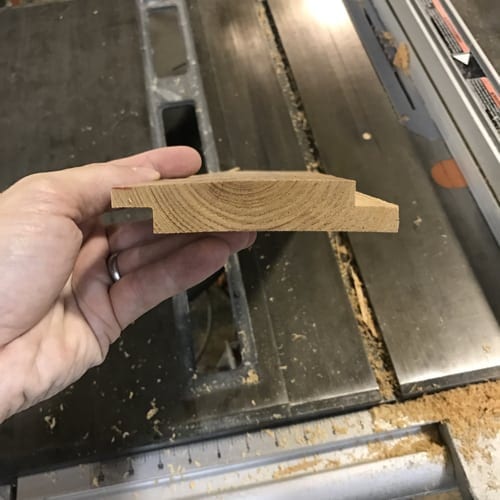
Now stand the board up on its edge, and without changing the settings on the saw, rip both edges of the board. A 3/8″ sliver of wood should come off of each edge. Your board should now have two 3/8″ rabbets on opposing sides and will resemble the letter “Z”. For the wood dorks like me, this joint you have just created is called a half-lap joint.
5¢ Spacing
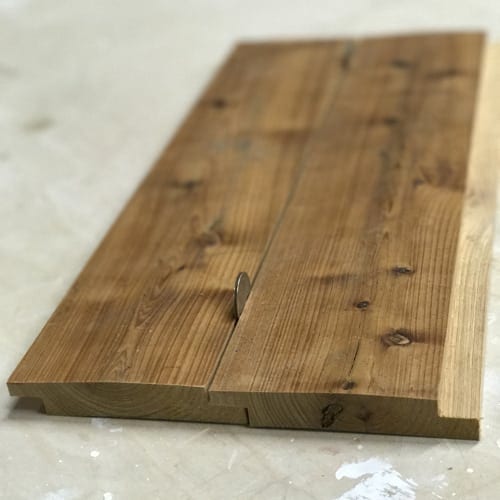
Depending on the look you want, you can space your boards right up against each other as this half-lap joint will allow them to self-space tightly. Or you can get that joint to show a bit more if you’d like by using a spacer.
What spacer should you use? Good question. I use a nickel. Raid the coin jar and grab a handful of nickels and place them in the joint so that there will be a small gap between the joints before you nail things in place. This helps give the wood some space for expansion and contraction with the weather as well as adds some visual interest to the wall. Really, you can use any thickness spacer to attain the look you want.
Nail it Up
Start at the bottom which is easiest, and make sure that first board is perfectly level, otherwise the whole wall will be askew. Plan your layout as best as you can to avoid awkward small pieces. The top most board will not need the top rabbet cut out of it so that the wall looks uniform.
I prefer to nail with 15 or 16 ga nails since they have more vertical holding power to keep things from sagging. Make sure you are nailing into the studs, just like when installing beadboard, and you’ll have no problems. If you have trouble finding the studs, try these tricks. Don’t forget to set the nails back behind the surface so you don’t get any snags or scratches.
Now you know how to make shiplap on your own, so there’s no reason to not add some to your house if you don’t already have this stylish wall covering. Shiplap adds a ton of character and warmth to a room, and with this technique, you can make more than enough shiplap without having to comb through salvage yards for hours on end.
If there is any other way I can help you get your shiplap on, leave me some feedback in the comments below.


Founder & Editor-in-Chief
I love old houses, working with my hands, and teaching others the excitment of doing it yourself! Everything is teachable if you only give it the chance.
Can I do shiplap by simply cutting the right pieces and nailing them, rather than cutting the “groove” to make them fit like a “puzzle piece”?
At that point, it most likely wouldn’t be genuine shiplap but would have the “faux shiplap” look a lot of people call shiplap, so it’s really up to you and how precise/genuine/authentic you would like it to be. 🙂 Hope this helps!
Isn’t that totally fine in a modern home where this isn’t providing any structural function? You end up wasting 3/8” with every board plus creating additional work.
I have a living room wall that is concrete behind the sheetrock. could I do a strong adhesive instead of nails on the underlayment strips of board?
We live in a 100+ yr. old farm house…the plaster walls are crumbling. Would it work to remove the existing plaster and put up tar paper over the lath and then pine boards for the ‘shiplap’. We were going to use plywood cut into 8″ widths…but I just don’t think that’s what I want.
On another note, the ceiling in our living room has been covered with fiberboard square tiles…I’m assuming because of the crumbling plaster, if we pull that down, can’t be we put up plywood over the lath and then put tin tiles up, or some other decorative ceiling?
Depending on the grade plywood you use it may look fine. Cut some strips and give it a try, no one may ever notice especially if its being painted.
That fibrous ceiling tile could be asbestos. After taking it down you could use a thin Luan over the ceiling (making sure to screw into the joists) and then putting up your tin. A thinner grade plywood would work as well.
Dont cut to 8in cause tje last board will be shy of 8 cut at 6 or 7 i
So we just started our new wall and there is a lip on the first piece. Any help on this issue? Thanks!
Shouldn’t be an issue at all. Keep going!
Thank you for the quick help on this! Sounds good.
What about installing shiplap right over exposed studs and insulation? I’ve seen it done before on home remodeling shows…but is it a good idea? If not, what would the minimum amount of material for a smart install be? Plastic barrier? Non T&F’ed drywall?
My contractor installed pine shiplap and painted it white. As the season as changed and the wood began to expand and contract, the spacing between boards grew and now we can see raw wood in the cracks. We tried repainting, but the paint is separating as it dries. Now our contractor wants to replace it with MDF planks. What do you suggest??
Hi Scott,
How can I install shiplap over a wall to be easily removed for resale?
Thanks:)
Leave the drywall up and nail up your shiplap thru in the studs (no glue) then pull it off when you leave and sparkle the holes.
I wouldn’t suggest sparkling. That could be a shiny situation.
Should you stain the shiplap before or after it’s on the wall?
I am curious what color stain was used for this wood, if any. I love the color.
Fabulous article! Thanks for sharing!
My cabin had a shiplap ceiling in the kitchen orginally. The previous owner opened up the ceiling and repurposed the shiplap into the kitchen counter. Several years later it has normal wear and tear of a kitchen cutting block. How can I restore the surface and protect it from here on out?
Sand and treat with mineral oil
What about painting the shiplap? How to?
Just like any wood. Prime with an oil based primer and 2 coats of your favorite paint. Don’t caulk the joints because you want that appearance.
Thanks Scott for the Shiplap clarification. I too, love Fixer upper and my wife is demanding shiplap. I think the purpose of the shiplap look is multiple. For those wanting to use MDF, I think you are missing the point. If you want smooth, stick with sheet rock or plaster. Shiplap should expose some natural character of the wood. Wood does have knots.
How are you missing the point if they want the shiplap to be white and smooth? Don’t be a wannabe mr. knowitall.
He’s right. Shiplap should be whitewashed if anything, so the Wood’s grain can be seen beneath. MSfF is too ‘perfect’ and yes they’ve then missed the point Mr. Mouth.
Well said Jake. MDF is a great option for painted shiplap with a nickel gap. It will be very stable trough the seasons.
Ok now after all these reviews I’m even more confused on ship lap. So if you use 1X6 regular pine or mpf or do you really need to put forth the effort n make your own tongue n groove style. I guess my question is– will any of these boards warp n require more labor in years to come? Also can or can you not use any of these boards in a bathroom bc of the moisture? I think every person I have ask in a home improvement store has told me different. Please I need advice bc of experience or knowledge. Bc I’m n process of remodeling my den
Beverly, in rooms other than bathrooms or kitchens there is little to no chance of the boards warping under normal conditions. In the bathroom priming all sides of the board can help with the swelling and warping but they were intentionally installed with a gap to help resolve any binding issues.
Hi,
Is it possible to use 4″ pressure treated wood as siding and leave a nickel gap? I would cover the structure first with pressure treated plywood before applying the 4″ pressure treated boards.
Thank you
Need help quick
Why? SO many cheaper options than water soaked pressure treated wood.
I’ve seen several “cheats” to creating shiplap walls. Many people have just ripped thin 4×8 sheets of plywood. (I personally think 1/4″ MDF would be better because the edges wouldn’t splinter like plywood) But what do you do when your wall is longer than 8′? As best I can tell, the “shiplap” walls on Fixer Upper are one continuous piece of wood vs. having a vertical gap as well. So either someone is really good at making seam cuts or they’re finding really long pieces of wood.
When we move into our new home I intend on starting with two shiplap projects. One in my daughters room along a 10′ wall and the other project…the stairwell. Does 1/4″ MDF come in sheets longer than 8′? Using MDF seems to be the cheaper option but I’m guessing even if does come in longer sheets, it would work for the bedroom, but not the stairwell.
Or do I suck it up and use 1×10’s? (bedroom)
For the staircase…do I use 1×20’s? (or however long the wall is) or seam wood pieces together with 45 degree cuts? And if I seam them, do you have any tips to make sure they can’t be seen when I’m done?
Thanks for the help!
I know it’s a lot of questions….If you’ve already done a post about this, I’d be thrilled with a link 🙂
I always prefer real wood compared to MDF. The lengths aren’t an issue for longer runs because anything over 16′ can just have butts joints which is what they traditionally did. Just stagger the joints so there is no pattern to it and it will blend nicely.
Sheet goods (ripped) only come 8′ long. Not 16. What can I do if I’m opting for a less expensive method?
You can use paintable caulk for the seams between the boards and then paint it all, that’s likely what Joanne does…but a ‘real’ look has shorter boards with staggered ends.
I just recently bought my house that was built in the late 20’s early 30’s. I tore off the drywall to find that ugly wood paneling so I tore that off as well to find ship lap a few of the boards are really soft and starting to crumble the problem is they are by the bottom how do I go about taking these boards out and replacing them!
Very helpful writeup. I, too, am a big fan of Joanna and Chip Gaines but realized early on that not all “shiplap” is the same. ?I’m old enough to have seen the real stuff. With your instructions and my handy husband who always helps with my decorating projects, I’m moving ahead with a wall in our 2nd bedroom/office.Thank you!
Go get ’em Linda!
Can you apply lapped wood siding (“shiplap” styling) directly to the studs? Is there a requirement for drywall?
From my understanding of the evolution of wall materials, this question is maybe like asking, “is there a reason to use the most up to date technology of building material?” What kind of trade-offs are made by using ship-lap/paneling rather than drywall? I would imagine the fire rating of drywall is better than that of any wood material. But beyond that it is not clear to me.
But my wife and I are working on a remodel of a 1912 cottage in Portland, OR. If it is possible to avoid drywall+paneling, I’d like to save time and money and make-up the walls with just one of these materials.
Also, reading through comments on your post, explaining what shiplap is and isn’t, I saw some discussion (and discouragement) on putting shiplap in a bathroom due to moisture. Are there any measures that could be taken to lessen the issue of water/moisture?
Spacing between pieces of wood. A nickel would work, I use a quarter or a 50 cent piece spacing though.
Also, I would suggest vapor barriers and drywall. For the insurance purposes alone.
I had been thinking shiplap but with plaster walls, now I’m thinking that falls under the category of “not such a good idea”. Oh well! I’d rather have the plaster than the shiplap.