What’s the best way to save money on your energy bills? Hands down it has to be adding blown-in insulation to your attic. There are more complicated and expensive ways to save energy, but without a doubt the low cost and quick payback of adding blown-in insulation to your attic blows away (pun intended!) the competition.
How cheap is it? You can add 12″ of blown-in cellulose to an average sized house (1500-1800 SF) for between $600 and $800. And since the attic is one of the greatest sources of heat loss in the winter and heat gain in the summer, the savings can be realized year round.
Whats the ROI on adding blown-in insulation to your attic? Figuring a modest savings of 10% with average monthly energy bills of $200 per month that means it will have paid for itself in about 3 years! Compare that to the 41 years it takes to payback the cost of replacement windows and you can start to see how much of a big deal this really is.
How to Install Blow-in Insulation
The other great thing about blown-in insulation is how easy it is to install. Unlike spray foam or batt insulation, installation is a breeze. Yes, it’s annoying to crawl around in your attic for a day, but one day of work is definitely easier than the other options.
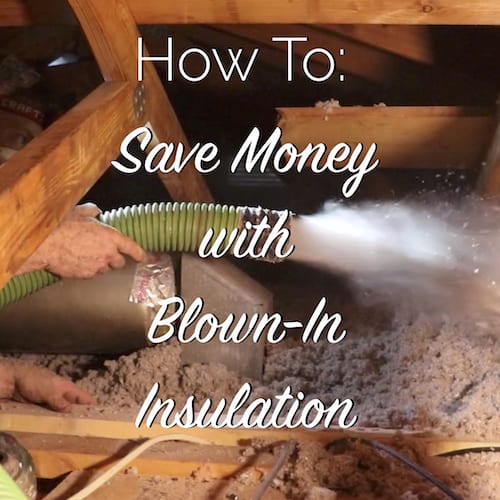
Home Depot has a great thing going where they will give you a FREE rental of a blower if you buy a certain amount of insulation. So, I went down to the Depot and picked up 50 bags of insulation and my free blower to help out a friend since installation is definitely a two-person job.
The video below details the whole process, but essentially one of us climbed into the hot abyss and started at the back of the attic blowing the insulation evenly across the attic floor (avoiding covering any soffit vents that would impede airflow) while the other person stayed downstairs and fed the blower with the bags of insulation.
Below I’ll give you some tips to help you be safe and get the most out of your insulation day.
Tip #1 Wear a Mask
We installed Green Fiber insulation which is a brand of cellulose blown-in. While this isn’t toxic, the blower creates a lot of airborne dust and you can get quite sick if you don’t protect yourself. Wear at least a P95 mask while working with stuff to avoid an early death or at the very least a stubborn cough.
Tip #2 Wear Safety Glasses
Do I even need to mention that if you are blowing materials at a high velocity out of the end of a hose you should have some eye protection on? Be smart and be safe.
Tip #3 Get Enough Hose
Take some rough measurements and make sure you have enough hose to reach the furthest recesses of your attic from you where you plan to stage the blower. The rental department will usually give you as much hose as you need if you ask for it at no extra charge.
Tip #4 Account For Settling
Blown-in insulation settles a couple inches after it is installed so take that into account. If you install 12″ you’ll only be left with about 10″ in a month when everything has settled. Over insulate because you don’t want to do this again. You can always return the extra insulation if you didn’t use it.
Tip #5 Allow Airflow
Do not cover up soffit vents or off-ridge vents in your attic. Blocking this airflow in traditional vented attics can cause moisture issues or overheating which will do more harm than if you hadn’t insulated at all.
Tip #6 Get Proper Lighting
Lighting in most attics is pretty shoddy so make sure you figure something out so you can get a good sense of where and how much insulation you are installing. It’s hard enough work that you don’t need to add the handicap of doing it blind. I like a good headlamp to light my way in attics.
When you’re done sit back in comfort and watch the savings trickle in month after month and year after year all because you donated one Saturday to insulate your attic properly.


Founder & Editor-in-Chief
I love old houses, working with my hands, and teaching others the excitment of doing it yourself! Everything is teachable if you only give it the chance.
I recently had the attic of my 1916 bungalow in Houston’s Eastwood neighborhood filled with blown-in fiberglass insulation. It is a 1,320 square foot post and beam home with wood siding that had less than 2″ of insulation when I acquired it. Despite installing a new HVAC unit immediately after purchase, the A/C struggled to keep up in the hot summer months. I added 17″ of fiberglass insulation to bring it up to an R38 rating and the cost was $900, hired out. This summer has been much more tolerable and the insulation is doing quite well. Today it was 95 degrees and the house temperature never breached 73 degrees until late afternoon when it maxed out at 75. Prior to the insulation it would have been 83+ degrees in the house. The installer also foam-sealed around all the air vents, pipes, etc.
My only regret is not having self-installed a radiant barrier in the attic prior to insulating, since it will be difficult to navigate through the new sea of insulation. Also, if hired out, make sure to double-check the depth of your blown-in insulation to ensure you are getting the R-rating value of the charge you agreed to with your installment professional.
Yes for the batt form Scott, but i thought i could also use – instead i mean – a “spray” form of insulation. where i want to insulate, it’s very…intricate.
Thank you to all!
Thank you very much Scott! What green (low cov) product would you recommend to put on vertical walls though ? Naturally it has to be a DIY project. I am re-doing a bathroom hand i have the old “fiberglass” from the 1950.
Thanks again for your book on Window Restoration.
Cordialement.
Rockwool is great insulation available in batt form. Take a look at my previous post about it.
A couple of additional recommendations. Before you blow in the insulation spend a few hours with a can(s) of expanding foam filling any attic floor electrical, plumbing, and/or mechanical penetrations. Also, check for any open chases, dropped soffits or other potential problem areas. Make sure all recessed lights are IC (insulation contact) rated and electrical work is updated and/or repaired. Check to make sure your bath fans are vented to outside the roof and not into the attic. And finally, Your box store does sell soffit vent baffles to deal correctly with vents. I know you wanted to keep your video short but there are basics you need to do.
Good tips! Also, if you have a balloon-framed house, seal the spaces between the studs and joists. Most houses built after about 1840 and before 1920 were balloon framed, and some one-story ones were afterwards. Of course some are timber framed or load-bearing masonry, or even concealed log or plank construction.
It is not recommended to insulate exterior walls unless you are also resheathing and adding a rain screen/vapor barrier or exterior insulation. Green Building Advisor website has illustrated recommended wall assemblies for new construction, and Bob Yapp and Olde Mohawk Historic Preservation have quite a lot to say on the problems with wall insulation and misguided insulation requirements in old homes. Old houses don’t function like new houses and wall and improper insulation can cause a real mess, in both frame and masonry homes.
Also, installing proper soffits (the foam baffles) is good, but old houses often don’t have soffit ventilation and it can be quite a job to retrofit. If you do have good soffit ventilation and ridge vents, gable vents can actually decrease performance. You have to look at the full system because the mere presence of those pink baffles doesn’t mean the soffits are actually ventilated. They can be put in place just to provide a bit of an air gap and separation from the roof sheathing, and to be in place if soffit ventilation is installed.
Thank you very much. Since my house is a 1945-1950 model and that i have old insulation already, i assume it will be ok to change it with new one and use foam at certain places. I will not try to crazy insulate. just cut a bit more the draft and change and old – lower R – insulation.