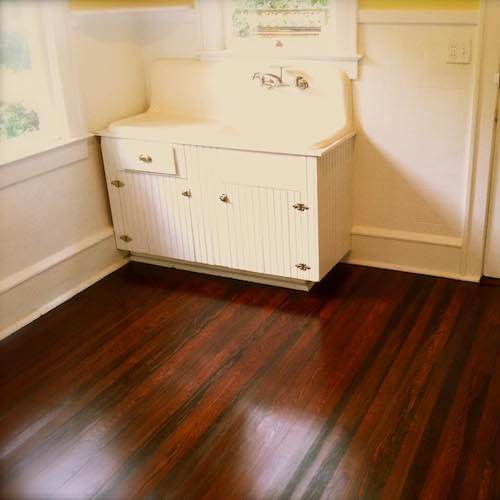
 Hardwood floors are synonymous with old homes. It’s almost impossible to find an old home without them. And yet, they are disappearing because people don’t realize how resilient and long-lasting they are. Unknowing homeowners and contractors rip out or cover up these amazing floors when they could be saved and used for another 100+ years!
Other than refinishing hardwood floors, the most typical repair we run into is board replacement. It may seem daunting to remove a tongue and groove floor board without damaging the neighboring boards, but with a couple tricks of the trade I’ll teach you to get it done yourself if you are a brave DIY warrior.
And don’t miss my little secret to a perfect match at the end!
 Step #1 Remove the Damaged Boards
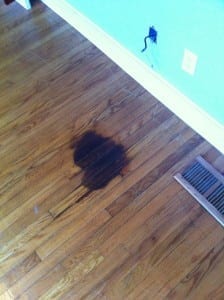
Whether it’s termites or pet stains, some boards will inevitably be beyond saving. When you find these boards, you’ll have to remove them completely and find a suitable replacement (more on this later). It’s also important to take the entire board, or at least stagger the joints like in the picture below. This will allow the patch to blend in seamlessly with the existing floor. You’ll need a few tools to get the job done too:
-
- Circular Saw
- Hammer
- Cat’s Paw/Trim Pry Bar
- Wood Chisel
- Multi-Tool (recommended)
- Brad Nailer
- Mark the Boards – I mark the specific boards I will be removing very clearly along their entire length so there are no mistakes.
- Determine Thickness – You need to find out how thick they are (*this is important*). You need to know how thick the boards are so you can set the depth of the cut on your circular saw properly. Most old wood floors are between 1/2″ and 1″. The best place to find the depth is to remove a floor heat register or pull up a threshold. The threshold is less fun.
- Set Saw Depth – Once you know the thickness of your flooring, set your circular saw to just a hair deeper than the thickness of the flooring (about 1/32″).
- Cut 2 Lines – Make 2 parallel plunge cuts into the floor board along its length with the circular saw. Start and finish as close as you can to the ends without crossing into the next board. You’ll essentially be cutting the board into three slimmer boards. One piece will have the tongue, one piece the groove, and the middle piece will be free floating.
- Finish Cut With Multi-Tool – To finish the cut, you need a multi-tool or chisel. Cut the small amount of wood remaining to the end of the board so that all three pieces of the board are completely independent of each other.
- Remove the Pieces – The middle piece should come out easily with a pry bar or even your fingers. The groove side will likely need a bit more coaxing with your pry bar. The tongue side will have been nailed down and so you’ll need to use the cat’s paw to either dig out the nails or simply tear the remaining piece out. This side usually breaks a few times on its way out.
- Clean Up – Vacuum out all the saw dust and make sure the tongue and groove of the remaining boards are clear of any remaining wood and in good shape.
Step #2 Install the Replacement Boards

So, now that it’s all cleaned up and free of any damaged boards, you need to patch the floor with your replacement boards. If your replacement boards are not the EXACT same width and thickness as the originals, the repair will not work at all. Don’t think something close will suffice. Here is the way to get the boards into place properly.
- Measure & Cut to Length – Measure the length you need to replace and cut your replacement to size. It will need to be tight so if anything, don’t cut it short. Cut it long and sneak up on it if you must.
To replace just a few boards:
- Remove the Groove – You’ll need to remove the bottom half of the groove on your replacement board. I usually use a table saw to cut it off cleanly, but a wood chisel or hand plane will work fine. It doesn’t have to be pretty, just don’t hurt the top of the board. This is only to be done if you are replacing just a few boards. For larger sections see the instructions in the following section.
- Insert Tongue Side First – Insert the replacement piece tongue side first into the existing flooring. It will require some force to get it into place, but don’t be too aggressive. Sometime a piece of scrap lumber can be used as a beater board so you can gently hammer the piece in place with scarring the surface.
- Face Nail in Place – Once the board is seated properly and flush with the existing floor, you can nail it in place. I put two 1 1/2″ brads on each end and then every 16-24″ alternating sides. Keep in mind that since we removed the bottom half of the groove, the only thing holding that side down in the nail. So you may need a couple more nails on the groove side if the board isn’t perfectly snugged down at first.
To replace a large section:

- Insert Groove Side First – If you’re doing a large section, you should install the groove side first. There is no need to remove the groove. Simply fit the replacement’s groove into the existing board’s tongue. Use a beater board and hammer to make sure it is fully seated and snug.
- Blind Nail – With this technique you can now blind nail the board in place by nailing through the tongue into the subfloor or floor joist. Do this every 16″ or every where you have a joist if there is no subfloor.
- The Last Board – In order the set the final board, you will have to follow the instructions above about removing the groove. and continue on from there.
Step #3 Refinish the Repair
Once the boards are in place, the only way to have a seamless match is to refinish the whole floor. This will take care of any high or low spots and will also ensure a consistent finish throughout.
If you replaced just a couple boards, you may be able to finish them prior to installing, but they will still look slightly different. If a full refinishing is beyond your reach or price range right now then just relax. The replacement boards will be fine until the time to refinish works with your budget. Until then, you’ll just have to enjoy the fact that you don’t have crumbling or badly stained boards anymore!
A Few More Tips
Now you have the basics for replacing damaged boards on your hardwood floors. It has always been a fairly easy repair for me to do, but as I wrote the instructions down, I began to realize how much there was to think about! It really is fairly straight forward, I promise.
You may just want to print out this list to set beside you if you decide to take this on. I’ll also be putting together a video very soon of the process for those of you who are visual learners like me! But here’s a few more things to think about before you start:
-
- Get the same species of wood – This kind of goes without saying, but you need replacement boards of the same species of wood, otherwise they won’t match. The 3 types of historic flooring I run across the most often are heart pine, red oak, and white oak.
- Get the same age of floors – This is my little secret to make your floors match PERFECTLY! Wood has changed a lot over the decades and centuries. If you put red oak from 1995 next to red oak from 1925, next to red oak from 1795, all three will look very different. Try to find replacement boards from the same decade from architectural salvage.
- Subfloor or not – Some old houses have subfloors and some do not. If you start taking up boards and don’t find a subfloor, don’t panic. It is more difficult, but can be done just the same. Your replacement boards will just have to end and start on a floor joist. Also, be careful not to fall through!
Alright, that’s it! You now know pretty much everything I know about hardwood flooring repair from this VERY long post. Now go get busy saving that old house!
Photos: © Austin Home Restorations


Founder & Editor-in-Chief
I love old houses, working with my hands, and teaching others the excitment of doing it yourself! Everything is teachable if you only give it the chance.
Wow am I ever glad I found your site. Our home was built in 1958. We just found hardwoods under the carpet in the living room. It is gorgeous. What we found under the carpet is 2 area where there we floor registers. We have two bedroom where we can get wood to fix it. How do I get the boards out with out damaging them.
Thanks for your wisdom.
R
Russ, it’s not easy to remove floor boards without damaging them but it can be done. You’ll have to sacrifice a couple boards to get it started though. If you can get access to the tongue side of the board you can then gently pry up the nails that were installed through the tongue in order to get the board out.
Hi! I’ve successfully repaired two large areas of our 1940’s home. I’ve now come to a tricky spot. I patched the entry to a bedroom, and the hallway flooring is perpendicular to the entry. I removed one of the hallway boards to give myself a little wiggle room. Now, I need to figure out how to make a perfect cut along my repaired row in order to place a new threshold board. Suggestions? Thanks.
I would just use a straightedge like a combination square or level to mark out a line across the boards and then cut with the circular saw. Take your time to make sure it is right where you want it and then cut away.
Thanks for the quick response. The problem is that this is in a doorway threshold. A circular saw can’t get me to the edges. I have a multi-tool with a plunge cutter. Maybe that will work? In a perfect world I could use one cutting instrument for the entire cut. Especially since I’m new at all this! Thanks!
The multi-tool is the way to go. That what I use for the hard to reach spots.
Hi, I am repairing som white oak flooring and need to fit in 3″, 4″ and 5″ wide pieces. I do have leftover flooring from when it was done appx. 7 yrs. ago but the leftover flooring that I have is a bit wider than what needs to be replaced. Apparently the existing floor has shrunk a bit, is my best bet to trim the replacement pieces on a table saw?
Thanks.
You got it Craig!
I’m replacing a few pine boards on a hardwood floor in an old historic home. The floor will be sanded and refinished. I have been researching all over the web for answers for filling the rather large gaps between the boards which range from 0″ to 3/8″. I am using “Select pine” boards that match the thickness and width of the existing floor. My patch is not tongue and groove, so I am gluing with sub-floor glue and finish nailing them to the joists, as there is no sub-floor. The best solution I have read (in my opinion) in filling the gaps is to use either cork or rope. I would like to know what product to use over the cork/rope that will expand and contract, will accept stain, look natural and last a long time.
Tom, any filler you put in the cracks between floor boards will usually crack over time due to the enormous wear and movement that floors experience. That being said I have never tried using stainable epoxies to fill gaps between boards. I have had good luck using WoodEpox to fill damaged boards in the middle of the boards, but I would think that between boards is a different scenario. Worth a try though.
I’m facing a species problem. My upstairs floors need to be refinished, and a few boards may need to be patched…but I don’t know what they are! The trim is definitely pine, stair treads definitely oak, and a scrap of flooring found inside an old air return seems to be heart pine from the look and smell of it. But my blueprints (from 100 years ago) say floors should be white oak throughout – why would someone replace their oak with pine?? Is it possible they patched the oak with pine? How would you test it to find out?
Heidi, there are some good resources on-line for determining species of wood. You’ll just have to judge by color and grain patterns as best you can. If you find something that looks close enough (even if it’s not the same species) who would ever know the difference? Good luck!
I’m a little distressed that the kitchen floor of my 1900-built house has no subfloor under the doug fir flooring. I have a big section in the middle to patch (with some great reclaimed doug fir I got in Portland last week) and surely don’t want to have to re-do the whole floor. Is no subfloor a problem? I guess it hasn’t been for most of 114 years. The patch is needed because the previous owner cut thru the floor in big squares to access plumbing and electrical, then covered the holes with plywood, and then covered the whole floor with particle board and (very ugly) linoleum…
A lot of homes were built without subfloors. The finish floor was laid right on the joists and nailed into place. It’s a little more work to replace the damaged boards since you have to cut your replacement boards to make sure they end and start on a joist, but we do it often. Try to weave in the replacement boards and you’ll be able to hide the repair pretty well.
Thanks, I started today, and except for a couple of oddities, it is looking (and feels under foot) great!
I have a floor that has gaps throughout over half of it. Should I just replace the boards that are damaged or the entire floor?
It really depends on how bad they are, Aaron. You can replace only the damaged boards or do the whole floor. It just depends on condition and your preference.
Hey thanks for the mention in such a great post. If you have any questions about specific species or anything I would love to help out.
Great post! far too many people these days dont see the beauty, and durability that a hardwood floor has to offer. There are some great tips in here on how to tweak floors to get rid of the old worn parts, and keep the rest. Great stuff
What’s the best way and best material to fill the huge cracks in Southern Yellow Pine floors ? These floors were put down in 1865 with square hand hewn nails, so I’d rather not pull it up and reset it.
I certainly would not pull the boards up. Standard wood putty will work but won’t last too many years. A wood epoxy like Abatron WoodEpox or a similar product will fill the gaps and last. Be careful not to fill gaps between boards during colder times of the year though because wood floors will shrink in the winter and expand in the summer. Fills the gaps during the hot summer days otherwise the filler will be pushed out by the expansion in the summer.
If filled in the summer months, would the contraction of the wood cause the filler to break lose in the winter months?
Filling the cracks will always result in the same issue after a few years due to repeated expansion and contraction. But using a more flexible filler can help.
Another tip for perfectly matched floors: Consider removing hardwood flooring in closets and under the staircase and repurposing it for patching up other areas. Of course, this is a tad extreme, but if you can’t get a hold of similar wood it might be worth your while.
Do you think that high moisture content areas could affect that? Like say, floors in a kitchen?
It’s very possible that moisture played a part in the damage. Usually issues like this are caused by spills and splashing water more than by the higher humidity in the room. So after the repair just keep the area free of spills and you can avoid this happening again in the future. Good luck with the repair!
How would you suggest repairing gaps between the planks. There is very little movement between seasons, but I do not want this to pop out. I’ve heard rope is a good option, what are your thoughts on this?
Jeremy, gaps between planks shouldn’t be anything more than a cosmetic problem. If the nails are still securely in the flooring you won’t have a problem with anything popping out. I’d be curious how large the gaps are between boards though.
The gaps range anywhere from about 1/8″ to about 1/4″ and while they are definitely a cosmetic problem, these cracks have been here for a substantial amount of time and some of the boards are splintering on the edges and catch in socks and bare feet. Not to mention the pain of having dirt and whatever else fall into the gaps and having to vacuum them out every other day. I do not want to replace my floors, so I’m looking for a better solution, as is my wife.
Jeremy, if the gaps are giving you trouble then I would go ahead with a board replacement in those trouble areas. Take some measurements and see if the floor has spread out or if the boards have just been broken off in places and that created the gaps. You may have to find some wider boards to replace the damaged ones in that area.
Alright, thank you.
I read your blog. Thanks for sharing such good information about how to repair hardwood floors….very useful information…
I really appreciate this post. I’ve been looking all over for this!
Good informative post
Informative tips!!! Repairing of floors require patience and correct techniques. I have seen many floors that were not properly repaired due to the impatient nature and techniques of the worker.
I like this type of information because you always can learn some interesting new knowledge and at the same time revive the knowledge you already know.
Thanks for posting such a infornative article…..
Great Explanation.
Are there diagonal pine boards under the oak you’ve patched? Amazing, I haven’t seen a lot of diagonal flooring. Looks nice, sadly that it’s just subfloor…
Regards,
Sergey
Happy Floors Inc
http://www.HappyFloors.com
Before the 1960s most subfloors were the diagonal 1x materials instead of plywood. So, yeah we see that more often than not. Although sometimes we run into houses with no subfloors at all, just strip flooring run across the joists.