

I recently had the opportunity to build a shiplap fireplace facade for a client and decided I would share the journey with you from start to finish. The design was fairly simple and it is definitely something an average DIYer can tackle.
A DIY project like this can really spruce up your living room and the fact that I was able to complete everything for under $600 (not counting the cost of the fireplace itself) makes it a very cost effective project that delivers a lot of bang for the buck.
I’ll walk you through the whole process step by step, even showing the issues I encountered along the way since you will inevitably face similar issues.
Here are the tools I used and the materials purchased:
Tools
- 18 gauge nailer
- Air Compressor and hose
- Nail set
- Angle finder
- 4’ level
- Speed square
- Framing square
- Drill & Driver
- Drill bit set
- Miter Saw
- Hand Saw
- Pencil
- Stud finder
- Caulk gun
- Hammer
Materials
- 27 @ 5 ¼” by ½” thick primed shiplap boards
- 8 @ 12’ 1×4 primed square trim boards
- 4 @ 8’ 2x4s
- 7 @ 12’ 2x4s
- Salvaged rough-hewn beam
- 2 ½” screws
- 1 tube of 100% silicone caulk
- 1 ¾” brad nails
- 1 tube of low shrinking acrylic latex caulk
- Paint
- Floating shelf mounting kit
- Metal strap
marking and framing
Once the client and I had settled on the details of the design, the very first step was marking out where to build the frame. This included finding and marking the studs in the wall and the rafters in the ceiling. I also marked the placement of the firebox within the frame.

With everything marked it was time to build the frame. I started on the floor which was not level and had a hump right in the middle. I left a space on the floor between the studs to help deal with this hump and screwed down some nailer boards for the shiplap in a later step.
The walls were not plumb either. In fact, the right side was falling out and the left side was falling in. Because I wanted my fireplace facade to be plumb despite the walls, I planned my frame with this in mind.
I started my first measurement of the top plate, or top horizontal board, on the right side, and plumbing my front stud down to the bottom plate on the floor. Then I worked from the bottom plate on the left side and up since it was falling in. This was to ensure I would keep to the maximum projection from the wall and have a nice square structure to nail my shiplap to later.
A request by the client was to keep the fireplace facade very shallow so as not to take up too much space when projecting into the room. This meant the top of the framing could not be screwed to the ceiling joists since it didn’t reach.

However, I was able to screw to the ridge board running along the peak of the ceiling. The plates and studs were all screwed together and with the shiplap nailed to the frame in a later step, a strong structural facade would be left.

With a plumb and square frame complete it was time to install the shiplap and square trim boards.
Prepping for Trim & Shiplap
First, I needed to determine where the first board should start. Did I want to start from the top and work down or vice versa? The very bottom of the facade would have a horizontal 1×4 trim board like a baseboard and I wanted to have a full shiplap board above that so I planned to start at the bottom. Plus, I wanted to end the shiplap at the peak of the ceiling.
Since the trim boards would be nailed to the face of the shiplap and considering that I wanted a full-width shiplap board above the bottom horizontal trim board, I marked accordingly. I lowered the first shiplap board so that the bottom trim board would overlap ½” when I nailed it in a later step.
I marked the frame on the front using a long level and pencil and then on the sides of the frame that return to the wall. I made the first mark measuring up from the high side of the unlevel floor. This would leave a gap under the trim board on the low side of the floor if I nailed it level in a later step. I would decide how to deal with the gap later.

Start With Shiplap
I started with shiplap boards on the return sides of the frame first. Because the corners of the shiplap facade will be finished with trim boards, the lengths do not have to be perfect so long as they are not too long. Slightly short is ok since the trim boards will cover over the corners later. No need to have mitered corners and the butt joints do not need to be perfect.
I measured for the shortest length to the wall and cut all the piecesto that size. If the wall was perfectly flat and plumb they should all be the same size. This wall was not. Not only was it not plumb, but also rolled in and out.
I made sure the first board was level, nailed it to the frame, then started stacking and nailing my way up. I tried to blind nail the shiplap where the hole would be hidden by the next overlapping board, or by trim in a later step, but sometimes you just have to nail through the face of the board to secure it to the frame and fill the holes later.
Installing the Fireplace
The electric firebox required that the unit be unplugged when not in use and the outlet was inside the fireplace facade. I needed to make sure I did not nail the shiplap board nearest to this outlet. I created a panel from this loose piece of shiplap and added a metal strap on the backside of the board above to create a groove for the panel to slide in to.
Next, I measured the full width of the shiplap facade including the shiplap on the return sides I previously installed. I made sure to cut these precisely or just undersized to ensure that the shiplap is not standing proud on the corners. I wanted to make sure my trim boards would fit snug in a later step.
The front shiplap boards along either side of the firebox were cut to length so that they created the proper opening for the firebox to screw in to.
Before beginning the shiplap installation, I stacked and screwed nailer boards to the floor in the space where the hump was so I could support the middle of the bottom trim board and the first row of shiplap.
Starting at the bottom, I nailed in the first full-size board along the level lines marked on the frame. After verifying the board was level, I stacked and nailed in the shiplap boards along the left and right sides of the firebox.
I slid the firebox into the opening to ensure a good fit and checked that the next full board above the firebox would fit snug on top of the box as well as the adjacent shiplap boards. It looked good so I screwed in the firebox according to the manufactures instructions, verifying that I had a 2 ½” clearance on the sides.
I took a moment to check the frame and interior, as well as clean up the inside one last time before continuing to nail up the remaining shiplap. With everything checked, I continued nailing in the shiplap boards until I reached the ceiling, or in this case, up to the last full board before the peak started.
Remember to occasionally give a visual inspection and check for level along the way. It’s easier to fix a mistake in just 1 board rather than 1 board plus the 6 nailed on top of it.
Cutting the Angles
With all of the full-length shiplap boards nailed up, I was ready to start cutting the shiplap to fit the vaulted ceiling. Because the shiplap will be covered by trim boards along the ceiling, the cuts do not have to be perfect.
The peak was not angled enough for me to use a miter saw, so I used my jigsaw. I cut a full-width board and then measured over and up from each side of the facade and marked my board accordingly. I marked the backside of the board and ran my saw along that side to keep my ready-to-paint side clean and scratch-free.
After a test fit, I nailed it in place. The next board was going to be shorter to start, so I measured the top of the previous board to get my overall measurement. I followed the same steps, measuring over and up to the ceiling and then marking and cutting the board accordingly until I reached the peak.
At this point, I had all of the shiplap nailed up. It was time for the trim boards to go on.
Installing Trim Boards
Because I knew the floor had the hump and was out of a level ahead of time, I planned on installing the bottom trim board last. That way I could decide if I wanted the trim board to be level with the shiplap and leave a slight gap on the low side or if I wanted to follow the floor and close the gap. I chose to close the gap with the trim board since it looks much better after comparing the two options.
First, I shimmed out the frame along the floor, below the first shiplap board, using offcuts from the shiplap since they are were the same thickness.
This is where the trim boards along the bottom would be nailed, but first I wanted to install all the vertical trim boards. These would run the full length of the facade, from floor to ceiling.
I didn’t want to see the joint on the face of the fireplace where the two corner trim boards butt together, so I installed the sides first so that they would butt into the backside of the front trim boards. This allowed for the vertical joint to show on the sides.
I doublechecked the angles of each slope on the ceiling one more time. The right side was mostly 15 degrees and the left side was mostly 13 degrees and both a bit bumpy along the rise.
The side trim boards were all cut square and at a length so they would fit snug against the sloped ceiling. No need to angle cut these ends since they will be overlapped by the front trim boards.
After nailing in the vertical side pieces, on to the front. The front trim boards were cut at the appropriate angles so that the boards fit snug against the floor and the ceiling, and nailed so that they would overlap the trim boards on the sides.
Next were the horizontal trim boards, starting with the peak. Because the ceiling was a bit of a mess, I cut some test pieces ranging from 12-15 degrees just so I could get a visual of where the angled boards met the vertical boards. I also marked the ceiling for the true peak center since the two slopes converged on a slightly different plane. From this mark is where I measured each angled trim board to ensure a good miter joint at the peak.
After cutting and nailing in one trim board, I double-checked the fit at the peak using my test boards and then measured, cut, and nailed the other side.
With the peak done, I measured and made a cut list of the remaining horizontal trim boards. One upper and one lower piece for the right and left return sides and one bottom piece running along the floor in the front. These would all be cut square and nailed so they fit snug between the vertical trim boards.
Since this particular firebox was a wide flush-mount design and due to the overall limitation of space, we decided against a trim board surround around the glass.
caulking and painting
We decided ahead of time that we would do minimal caulking since the appeal of this slightly rustic shiplap design is having shadow lines. We chose to not caulk against the wall, ceiling, or floor and only caulked the nail holes and where the trim boards joined. If we didn’t like the look in the end we could always add caulk and touch up the paint, but not vice versa.
Installing some tape on the hardwood floors and a good dropcloth kept everything clean while I filled nail holes with caulk and used a small whizzy roller to get a smooth coat of paint on the shiplap and trim.
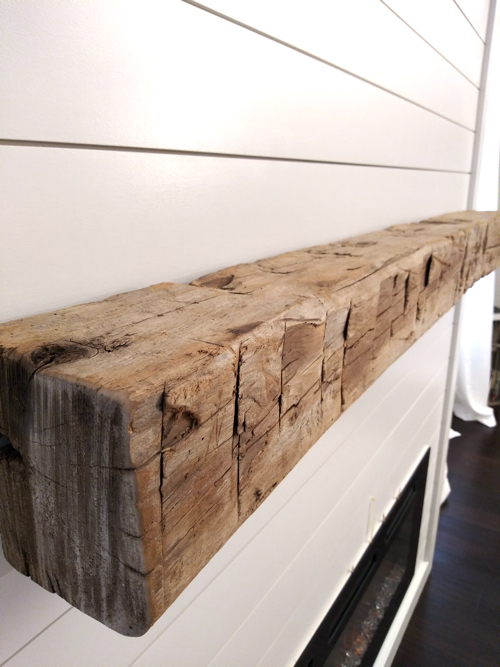
Reclaimed Wood Mantel
We felt that a shiplap fireplace needed a little pop of character to balance out the white and after discussing the options of a box-style mantel using old-growth wood planks or using a solid beam, the client decided on a rough-hewn beam I found in a local stockpile.
Trimming the Mantel
I decided the length that would look best between the vertical trim boards, keeping in mind the overall width of the fireplace facade and the width of the firebox itself. After trimming the mantel, I held it up on the shiplap facade to make sure it looked right.
I used a handsaw to trim the mantel rather than a circular saw or another type of power saw. This gave me the look I wanted and allowed me to make a clean, square cut on a very rough beam.
I rounded over the edges of the new cut with an orbital sander and used sandpaper to knock down any other sharp edges.
Cleaning the Mantel
Next, I checked for splinters and foreign objects like bugs, cocoons, and old nails and removed them. Then I took a short-handled shop brush and brushed any loose pieces away.
For the last step before mounting the mantel on the supports, I used an air compressor and blew off any remaining dust.
Another option for thoroughly cleaning reclaimed wood is to use a pressure washer. This particular beam didn’t need that depth of cleaning and we wanted to retain as much of the silver hue as possible.
Mounting the Mantel
The client chose to have a floating mantel above his shiplap fireplace. This meant no visible brackets to help support the old rough-hewn beam. This is where a sturdy set of floating shelf brackets come in. The system uses horizontal steel rods mounted to a frame or wall that a mantel or shelf can slide onto.
The mantel is 5” deep by 6” tall and weighs about 20lbs. We chose a kit that came with a set of 4 supports and was 4” deep by 1/2” in diameter and came with fasteners. Each support is capable of holding 15lbs and a 5-8” mantel depth.
I used all 4 supports though only 2 would have sufficed. Using a level and pencil, I marked where I needed to fasten the supports. The 2 outer supports were screwed through the shiplap and into the studs and the 2 inner supports screwed to the shiplap only.
After the brackets were fastened, I marked the backside of the mantel for the 4 holes I would drill. Using a 9/16” drill bit and a battery drill, I bored out just over 4” deep at each mark trying to keep the bit perpendicular to the mantel. Not that easy on such a mangled beam. A drill press would have been nice for this part, but I made use of a flat board and speed square to guide me.
After the holes were drilled and cleaned out, it was time to test fit. I slid the mantel onto the 4 rods and gently tried sliding it back to the shiplap wall. It didn’t quite make it so I reamed out the holes more until I was able to slide it all the way back.
Next, I removed the mantel and placed it holes up, and filled each hole with 100% silicone caulk about halfway depending on the condition of the wood around the hole. Some spots looked like it could use more silicone for support.
Finally, I lifted the mantel back up and carefully slid it onto the rods watching to make sure the silicone did not squeeze out and find its way onto the shiplap or dropcloth.
The mantel was left alone to cure for a full 24 hours before testing or any objects were placed on it and we made a final decision to not coat the mantel at all, but to leave it raw. It looks great and will have virtually no traffic or concern for staining so it should do just fine the way it is.
The End Result
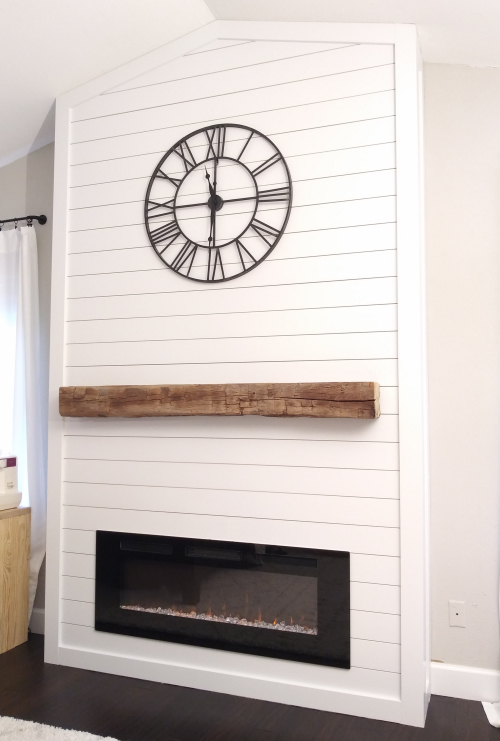
The finished dimensions of this fireplace are 6’-1” wide by 11’-6” to the peak and projects out from the wall 1’-½”. The total cost of materials not including the firebox was $538.99.
Overall it took me about 37 hours to build this shiplap fireplace and a lot of that was searching for the perfect piece of salvaged wood for the mantel so this is easily a weekend project once you have all the materials at hand.
Let me know what you think and comment below if you feel like this is something you could tackle yourself.


Founder & Editor-in-Chief
I love old houses, working with my hands, and teaching others the excitment of doing it yourself! Everything is teachable if you only give it the chance.