
 There are a lot of different techniques to weatherstrip wood windows. Like anything, some are more effective than others. In this post I’ll show you how to install spring bronze weatherstripping on your old windows.
Spring bronze is, without a doubt, my favorite type of weatherstripping for a few reasons:
- Very attractive and gains a nice patina as it ages
- Lasts well over 100 years when installed properly
- Very effective at air sealing
- Extremely adaptable to seal gaps of various sizes
Anything that lasts as long and works as well as spring bronze weatherstripping usually requires a bit more work to install than the peel and stick weatherstripping you find at the hardware store. Once it’s installed and tuned properly, you can forget about it, and in our “no maintenance” culture today that is awesome!
Tools Needed:
- Tin Snips
- 1 1/4″ Spring Bronze
- Coppered Nails (if you live in coastal areas, use solid bronze nails)
- Drill (with 5/64″ bit)
- Hammer
- Tape Measure
You can read my previous post about weatherstripping doors here: How To: Install Spring Bronze Weatherstripping
How To: Weatherstrip Wood Windows
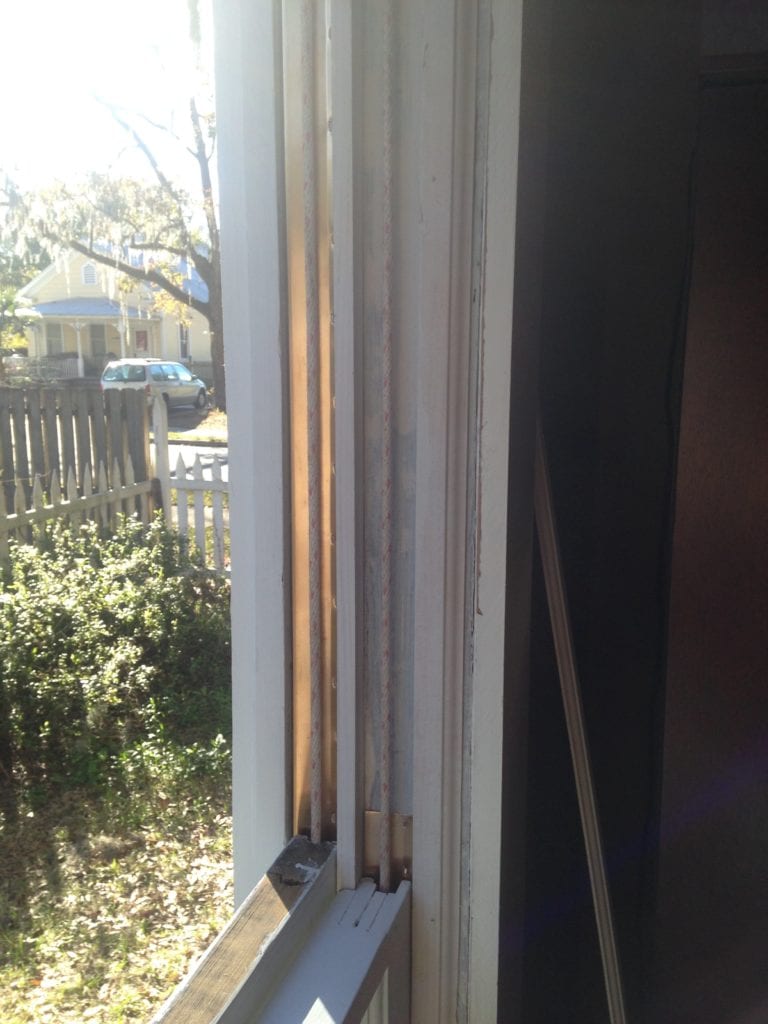 You’ll need to have the sashes removed from the window jamb in order to install the spring bronze. We tend to install the weatherstripping as a part of a full restoration of the jambs and sashes.
If your windows are painted shut or can barely move due to paint build up, installing spring bronze won’t do much good other than to make them even more difficult to operate.
If this is the case, prior to installation, scrape the jambs clean of the decades of paint build up so you have a smooth surface to work with. If you want your jambs primed (which I recommend) or painted, you’ll need to do this prior to installation as well. Trying to paint around spring bronze is a pain in the @$#.
If you have restored, easily operable, or windows that are even just loose in their jambs, you are a good candidate for spring bronze weatherstripping.
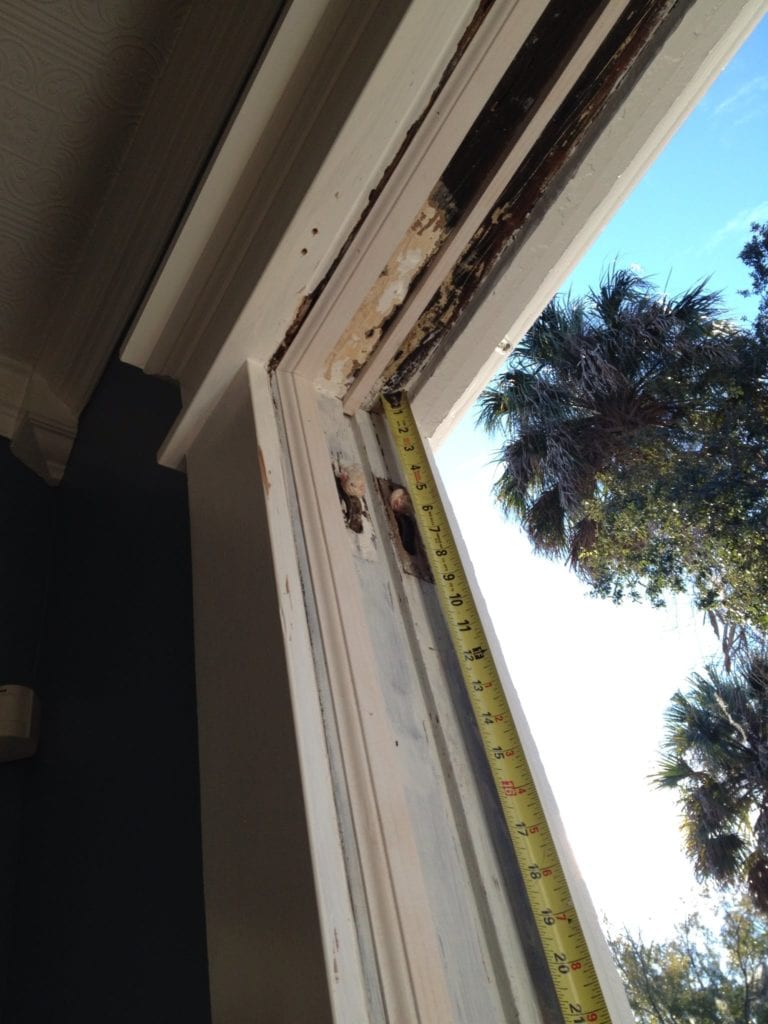
Step #1 Cut to Length
Measure the height of the bottom sash. Using your tin snips, cut two lengths (one for each side of the jamb). Cut them 1 1/2″ longer than the height of the bottom sash with a bevel at the bottom to match the sill angle.
For the top sash, your measurements have to be a little different. Measure the height of the top sash, add 1 1/2″ then measure the distance from the top for he jamb to the bottom of the pulley (in the case of this picture 9″). Subtract the 9″ (or whatever your measurement is from the previous number and you’ll have the length of your bronze for the top sash.
ie. Top sash height = 32″ + 1 1/2″ – 9″ = 24 1/2″
I promise the math lesson is now over. Phew!
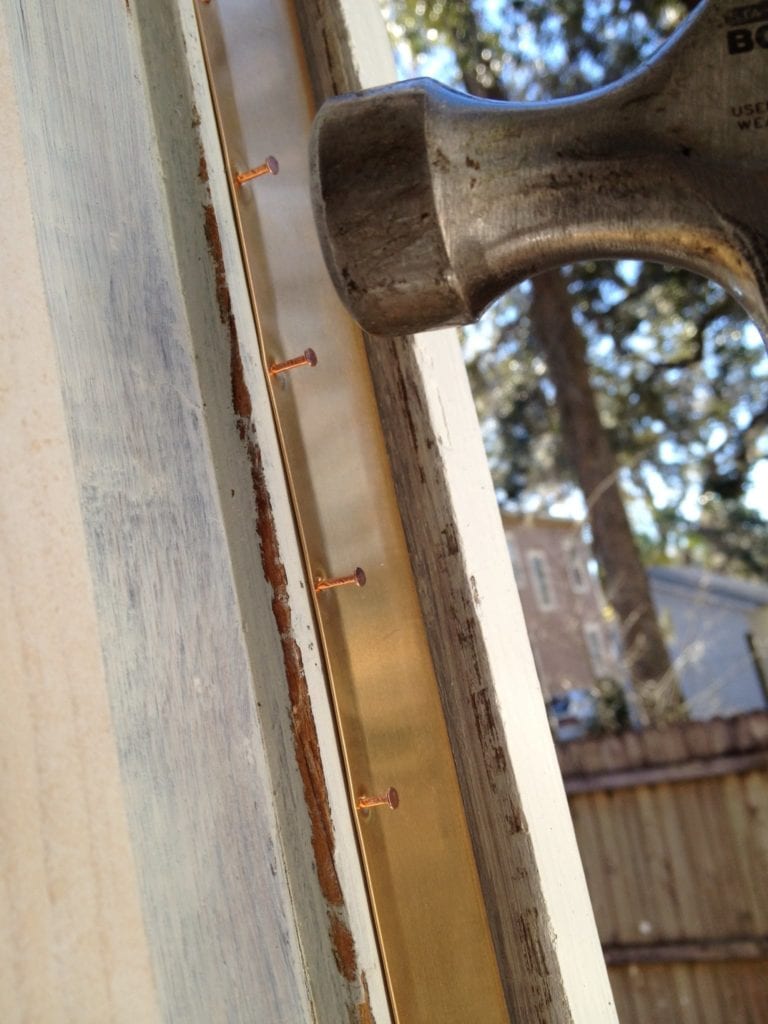
Step #2 Pre-drill & Nail
 *Caution: Spring bronze is nailed over top of the weight pocket access doors. Once it is installed, it will have to be removed is you ever need to access the weight pockets to re-rope your old windows.
If your jambs are very sturdy and the wood isn’t hard as a rock, then you can just nail right through the bronze and into the wood. If this is the case, you are a very lucky person.
I have only found one house that this worked on. The rest have had jambs that are made from petrified wood that is so poorly attached that it bounces like a trampoline with every blow of my hammer. If this is the case, you’ll need to pre-drill. Here’s how:
- Set your bronze in place on the jamb with the nail side (the flat side) facing inside the house. Make sure it is right in the middle of the jamb. There should be at least 1/16″ space between the bronze and the blind stop and parting bead to allow it to flex properly.
- Drill the first hole at the top thru the bronze and into the wood about a 1/2″. Tap in a coppered nail so it dimples the surface just a bit.
- Pull the bronze nice and tight and repeat the process about halfway down the length and again at the bottom. The second hole you pre-drill will set the angle of the bronze, so make sure it is lined up straight and doesn’t wander into the parting bead or blind stop at one end.
- Go back and repeat the process so that there is a nail every 1 1/2″ to 2″ along the length of the spring bronze.
Step #3 Spring the Bronze
 Once it’s all nailed in place, go back and spring the bronze if necessary to increase the amount of gap it will fill. Test fit your window first to see if you have a snug fit or if there are gaps where the bronze isn’t running against the side of the sash.
If there are gaps, you need to bend the spring bronze out in those sections so that it puts light consistent pressure on the sides of the sash. To bend the bronze, you can gently use a putty knife to bend it back.
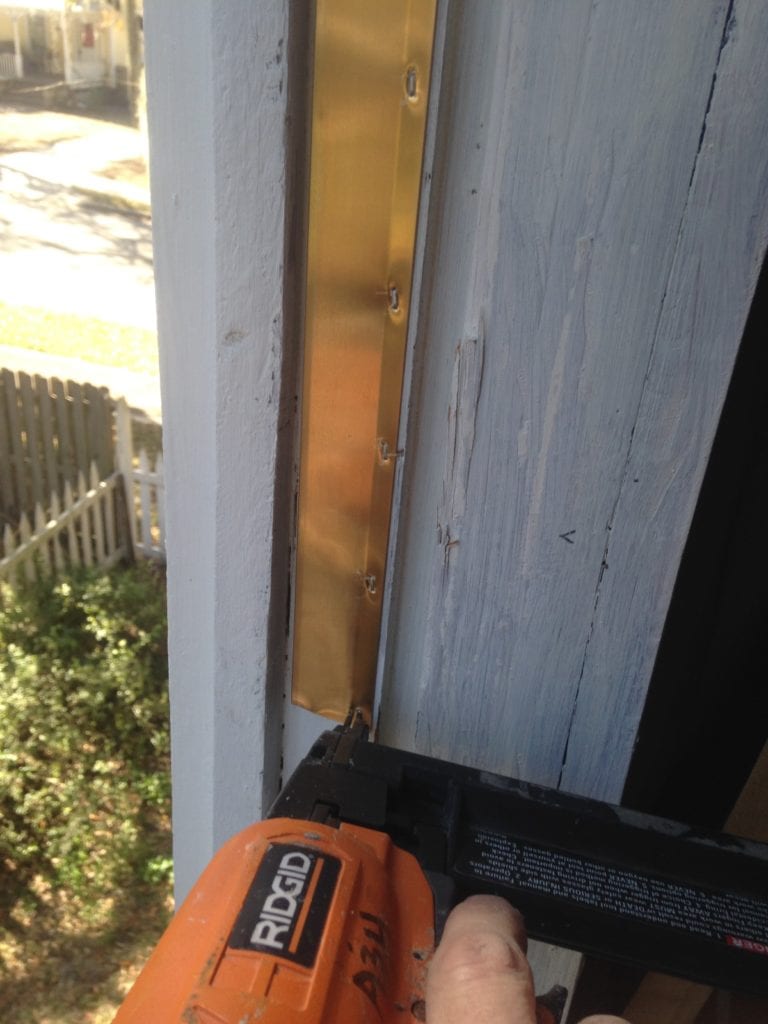
Alternative Installation
Sometimes I have come across windows where the jambs are just too loose to nail anything. In these cases, I have resorted to a pneumatic narrow crown stapler to install the bronze. I’m not going to lie, it goes MUCH faster! But there are a few things to be careful of if you decide to go this route.
- Use only 3/4″ stainless steel staples – Anything longer than that can get in the way of the moving weights behind the jamb. These nails will be exposed to the weather so if they aren’t stainless, they will rust and loosen their hold in a short time. Also, anytime you put two different types of metal together, you run the risk of galvanic corrosion which causes the metals to rust and corrode prematurely. This shouldn’t be a problem with stainless steel because the coppered nails are steel in their core as well. But if you use something like aluminum nails you may have a problem.
- Turn the pressure down on your nailer. It is very easy to blow right through the thin bronze with an air nailer/stapler. Test a few strips to find the right air pressure and depth.
- Still put a nail at the top and bottom of the bronze. The coppered nails hold better than pneumatic staples will. The two spots that are most likely to pull away are the end of the bronze so put a nail in those spots to make sure it doesn’t pull away in the future.
There is also a strip of bronze that can be installed at the meeting rails between the two sashes, but I rarely use it since I have found that by simply adjusting the sash lock, I can achieve a good enough seal to avoid this added expense.
Once your spring bronze is installed, you won’t have the stereotypical drafty old house anymore. Enjoy the lower energy bills and warmer winters indoors!
You can find some more energy saving ideas for an old house here: 4 Cures For a Drafty Old House


Founder & Editor-in-Chief
I love old houses, working with my hands, and teaching others the excitment of doing it yourself! Everything is teachable if you only give it the chance.
I’m restoring some double hung windows with spiral balancers. I have the sashes removed. What do you recommend for weatherstripping?
Great information in your blog. I read and re-read prior to cutting the first painted-in window. Getting ready to put back together.
I have been attaching the weather strip to the sash it works well, is invisible and does not cover the weight door . .
Thanks for this post. I’ve installed this weather stripping on my 1890s Victorian in Michigan on five of my original windows now. I’ve got 3 more to go still!
Hi Scott,
I have an 1880’s house with arched, fully half round, top sashes. Would the spring strip work on those?. The weather stripping does sound intriguing. Thank you in advance for any advice. Great Blog by the way.
Yep works on radiused tops.
Disregard my last comment about no instructions on weatherstripping in your book Old Windows Made Easy. Looking forward to restoring the windows in my 1906 bungalow. And they are beautiful with diamond shaped muttons in the top sash and old wavy glass. What a treasure these windows are and I look forward to making them proud again.
Thank you!
John
Thanks for all of your info. I have windows that had been weather stripped at some point with galvanized channel. Over time with wood movement, some of the windows are really sticking. I am wondering if you would recommend removing the galvanized and re-weather stripping with spring bronze, or trying to fix the issues with the galvanized weather stripping (I plan to reglaze them so I have to remove the sash anyway)? Oh, and what is your opinion of weather stripping systems like these? http://www.heirloomwindows.com/weather-stripping-kit.html
scott,
i am currently restoring my windows in my 1926 craftsman home here in tampa. As far as weatherstripping, i have used the spring bronze on the jambs. Im still getting a draft at the bottom of the sash. What would be the best solution to fixing this problem? I really like the spring bronze look. i was wondering if i could run a clean strip across the sill, or do u foresee this being a problem?
mark
Hi – I’ve rebuilt 22 double-hung so far… 18 to go. I’ve used the spring bronze in the tracks, and on the bottoms of the sash, the top, and where they meet. DON’T DO IT! Definitely use it in the tracks. But I found here in the NW that the bottom bronze leaves blue streaks on the sills AND the nails attract humidity in both the top and the bottom. So they wind up rusting in the sash… which then leads to more humidity staying longer, and the sash rotting out around the nails.
I am using instead “v-strip” weather-stripping. Put it on the bottom of the bottom sash, the top of the top sash, and the front-facing (room-facing) bottom rail of the top window-sash. Yes, you will see it when you open either window, but you will have LOTS less problem with it peeling off as you use your windows. You can also use it above the pulleys where it is difficult to nail in the bronze. I cut the strip long enough to extend down behind the bronze (I’m talking in the jambs/tracks here). This allows the window to slide over it without catching on it. So it goes from the top of the track, along the side of the pulley, and disappears behind the nailed edge of the bronze strip. It makes a nice, continuous fit from top to bottom that way.
I’ve used this with excellent results, from Amazon and from my local Winks Hardware store:
M-D Building Products 3525 V-Flex Weatherstrip,17-Foot Length, 3/8-Inch Wide, White
You absolutely can add a strip of bronze across the sill to tighten up the bottom. I’d keep the nail side to the inside.
Hey Scott!
thanks again for your website and advice. I am really pleased with how my window restoration project has been coming along and your blog has been my primary source for instructional material. Just a quick question about spring bronze: what is the approximate minimum thickness that it can be compressed to? Even after stripping all of the paint from my sashes and jambs, there is not a lot of wiggle room. Maybe it wouldn’t be that useful in my situation? Or possibly when the wood shrinks this winter gaps will open up? Once again, thank you!
I have found that a gap roughly from 1/16″ all the way up to 1/4″ can be filled with spring bronze.
I’ve got windows where only the bottom sash opens and there is no counter balancing. Would a full weather stripping job consist of Spring Bronze on:
1. Both sides of the Jam where the bottom sash slides up and down.
2. The top, where the bottom sash rail meets the top sash rail.
3. The bottom of the jam where the bottom sash rests when the window is fully closed
Thanks!
Bob, those are single hung windows and you are spot on with how to weatherstrip them. That’s right!
Scott, Why do you cut the weather stripping 1 1/2″ longer than the bottom sash? Where does that 1 1/2″ end up?
With my Windows only the bottom sash opens and they’re not counter weighted.
Thanks!
Bob, the spring bronze runs a little taller than the sash so that when it is in the most open position the sash down slide past the bronze and get stuck.
Could you discuss the meeting rail situation further? We’ve refinished our windows and are ready for weatherstripping, but I remember that they were very leaky at the meeting rails.
What adjustments to the sash lock did you do? If that doesn’t work well enough in my situation, how do I do the spring bronze? Thanks!
Simple 1914 farmhouse in Washington state Gorgeous fir windows.
Amy, here’s how I tune a loose sash lock:
1. Remove the sweep (the part that turns)
2. With the windows on the closed position pull the meeting rail tightly together.
3. Holding the meeting rail tight, place the sweep on the window in the closed position and mark where it should go.
4. Remove the sweep and drill the new holes on your marks.
5. Install the sweep and test for a tighter fit.
The meeting rails can also be bowed away from each other. I have old cedar double-hungs, and some do that. I highly recommend AGAINST spring bronze on my actual sash rails: top, bottom and mid-rails. I DO use it in the tracks. I’ve actually just removed my spring bronze from my rails that I installed on the first few I repaired. I find that the nails attract condensation because of the temperature differential between indoor/outdoor and start deteriorating the wood around the nails. In fact, in a few windowsills (exterior… interior are called stools), some nails that had been left over from the previous owner’s plastic storms had actually turned into quite nasty holes in the old fir sills.
Anyway, I digress. Do use spring bronze in the tracks, but not on the sashes themselves. Instead, I use the v-strip weatherstripping you can get off of Amazon, or at some hardware stores. It is self-adhesive, clean, white, and easily replaced. It is not nearly as bulky, and the nails will not rust or discolor the sills under the sash. (Even the “brass” nails are only coated.)
To make the rails meet properly, of the back one is too low relative to the front one, I have started planning off the top of the top sash. It means removing the window completely, but on those I have rebuilt, that is relatively painless now. I use a Porter-Cable electric planer from Amazon (about $80 new) and it is a really easy way to do a good job. Just be very careful you don’t remove too much!
If the back middle rail is to HIGH, you will have to use shims. I have one like that (too much of the P-C planer!) so plan to use the v-strip in a layer laid flat (not folded into a V), with a second layer over it, folded into the V, on the upper rail of upper sash.
I hope this helps!
I was wondering if you could explain a little more about how you use the spring bronze around the pulley on the upper sash. I didn’t quite understand how to make that work. Thanks for your help, I starting to get the confidence to tackle the 54 window sashes on the downstairs of my house. Thanks
Loren, I usually don’t install spring bronze above the pulley. The mechanics of it always seem to be problematic and I find that though I would like to have the top 3 or 4 inches weatherstripped it’s not worth the inevitable trouble that it causes. So basically my recommendation would be to run the spring bronze from just below the pulley to just below the meeting rail on the top sash.
can you tell me if the same process of weatherstripping can be applied to casement windows?
It definitely works on casements. The process is more similar to installing on a door. You can the details here: https://thecraftsmanblog.com/how-to-install-spring-bronze-weatherstripping/
Awesome website…very informative and helpful. I have been rehabbing a 1930 depression baby in Taylor, TX for the last 5 months. Wallpaper on cheesecloth on ship lath. Finally moved in and starting on the windows. Was planning to replace the rope with chain and weather strip with v-seal weatherstrip. OK? The old growth lumber is sacred to me. 2 5 gallon bucket of nails pulled. All the ship lath went back on. There was a lot of repurposed lumber already on the walls. 1 x 12, 10, 8. 3″ and 5″ t n g flooring…on the walls. It’s been quite the adventure. 20′ longleaf pine floorboards and ship lap! That stuff doesn’t just grow on trees anymore. Thanx…your site is very helpful.
Marcus, chain is great but usually an unnecessary expense. Check out this post: https://thecraftsmanblog.com/what-kind-of-sash-rope-should-i-use/
Glad you’re saving as much as you can! Sounds like a fun project.
Yup! What Scott says. Don’t waste the money. I invested instead in Sarco M glazing putty out of Chicago. Much better than DAP 30. What’s really cool about it is you can flatten it in the bucket, pour a thin layer of boiled Linseed oil (BLO) over it, and then re-use it months and months later.
I’m using these techniques on my windows as well. Using Sarco-M putty out of Chicago. FYI, for the rail-meeting, and tops and bottoms of the windows, use the V-strip weather-strip. Works really well. I also use it above the pulleys. I ALSO use it flat under my wooden drawers, both sliding surfaces. They slide like silk! Good article… thanks for promoting keeping the windows. They really are the soul of the exterior.
Hi, great article. It has inspired me to try doing my old windows. My question is how do I size the width of the bronze spring? If I have a window that is 1.5 ” thick would using the 1 3/8 bronze spring be the right size? Can you use a small size and still gain the benefit of bronze? Reason I am asking I have several different windows depth that where installed at different times during the house got addition as added over the years.
Glad you’re gonna try to do it yourself Ray! Standard residential windows are usually 1 3/8″ unless they are older than the mid 1800s. Smaller spring bronze works fine, but I prefer to stay as close to the width of the window as you can.
I am replacing window weights with spring balances. can I use the spring bronze as well, to tighten seal at sides of windows?
Carol, the spring balances will not fit with the spring bronze. If done properly, the spring balances should tighten things up a good bit though.
Another source of high-quality, custom-fitted storm windows: MonRay.
Readers may want to check out http://www.windowstandards.org for a book developed over the last few years by 100+ collaborators and 5 nationally-know window restorationists.
If you need to reglaze and strip old paint, use lead-safe work practices to protect building occupants ( http://www.epa.gov/lead) and consider a method that protects the old glass, is gentle on the irreplaceable, old wood, and softens the glazing and paint for fast scraping – Speedheater Infrared Paint Remover at http://www.eco-strip.com in USA
I love spring bronze for my doors, but fear that it will become extinct because I had a little difficulty finding it last time I needed it. Thanks for promoting it and giving us a new use!
It’s here to stay even if it a bit harder to find these days!
Oh yeah, forgot one other thing – I’m going to play with breaking the spring bronze at the sash weight pocket for maintenance purposes. Thinking of doing some kind of lapped tab or bayonet joint to allow for pocket door removal without having to remove the spring bronze. Have you ever played with this idea, or any recommendations on what will or won’t work?
Never tried anything like that. Let me know if you have success with it.
Great blog! Lots of good advice on the exact types of projects I’m working on. I’m working in the Tampa area as the QC director for a big commercial builder, but when I grow up I want to do what you do. I love the way houses used to be built, and bringing them back to where they should be. For now – I’m working on my 1935 farm house, and taking on the windows. Had a few questions on the process
– Parting stops – its tough pulling these without damaging them. Do you usually end up replacing a lot of these? If you do, what do you typically make them from?
– Storms – what products work well to maintain the historic look of the house? I’ve got wood framed screens with the original copper in them, and I’d hate to lose the look (they are red which is a key color component to the scheme). I’m starting with the window refurbishing and weather stripping, but if that doesn’t reduce noise and drafts enough – storms will be the next step.
I appreciate any advice you can offer. Thanks!
Thanks Jon! Partings bead is usually a big pain to remove with all the accumulated paint. If yours are nailed in, which occasionally is the case, it will be really hard to get them all out in one piece. We usually replace all the parting bead just because of cost and speed since it is readily available at most lumber yards and even Home Depot/Lowe’s. Try this: Put the top sash in the lowest position it will go and cut the paint on the parting bead before slowly trying to wiggle it out. Duck bill vise-grips will help immensely!
As for the storms I would go with traditional wood storms. They keep the historic look of the house and help with the noise and drafts. My company builds them as does Wood Window Makeover in Tampa.
This is really interesting, You’re a very skilled blogger.
I’ve joined your rss feed and look forward to seeking more of your magnificent post.
Also, I’ve shared your site in my social networks!