
 I get a lot of questions from people about removing their aluminum siding and potentially getting back to the original wood underneath. Is it possible? Is it feasible? What will I find? After all, siding is one of the 5 Worst Mistakes of Historic Homeowners.
Let me start by saying that removing aluminum siding is not complicated. It can be tedious work, but there is nothing particularly complex about the process, which makes it a perfect DIY project.
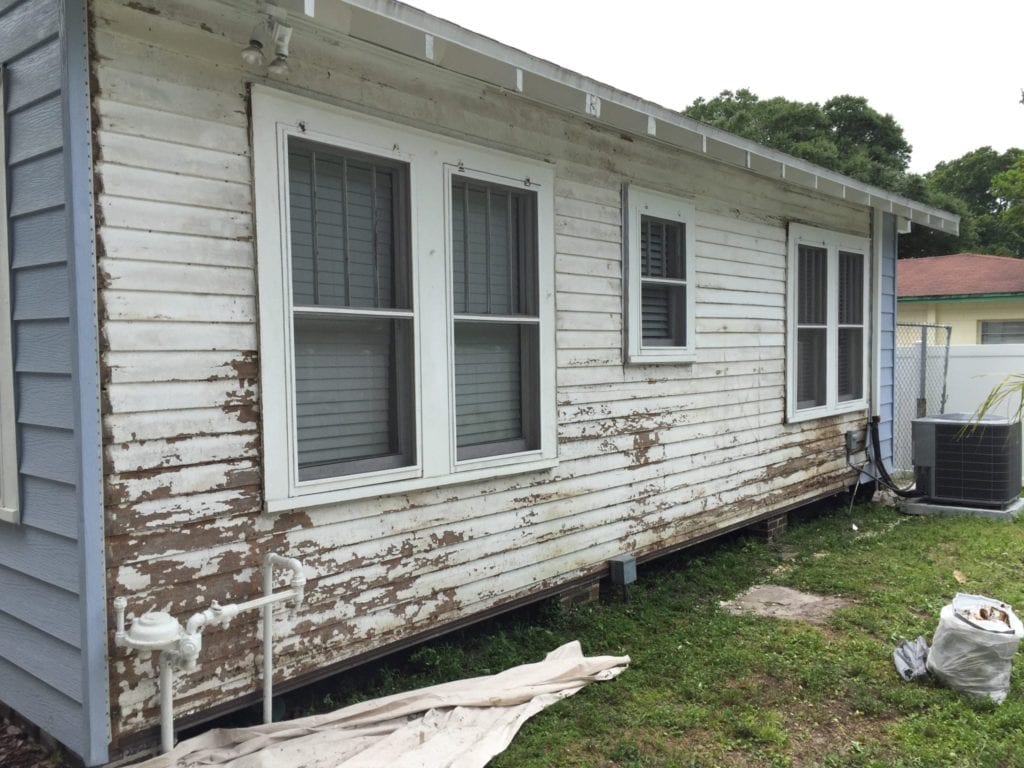
Most times, aluminum siding was installed right over the old wood with very few modifications. It was cheaper to do that way because removing the wood siding was usually cost prohibitive. That’s good news because if your old house originally had wood siding, then it is probably still hiding underneath all that tin foil.
The one caveat to removing aluminum siding, and vinyl siding for the matter, is that you don’t know what the condition of the wood underneath is.
If you are willing to roll the dice a little and have enough money in the budget to cover some repairs to the original siding, then removing your aluminum siding is definitely a worthwhile option. But before you start, you need to embrace the idea that you WILL have repairs needed to your home’s envelope when you remove aluminum siding.
There are two schools of thought on removing aluminum siding.
- How to remove it without damaging the siding
- How to remove it for the scrap yard
If you just want to get this stuff off and send it to the scrap yard, then the work is much easier. You can damage and tear the stuff apart pretty easily and have your house unwrapped in no time.
If you want to remove a section of the siding and then reinstall it, that requires much more finesse. We’ll talk about both below.
How to Remove Aluminum Siding
Step 1 Play Detective
Before you break out your pry bar, peel back a corner of the siding in a couple places and see what is going on under there. Knowing what’s underneath first will help you plan your work going forward.
Is it clapboard, shingles, asbestos siding? You need to know what you are getting into.
 Step 2 Peel it Back

Aluminum siding is very sharp and can easily cut you, so before you do anything, put on a pair of work gloves. Aluminum siding and vinyl siding are attached much the same way. They are nailed across the top of each piece and the bottom of the lap hooks into the top of the following piece.
Removal For Repair
Using a metal clothes hanger or other small hooks, dig into the end of one of the pieces of siding, which will allow you to pull it off. Pull the bottom down and away and then you should be able to simply unzip that piece horizontally across the wall all the way down to the end.
That will give you access to the nails holding the piece below the one you just unzipped so you can pry them out with a pry bar to free the piece from the wall.
Removal For Restoration
If you are getting rid of your aluminum siding then just grab that pry bar and starting at a corner, tear into this stuff. You can really just rip it off pretty easily. There may be some nails that need a pry bar’s help to come loose, but with some muscle, it will come free.
 Step 3 Nailing Channels & Trim
On outside and inside corners, you may have little channels that the aluminum slots into. These can be pried off by finding the nails that hold them in place too.
Also, depending on your siding salesman, your exterior trim and fascia may have been wrapped in aluminum, which creates just one more thing to remove. This cannot be removed without damaging the aluminum, which is fine if you plan to trash it, but can be a problem if you are planning to keep your aluminum.
Generally, the aluminum that wraps over your old wood trim is held in place with small aluminum nails. They are a bit of a pain to pry out, but if you can get a corner started, it is usually easy to peel the aluminum back and let the nails come with it, rather than trying to pry each nail out.
Step 4 Aluminum Soffits
The open eaves in old houses are another thing that often get covered up and turned into what appear to be vented aluminum soffits. These soffits are very easy to remove. Each panel is attached with a couple small nails to the sides of the J-channel. I honestly just get the first one off, and using the claw side of my hammer, just yank the rest of it down before undoing the nails holding the J-channel in place.
Step 5 Insulation
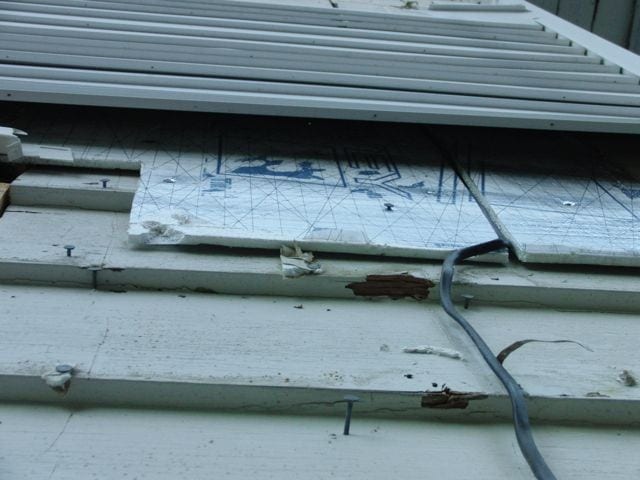
Often, you’ll find 1/2″ styrofoam or other rigid insulation underneath the aluminum siding which was nailed into the siding with fat headed roofing nails.
Removing this stuff is simple since it is so fragile and can be torn away from the building simply. Removing the myriad of nails throughout the old siding is the time consuming process. Removing the nails and patching all the holes is what takes me the most time in the whole process, probably.
What to Expect After Removing Aluminum Siding
Once you’ve got everything off, you can finally see what your house was supposed to look like. In my experience, there are a few things that often require restoration after we unwrap an old house.
- Painting – I have never unwrapped a house that wasn’t in dire need of a good paint job. Often, that was the reason the previous owner installed the aluminum in the first place, to avoid paying for a new paint job! Prepare for this in your budget.
- Head Casings – Drip caps and any kind of decorative casing at the top of windows and doors was often destroyed to create a flat plane for the new aluminum siding. These elements keep water from getting into your windows and should be repaired as soon as possible.
- Corner Trim – If the corner trim got in the way, a lot of siding contractors simply removed it before installing the aluminum. Use the old paint shadow lines as a guide for what size trim boards you need to button these corners up again.
- Window Sills – Just like the head casing and corner boards, anything that sticks out was either removed or chopped back rather roughly. Check to see if you have missing or damaged window sills.
- Additions – Aluminum siding was sometimes installed when there was an addition made to the house. That addition never had the original wood siding so you may be tasked with siding a whole section of the house.
If you can be prepared for some of these possibilities then you’ll be well ahead of the game. Removing aluminum siding can really do wonders to your home’s curb appeal if you have the budget to restore the siding underneath.
We’ve unwrapped a lot of houses and it never stops being fun for me to see what we find underneath. The depth and beauty of these old houses can really shine again once you get that awful fake stuff off its face.
And one last tip: don’t forget to haul all this aluminum to the recycling center for a nice payday at the end. Getting a check for a couple hundred bucks at the end of a hard day’s work makes it much more rewarding!


Founder & Editor-in-Chief
I love old houses, working with my hands, and teaching others the excitment of doing it yourself! Everything is teachable if you only give it the chance.
I plan to remove the aluminum siding from my 1925 bungalow and when it was installed they cut the window sill flush with inside edge of the window casing (or where there would have been window casing). Is there a recommended repair for this scenario?
Do I have to remove the gutters, fascia and soffit in order to replace vertical aluminum siding?
We have removed the vinyl siding on our c.1900 house, and need to make repairs/patches to several boards underneath. I’ve seen new wood siding have serious paint failure and rot within just a few years, do you have any recommendations on what type of wood siding boards to look for to making repairs to the historic siding? The main problems are a few boards with significant splits and the bottom board is in poor condition since it is within a few inches of the ground. Siding is simple lapped boards, not beveled.
Want to take off aluminum siding and also want to termite treat. Would it be wiser to wait until aluminum siding is removed before termite treating?
If you are going to tent then it doesn’t matter if the aluminum if off or not.
3 additional comments that should also be noted:
1. Beware of wasps when removing the aluminum soffits. They particularly like to nest in the corners. You can toss a roach fogger up into the soffits and the wasps will start flying out after about 10 minutes.This solution worked very well for clearing them out before tearing out the corner soffits. They returned shortly after, so there was a limited amount of time to tear down that soffit (about 15 minutes in my experience). Just beware and only do this if you accept the risks. They are dangerous pests to mess with and a single sting can be deadly to those of us who are allergic to them.
2. Check out the windows before removing the aluminum. The windows had been replaced with aluminum siding windows that were just tacked on with roofing nails and not flashed to keep the water out.
3. Check the condition of the paint. The old wood underneath may need more than a simple paint job. It may need substantially more work than the average exterior paint job.
One other note: Have a plan of action ready to deal with aluminum siding that is close to the electrical service head.