

Your roof is your home’s main line of defense against water intrusion. It gets baked by the sun, drenched in the rain, and covered by snow and ice. It is the workhorse of your house and does its job without complaint, but there is one little detail that is missed by way too many roofers that causes big time damage to your house.
It’s not valley flashing or underlayments, though those are just as important. It’s something so simple and it is blatantly obvious if you know what to look for.
In fact, this issue is so common that a lot of the localities and even contractor training classes teach roofers to do this incorrectly.
The Drip Edge
For any asphalt shingle roof, a drip edge is required by most local building codes. What is a drip edge you ask? It is a small piece of “L” shaped metal with a little kick out on the edge that goes around the perimeter of your roof. Its purpose is to give water an edge to drip safely off your roof onto the ground or into the gutter.
I haven’t seen a roofer forget the drip edge, but I have seen WAY too many who have no idea how to install it properly. Without proper installation, it is completely pointless.
Look at the picture below and you can see the wrong installation on the left and the correct way on the right.
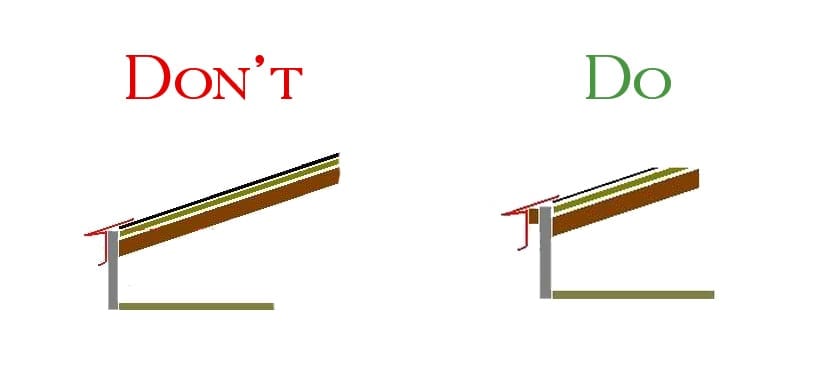
How To: Properly Install Drip Edge
This small little detail is incredibly important! I can’t stress this enough. The drip edge should be installed over a piece of 1×2 furring strip so that it stands off from the fascia or rafter tails.
If the drip edge is laid right up against the fascia or rafters, then because of surface tension, the water runs right up against the fascia and underneath the soffit.
You want water to stay off your house if you hope to avoid rot. This lazy installation causes all kinds of damage to much more than just the fascia. It creates soggy siding, encourages termite activity, and hugely increases any potential for rot.
A lot of roofers may disagree with me on this, saying that the kick out on the drip edge does its job without needing the furring strip, but experience is the greatest teacher. I’ve watched the water run down fascia boards and rafter tails on rainy days with the drip edge doing little if anything. So, in my opinion, there is only one way to install a drip edge properly, and it’s with the furring strip.
I have to think the problem is mainly ignorant roofers. I noticed the problem for years, but it wasn’t until my friend Steve Quillian of Wood Window Makeover kept ranting about it that I started to look for it.
And it is amazing how rampant this problem is. I’d say that close to 40% of the homes I see have this problem. It can be remedied fairly easily by a roofer for very minimal cost. And it honestly wouldn’t have cost anymore to do it the right way the first time. You just have find a roofer who knows what he is doing.
Check out your house and be a good neighbor by looking next door too. Hopefully, your home is protected. Knowing is half the battle. (Yes, I stole that line from GI Joe but, hey, it’s true!)
If your drip edge is improperly installed, I would call a local roofer and get it looked at immediately. The sooner you fix this, the sooner your house will be protected.


Founder & Editor-in-Chief
I love old houses, working with my hands, and teaching others the excitment of doing it yourself! Everything is teachable if you only give it the chance.
What do you do with the drip edge when you don’t have a fascia board to put the furring strip on? How do you apply the drip edge then? We have no soffits either.
So what about snow buildup in the gutters?? If the drip edge isn’t tight, the snow/ice will lift it up along with whatever it’s attached to.
Yup your right
Never mind it doesn’t look like my http pic links worked so you can’t see the pictures.
Both pictures are incorrect. Felt paper is meant to go over top of the drip edge at the eaves and under the drip edge at the rakes… GAF installation instructions make this clear. This will prevent the problem you are talking about. Actually it’s quite ironic for you to make this mistake.
Sorry about the rant roofing is hard work and and most roofers do quality work but they are probably not aware of this problem because the person who installs the gutters would get the call that water is leaking behind the gutters so they either pull the drip edge out or add flashing behind the drip edge and into the gutter to fix the problem .
.
I have an issue with the eave of my roof. The drip edge along with the shingles are bowing up in several places. Could this be because the drip edge was not installed correctly or some other reason?
In most cases if the shingles go past the drip edge about 3/4 of an inch the shingle edge will break the surface tension unless your roof has a shallow pitch then the water will reach the drip edge and if drip edge is tight to the facia board it will run down the fascia so as added insurance leave space between the fascia and drip edge . The furring strip idea may work so long as the bottom of the drip edge is lower then the furring strip by about a 1/2 inch. I do not think it is needed just leave a gap between the drip edge and fascia board .
I have been installing rain gutters for 25 years and have had no , zero luck getting any roofer to do their job right . So I waste hours and hours fixing their work so I do not get called back because water is running down the fascia board . The other thing they like to do is end the shingle at the edge of the drip edge while pinning the drip edge tight to the fascia or even go so far as nailing the drip edge to the fascia board just to guarantee that the water will run down the fascia board . Hint drip edge, the edge that water is to drip off of . If you leave a good 1/2 space between the facia and the drip edge that is enough to break the surface tension which allows the water to stay off the fascia board .
You say to leave the drip edge 1/2 inch from fascia only to help you put gutters up easier! The main article is to put a 1×2 up then drip edge. Why didn’t you say you can’t put gutters up properly with the 1×2 there? I don’t see roofers putting the shingles flush with the drip edge unless it is d-style drip. Obviously you don’t do roofs.
My new 7 year old as of June 25, 2020 corner townhouse unit has no drip edges Installed at all.
As a result wildlife critters squirrels are in my attic plus travelling through the other 7 units attached along this row Been in contact with Ontario wildlife and physically observed there is aphesis/droppings from these squirrels in my attic and another neighbor on this same row of townhomes has the same problem. We both have heard them up in the attic.
Been in contact with the builders, board members from the condo organization whom we pay condo fees to. Response from both is yes there is a 1 year warranty re the roof from date of possession and purchased.
Builder confirmed that not installing the drip edge was approved by the builder inspector prior to owner purchasing these townhome units. What they did in place of the drip edge was they installed shingles.
Ontario wildlife observed and took photos of the shingles lifting and wood Is rotting underneath therefore making this accessible for the animals to enter the attics.
My question to them is how did this type of roofing workmanship pass the inspection building code.
Can you please verify if there is a builder inspection bylaw code that makes this drip edge to be installed on all new homes no matter the style of homes. Is this mandatory?
Thank you for your article. I had gutter and roofing companies come by and it was only when I read your article that I knew what has been wrong with my roof/gutters that no one could pinpoint. Now I am looking for a company I can trust in Houston.
My moms house is in need of some facia board replacement that has the furring strip installed. The house was built in 1964. Is there a method to de-install the the furring strip with out removing the drip edge. Unfortunately this is on the gable end . I am trying to keep the cost down. But I do not want to create other problems. I know when installed the facia was attached first then the furring strip and the drip edge over the both. What appears to be a simple repair now possibly a new dripe edge and shingles,
Looking for some positive feed back
thanks
I just had a roof installed and they put holes in the vented drip edge from nailing the shingles. They removed the nails but here in Michigan we just got our first snow and at this point, I don’t want them doing anything else with my roof. I would like the drip edge replaced. So my question is if they replace the drip edge how can they nail it without putting holes in my ice shield and and making my roof leak later on ?
The ice and water shield will not be affected by nail holes as every shingle that is nailed into your roof has already put thousands of nail holes through it already. Just make sure he laps the ice and shield over the drip edge.
Hi, a contractor recently replaced my roof – half traditional shingles (GAF) and half rolled roof (GAF Liberty, 3 ply system), due to it’s low slope. They also replaced drip edge on the rakes. I noticed the shingled portion drip edge has what I expected to see with the ‘kick out’ on the bottom, but the rolled roof portion had an edge that seemed to actually ‘kick in’ towards the fascia. Here are some pics. It almost makes me wonder if the contractor ran out of the drip edge and just bent metal coil to be ‘drip edge’ but can’t imagine why they’d do it with a bevel IN towards the fascia? I’m also worried that they didn’t leave a gap between the drip edge and fascia, like is mentioned throughout this post. Any thoughts? Pics hosted here. Pics can be seen here: https://imgur.com/a/FJztRp1
The roofer did not install a drip edge it looks more to me like a decorative fascia as he may not what a proper drip edge looks like. However the shingles are extended well past the fascia and you will not have a problem 🙂
I think most roofers like to keep it tight to hold the aluminum facia. I prefer using cedar facia with a shadow block one inch thick with a proportional width of the facia to bring the drip edge out add some detail and a sacrificial layer. Ice and water shield is code here. I think gutters will do more damage than good, with ice and snow even the best gutter install can cause problems. The cleaning and maintenance is reason enough not to use them.
What is the purpose of a gutter? Would it be okay to install drip edges only?
Scott: Thanks for the great post.
Question:
A) If I install the 1×2 furring strip behind the drip edge, is it necessary to paint the furring strip on all 6 sides like I did for the fascia boards to protect it from water?
B) This Old House recommends instead of installing the 1×2 furring strip to simply have the roofer leave a “finger gap” between the drip edge and the fascia board so that the gap prevents the surface tension from pulling water up. There’s a very interesting demo video that This Old House did to show the movement of water up the fascia board in 3 examples when there is 1) NO Drip Edge, 2) Drip Edge butt tight against the fascia, and lastly iii) a gap between the fascia board and the drip edge.
Example 3 with the “gap”, performed the best with NO WATER traveling up the fascia board at all while the first two examples had very poor performance.
My question therefore, is it better to install the furring strip behind the drip edge or to just leave a finger gap (~3/8″) between fascia and drip edge?
P.S. I getting my roof done in the next week or so. You feedback would be greatly appreciated.
how do you fasten the 1×2, my drip edge kick is perpendicular to the ground and it stick against the fascia board that I can get my finger in I would have to cut the connection on both ends to stick the 1×2 as a suppot and then pry it out a 30 deg? or 40deg? Question: how to connect both cut ends and make it flush and leak proof?
The comments/suggestions are only half true…to put that “furring strip”/freeze board…on there, maybe a good idea BUT… You are missing a few other issues that need to be discussed. A) if your wood facia is covered with aluminum u r going to have to use something like Hardie board which is PVC siding, or if you going to use wood you are going to continually have to paint it… 2) Now if you plan on installing Seamless Gutters, that is going to take up one inch of typically 4” opening that the rain water has to run into. Simply put most homes have gutters on them now… After installing the gutters you slide a piece of aluminum up underneath the drip edge and put it directly into the gutter.. killing two birds with one stone…insuring all of the rain water goes into the gutter and not behind. And also if the fascia is not covered with aluminum my method will insure the rain water will not come in contact with the wood fascia
Best Advice Yet! Slide the aluminum flashing and be done with it.
I just did a repair of facia & soffit that was destroyed due to improper application of the drip edge. To correct the problem I too, slide aluminum flashing under the drip edge and into the gutter. Since then, the home owner had the roof redone and guess what? The roofer install the “new” drip edge right up against the facia again and the starter strip right in line with the drip edge! No overhang what so ever. Too many people installing roofs without proper training or guidance.
Noel, I install gutters, and this is the understanding that i have. as a matter of fact, i have never put the furlong in roofing, because of the gutter fact. Thank you fo r first posting this tid bit.
Thank you Scott for addressing and explaining this common water issue! I have a garage where I just noticed a rotting facia board which has turned dark on the inside of the back wall of my garage since the inside walls are not finished. Upon inspection, there is no drip edge installed on the rear part of the roof and the gutter at the higher end was installed up against the shingle edge. The shingle overhang is also not long enough. There is aluminum covering the facia board but it did not stop water from getting behind it. Now I’m looking at how the drip edge was also poorly installed on our house also.
Is there fascia the does not require drip edge?
Drip edge is required for asphalt shingle roofs no matter what is happening with fascia or cornice.
Great article! How is the furring strip attached to the fascia? Would it need to be sealed somehow so water doesn’t sit between the strip and the fascia? Thanks!
I have a question.. I just had a roof replaced. The estimate stated to remove and replace old drip edge… the roofer finished the job and wanted to collect his money, but I had another roofer friend look at it, and said that none of the drip edge was replaced at all. Does this sound right?
Hmmm honestly we can’t really provide accurate guidance without seeing it in person. What we would recommend is using our directory thecraftsmanblog.com/directory to find a licensed preservationist in your area who also is knowledgable about roofing and have them take a look at it in person.
Best of luck to you!
-Alyssa at The Craftsman Blog
If you have before and after pictures, it would help to upload them.
I recently had a new roof installed and two of the peaks had gaps about the size of a half dollar left right at the peak where the drip edges are supposed to overlap. To me it looked like they cut them wrong. They told me it was acceptable and would still pass inspection… they filled the holes with caulk. They said it all passed inspection but it surely doesn’t seem like they are cut correctly and I don’t believe it’s acceptable to just fill with caulking… shoukdbthey have pulled them off and recut new pieces…? Can anyone with roofing experience give me guidance? The owner of the company is supposed to see me to collect final portion of payment… it just doesn’t seem ‘acceptable’ to me…..
Thanks for any advice!!!
Hello!
Ugh, we are so sorry to hear about your situation. Honestly, since we can’t see it in person, our best recommendation is to find a certified historic preservationist in your area using our directory if your home is an old house and have them look in person and advise from that point. https://thecraftsmanblog.com/directory/
Best of luck!
-Alyssa at The Craftsman Blog
No, it is not acceptable. Ask your inspector to come check it. The roofer will give u 10 excuses!