
 One of the most most useful things I have in my shop is a simple DIY lumber rack that I built in just a few minutes using only scrap lumber.
It is ridiculously simple to build, almost to the point that you’d ask me if it actually works. Trust me it does. There is no need to pay money for a lumber rack when you can put this together to hold a ton of weight for almost no money.
I got the idea from a great book called Working Alone that gives you tips and tricks for building things without a helper. Building alone requires some creativity to get the job done and this book really helped me when my company consisted of just me, myself, and I. I’d recommend the book to any solo act.
How To Build a DIY Lumber Rack
If you have even the most basic carpentry skills, you can build this rack. There are no complicated measurements or extensive cut lists.
The one thing you will need is exposed framing on the inside of the wall, like in the pictures. Usually, this is available in most old garages or sheds.
 Here’s what you’ll need for your DIY lumber rack:
- Scrap 2×4 or 2×6 framing lumber
- Miter saw or circular saw
- 3 1/4″ framing nails or 3″ deck screws
- 1/2″ plywood or OSB (optional)
Decide how many shelves you want on your rack. In this case, I did three shelves keeping in mind that the floors can be used as another shelf for the heavier items.
Step 1 Layout
How much space do you want between shelves? It’s entirely up to you, but I have found that somewhere from 20″ to 30″ works best. Also, decide how long you want your rack to be. 16 feet is great for fitting almost all standard lumber, but you may not have 16 feet of space available, so decide what works for you.
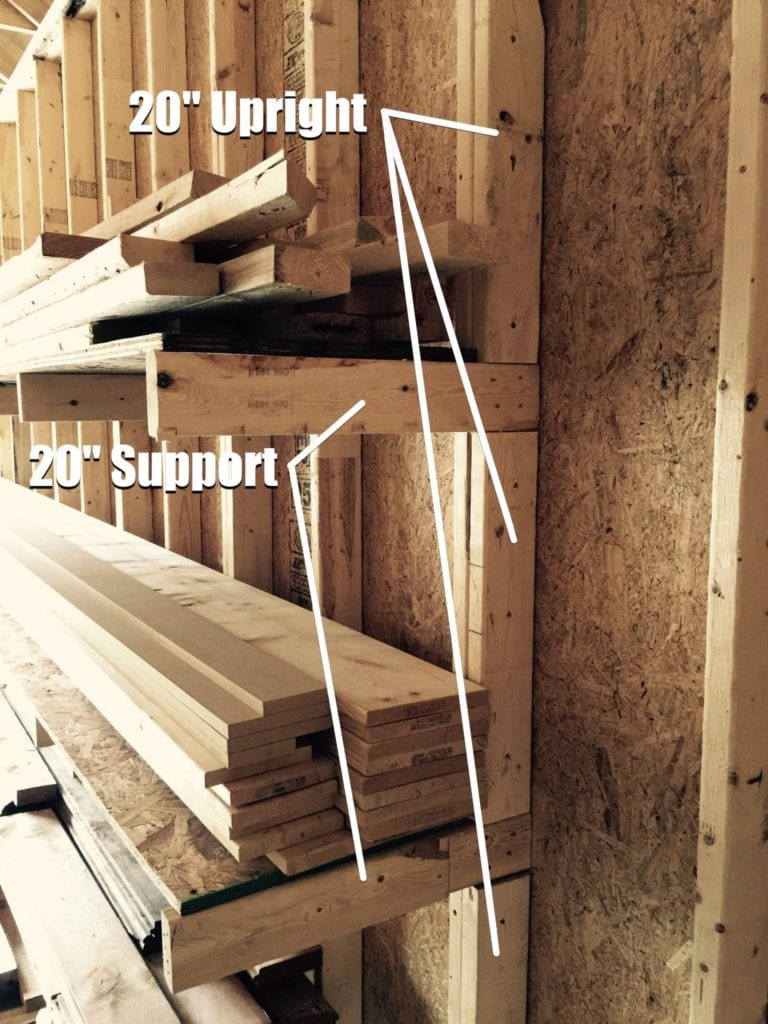
There are two elements to this lumber rack:
- Supports – These are the horizontal members that hold the lumber.
- Uprights – These go vertically along the side of the studs tightly between each support.
You’ll place one support on every stud and one upright above AND below each support. The uprights sandwich the support between them which gives the rack its holding power.
Now, count how many studs you’ll need based on your layout.
Step 2 Making Cuts
You’ve got your layout? Good! It’s simplest if you make all your support and uprights the same size. That way you are cutting the same length for every piece of lumber.
In my case, I used 20″ as my sizing for both uprights and supports. Get them all cut in one batch and then move on to the the next step.
 Step 3 Install Uprights
Attach one upright on the side of every stud at the bottom, resting on the sill plate. Put 3 staggered nails/screws through each upright. Once the supports are nailed in place, you’ll need to attach another upright above each support as well.
Step 4 Install Supports
Place a support on top of each upright and attach with 3 more staggered nails/screws. If your pieces were all cut the same, then you shouldn’t have to measure or level your shelves. They will self level since each piece is exactly the same.
Don’t forget to attach an upright above and below each support even the top support.
Step 5 Install Plywood Shelves (optional)
If you need to store lots of short pieces or other items, then adding plywood on top of the supports might be a good idea.
For longer lumber, this isn’t necessary, but you can store almost anything on these shelves once you add plywood. Measure and cut your plywood to fit the shelf as needed.
That’s it! Start stacking your lumber and chotchkies right away and enjoy better organization in your shop or garage today.


Founder & Editor-in-Chief
I love old houses, working with my hands, and teaching others the excitment of doing it yourself! Everything is teachable if you only give it the chance.
Good idea for a woman can even handle this job!