

Lattice was a very common thing on old houses. Not just for flowering backyard trellises, but to protect foundations from critters, varmints and the neighbor’s nosing cat. Just because lattice performs a valuable function keeping your crawl space free of pests doesn’t mean it can’t be a beautiful part of your home’s curb appeal.
Don’t settle for the dirt cheap home store version of lattice. This stuff is so thin and poorly assembled that it rarely lasts more than a couple years. And the plastic stuff that is also available never holds paint once lawn mowing season starts again.
You can make your own historic lattice or have a local carpenter, like my company, make it for you very simply. I’m not saying it doesn’t take time to assemble all the pieces, but it certainly does not require advanced woodworking skills and a shop full of machinery to build your own historic lattice.
In this post, I’ll walk you through some of the details for making simple vertical stick lattice. Other popular historic patterns are checkerboard and diagonal checkerboard, but this one is the easiest to start with.
Step #1 Assemble Your Materials
- Rot Resistant Wood – The main ingredient in quality lattice is quality wood. You need a very rot-resistant wood since this will be installed in contact with the ground. You can find some ideas for good rot-resistant woods here.
- Stainless Fastners – You’ll also need stainless nails and staples. so your lattice doesn’t come apart at the seams. Foundation lattice takes a beating in the weather and you need to use long lasting materials if you want your lattice to last. I use 3/4″ or 1″ stainless steel narrow crown staples and also 1 1/4″ stainless steel brad nails to assemble my lattice.
- Hardware Cloth – To keep the little pests like rats and mice out, you need 1/4″ hardware cloth along the backside of your lattice. Chicken wire isn’t sufficient. A mouse can fit through an opening larger than 1/4″ so you need this small thick gauge wire mesh to do the job right.
- Oil-based Primer – For exterior woodwork this is the only way to go.
- Finish Paint – Pick a high quality acrylic paint to finish the project off.
Step #2 Make Your Cuts
Take your measurements and start making cuts. When you measure, it needs to be a tight fit to keep the critters out, but don’t make it impossibly tight. Remember that you’ve got an old house and not every opening between the foundation piers will be the same or even square. Just because it is 48″ across the top doesn’t mean it will be the same measurement at the bottom. Each panel must be custom.
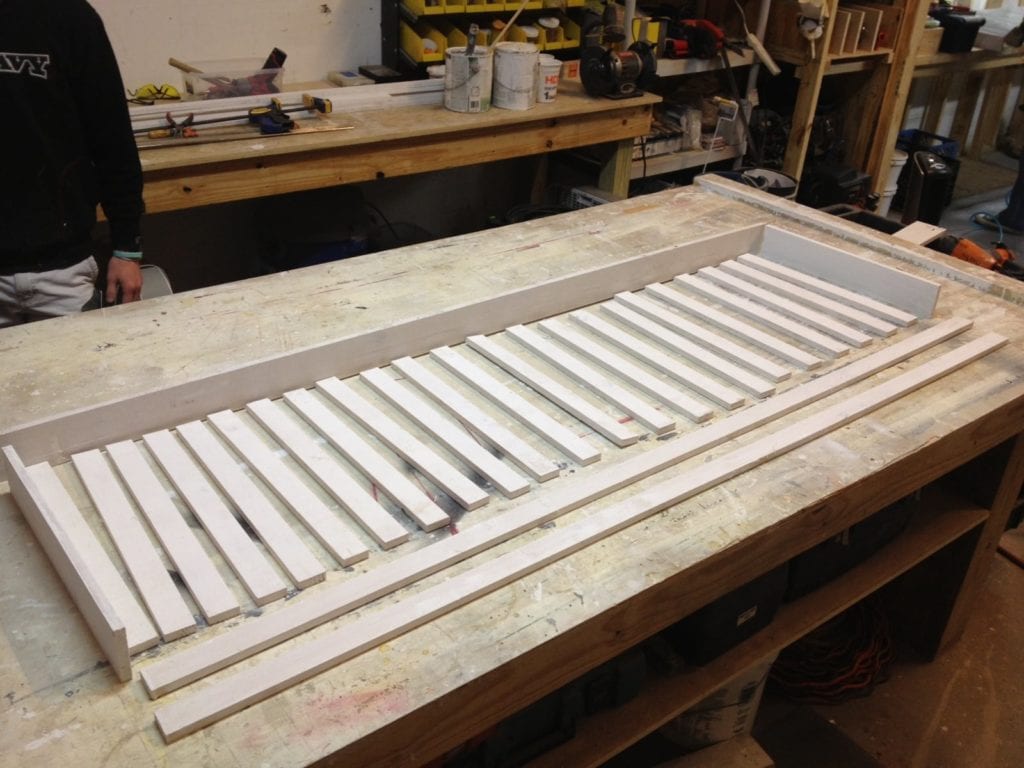
Your lattice should fit so that the bottom is resting just at or slightly above the dirt. Note the pieces prior to assembly in the photo. You can use whatever size is appropriate to your project. In this case we used western red cedar milled to a 1/2″ thickness, but you can just as easily use 3/4″ (simple 1x) stock available at any lumber yard.
The tops and sides were 4″, the lattice pieces themselves 1 1/2″ and the two bonding strips (laying at the bottom of the photo) were also 1 1/2″.
After you have your measurements, rip all your pieces to width on the table saw. Once everything is the right width, you can start cutting everything to length on the mitre saw.
How many pieces of individual lattice do you need? That depends how you tightly or loosely you want to space your lattice. The primary job of the lattice is to keep larger animals like cats, raccoons and possums from getting in. Keep the spacing relatively tight. For this project we spaced ours 1 1/2″ apart.
Step # 3 Prime
Here’s where the men are separated from the boys. If you really want your lattice to last, you need to prime absolutely everything with oil-based primer PRIOR to assembling. If you prime after, it is built there will be lots of bare, unsealed wood where water will get in and start rotting even the most rot resistant woods.
Prime it or lose it!
Step #4 Assemble
You can use a jig to lay out your lattice pieces or a storey-pole like we did in this case. Either way make sure you mark a centerline so that your lattice pattern is consistently spaced the whole way across.

- Bonding Strips – Using the storey-pole, mark your layouts on the bonding strips and attach the bottom of the lattice flush with the bottom of the bonding strips with one staple (don’t worry, we’ll add more staples in the next step) on both top and bottom. The bonding strips will hold all the vertical lattice where it should be. Make sure your spacing is consistent!
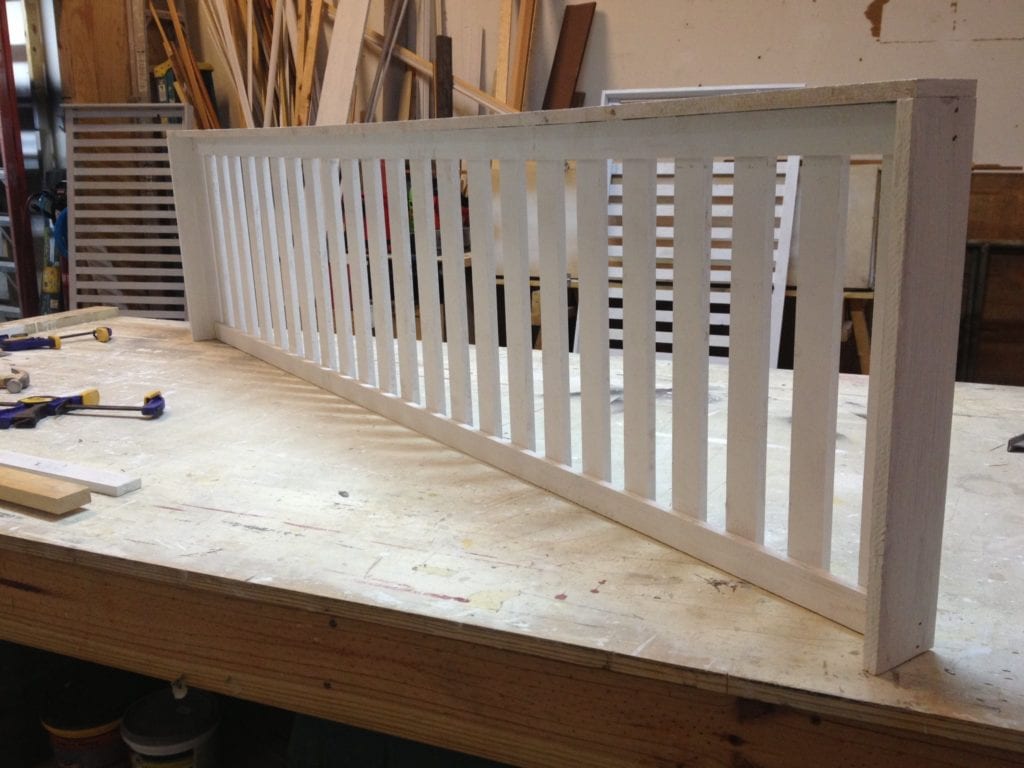
Your frame should now be complete and ready for hardware cloth.
Step #5 Hardware Cloth
Hardware cloth is an important part of the whole assembly. It should be cut the same width of the lattice assembly, but should be left 6″ long at the bottom. It’s left long at the bottom because when installing the lattice on the house, you’ll need to dig out the dirt and bury the hardware cloth below ground to stop pests from simply burrowing under your lattice to gain entry.
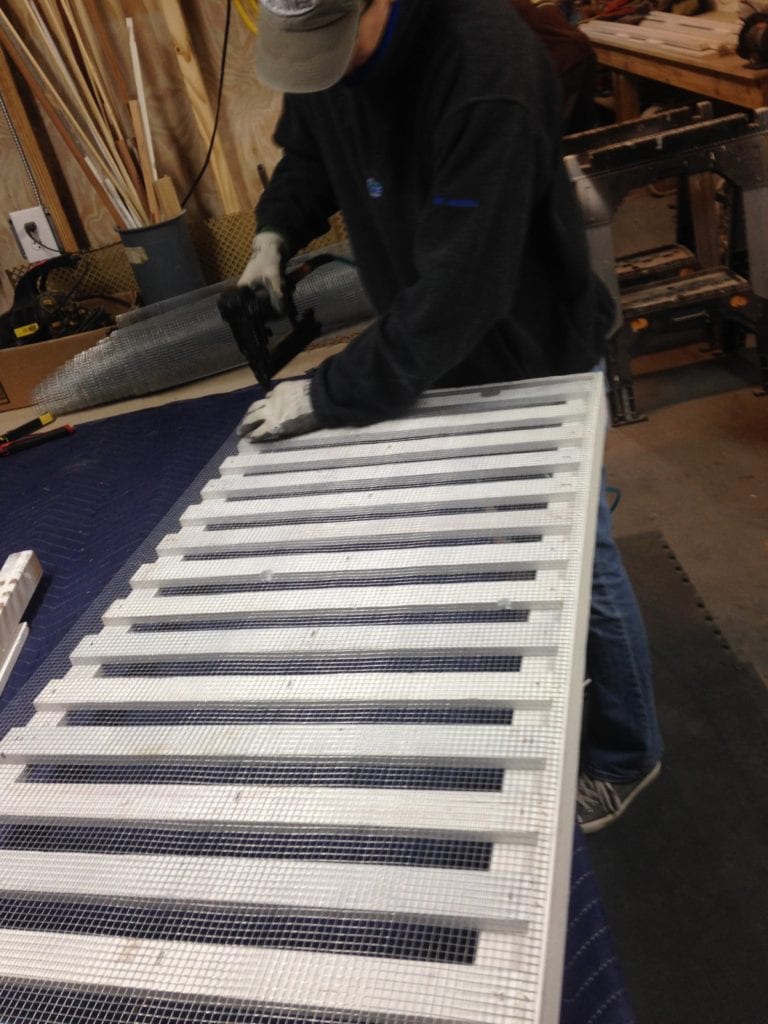
Install the hardware cloth on the backside of the lattice using the same staples you attached the bonding strips with. Along the top and bottom bonding strips, staple it into each individual piece of lattice. This will give the lattice assembly more strength as well.
Be careful that the staples are attaching the hardware cloth. It’s easy to miss the cloth with the staples or blow right through the thin wire mesh if your air pressure is too high.
If your lattice is too tall or your hardware cloth is too short you can simply run another course of hardware cloth. Just make sure to overlap it by at least 2″ and add another row of staples at the overlap.
Step #6 Paint
I’m not going to lie- painting lattice with a brush is a royal pain. If you have a lot to do, I would really recommend renting a paint sprayer or buying a handheld sprayer. It will make the process much more enjoyable.
Apply two coats of high quality acrylic exterior paint to the lattice prior to installation or when it is in place, whichever you prefer.
Step #7 Installation
Since you’ve built your lattice in your garage or shop the hard part is over (assuming you measured correctly)! Dig out the ground and bury the hardware cloth. Then, using Tapcons, drill and screw the side lattice frames into the foundation piers. I use two or three screws per side depending on how tall the lattice panels are.
You can also nail the top of the frame into the bottom of the sill for some extra support and to avoid sagging over the years.
That’s it! You’ve got beautiful foundation lattice that not only protects your largest investment, but also makes it that much more beautiful.


Founder & Editor-in-Chief
I love old houses, working with my hands, and teaching others the excitment of doing it yourself! Everything is teachable if you only give it the chance.
Hi,
thank you for your wonderful educational resources as they have been immensely helpful with our old house. Wondering what your thoughts on using a cellular PVC product for porch skirting? Our skirting is missing making the porch feel a bit naked. When we install it hoping to make easy to maintain to keep looking beautiful for a long while. Need a darker color so it blends in better and was wondering if you have any experience with paint holding up?
Thanks,
Megan
I am looking to remove my existing block skirting the is in between the piers around the perimeter of the house. Some of the house has sagged enough the be resting of the block skirting. Don’t know if removing these would cause problems with the integrity of the house. We want to remove the block to replace it with a more appealing look.
Wondering how your projects went. I have a similar situation with pier and beam but also concrete block perimeter. Plumbing leaks due to neglect and cast iron have done quite a bit of damage and once that is done over the next couple of weeks (I have to replace all with ABS), then I can get fill dirt and try to fill indentations and start leveling the piers. I would love to remove the block which is painted the color of the home OR will have to eventually landscape up around it since I don’t care for the look either. I have seen some homes nearby in my historic district here that have done what you wanted to do and it is so beautiful once completed. Update? I also need to redo all the lattice as Scott shows in this article. I think the frames can be painted and appear quality workmanship BUT they used screen which the rats and mice chewed through to gain access to crawl space. Scott is amazing and I wish he was nearby in CA as we need him here! I eventually will be using his books to help me restore as many windows that I can but some may need to be replaced on the south side of the home due to severe rot. Will see…he certainly has shown that it is better to restore.
Last post was in 2014 but I just found your sight. Any ideas on how to adjust your plans for tradition lattice? I have a 20’s bungalow – trying to restore it and the original lattice is gone.
Usually one of these forms of lattice will will work just fine.
I’ve got a 1930’s craftsman with a crawlspace that must have been (and still is) a hangout for all the neighborhood strays. We even have a possum under there now that we hear from time to time. I want to eventually seal it to keep the critters out, but there are many large depressions under the house, particularly in the front, but generally underneath and around the perimeter. This obviously allows water to rush under there when we get rain. I want to fill these areas in and create a slope away from the house. I’ve heard of folks filling the depressions with sand and then topping with soil. Do you have any recommendations?
The following solution worked surprisingly well for me. I own a century+ old Arts & Crafts bungalow in Eastwood, Houston, TX. Despite the house being significantly above street level in an area that doesn’t flood, there was practically a lake of stagnant water under the house because the yard grading sloped inward, so all the rain funneled down under the house. The expenses of buying a home, law school loans, and renovating had taken a toll, so I decided to try a DIY solution:
I searched for “free fill dirt” on Craigslist. There were lots of listings and I found one that seemed safe (it was from a residential area where a pool was being installed). The next morning, a giant dump truck dropped off the dirt. I used it to grade a slope around the perimeter, plus hauled about 18 wheelbarrows worth into the center of my house and dropped it through the middle hallway crawlspace access. Using a rake, I leveled out the depressions underneath the house, waited for rain, then addressed the remaining areas where water was still finding its route underneath the house.
To this day, the crawlspace remains bone dry, even after a heavy rainstorm. Years after completing the work, the most regarded leveling company in Houston—Pfister Pier & Beam Leveling— commented on how good the conditions were under the house. Both the owner and his son expressed their surprise at the conditions—to the point that they inquired how I’d addressed the pooling dilemma. They relayed that my crawlspace was drier than all the other customers that they had booked 6 months out!
Granted, it was a lot of work. It was a messy job. However, it was free and it came as a big relief to receive such a compliment from a company that has spent decades working in crawlspaces of historic homes, such as in the Houston Heights, Woodland Heights, and Eastwood, in Houston, Texas.
I hope this message helps someone reading this wonderful blog. Photo examples + before/afters of the crawlspace work I conducted are on my personal blog. I hope this tip helps someone who faces a situation similar to what I encountered. I was puzzled, perplexed and decided to take a chance. Those efforts ended up working out splendidly.
Thank you for the information about the fill dirt. I have a small 1913 Craftsman Bungalow that I am inheriting in Orange County, CA that is very neglected as a rental for the entire 50+ years owned by my father and Aunt. In the crawl space, I discovered all cast iron plumbing leaking both kitchen and bath areas and cast iron just sliced and rotted along the entire length so quite disgusting in bathroom but once that is done along with some other updating to wires and hanging water lines, I plan to find fill dirt using your idea and then eventually line the crawlspace with plastic. Also need to custom cut boards and attach as a subfloor between the beams with vapor barrier as there is none. I have some foundation leveling needed as well due to the plumbing leaks unrepaired. Work and more work!
Dumb question, but wouldn’t you finish paint the lattice before installing the hardware cloth? If you spray, the paint gets on the cloth and you lose the integrity of the look of wood construction. If you brush, the cloth is there to prevent you from painting the wood on that side.
Don, it depends what color you are painting. If painted white or another light color the hardware cloth will stand out too much. If it’s all going a dark color then it will hide better.
hey scott, i have a 1920 craftsman bungalow. I’m interested in putting custom lattice work around the perimeter of my home that the foundation is cinderblocks with large holes that animals are getting in. i only have about a 1/2-1 1/2″ of space to work with for the frame. could i just build a 2″ width frame? my next problem is how would i attach the lattice work? not really enough room to nail underneath the siding, or should i drill holes into the concrete block?? thank for the help!!
Mark, try attaching some PT furring strips to the block with tapcons and the nail your frames into that.
Could the method also be done on plaster ceilings?
The method works on ceilings and walls alike. The conditioner adhesive and everything else is called Big Wally’s Plaster Magic and you can buy it online. It works great!
Thanks Scott.
Oh ya, What adhesive where you using?
Saw your video on”How to Repair Plaster Walls”. How do I get that conditioner that you used in that video?